Cased Car

I saw a card Pinterest created by Cindy Elam and knew that it would be perfect for my card classes. I changed it a little – but not much. I stamped the greeting from the Geared Up Garage stamp set onto the lower right hand corner of Whisper White card using Memento Tuxedo Black ink. I cut the large cog wheel from Whisper White card using the Garage Gears Dies and attached it to the upper left hand corner of the stamped Whisper White card. I embossed the whole panel using the Subtle 3D Embossing Folder and attached it to scored and folded Bermuda Bay card.
  I stamped the car image from the Geared Up Garage stamp set onto Whisper White card using Memento Tuxedo Black ink and coloured it using Bermuda Bay Stampin’ Blends. I cut out the car using the co-ordinating Garage Gears Die and attached it to the card front using dimensionals.
To decorate the inside of the card I stamped the greeting “awesome at any age” from the Itty Bitty Birthdays stamp set onto Whisper White card using Bermuda Bay ink.
So thank you Cindy for sharing your creation. My ladies loved it.
Bye for now,
Kris
Product Used:


Product Used:
Birthday Birdies

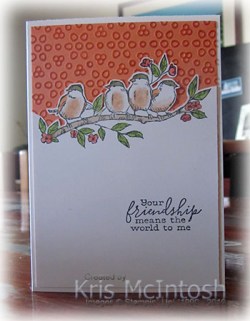
When I created the card with the Soft Spring stamp set, I had a Nested Label Die left over and thought I would use it as the starting point for today’s share. I stamped the greeting from the Itty Bitty Birthday stamp set onto the lower right hand corner of Whisper White card using Pretty Peacock ink. I embossed the top part of the stamped card using the Layering Leaves 3D Embossing Folder and wrapped the bottom of the embossing using the Pretty Peacock Scalloped Ribbon. The panel is attached to scored and folded Purple Posy card.  I stamped the bird image from the Free As A Bird stamp set onto Whisper White card and then coloured the image using the following Stampin’ Write Markers – Pretty Peacock, Purple Posy, Granny Apple Green and Crumb Cake. I fussy cut the image and attached it to the Pretty Peacock Stitched Nested Label and then the card front using dimensionals.
 To decorate the inside of the card, I stamped “time to celebrate” from the Itty Bitty Birthday stamp set using Pretty Peacock ink. I stamped the leaf image from the Free As A Bird stampset using Memento Tuxedo Black ink and coloured the leaves using the Granny Apple Green Stampin’ Write Marker.
I love that I was able to use the new incolour Purple Posy on this card. The ink pad is still unavailable, however, the Stampin’ Write Marker and the Stampin’ Blend can be used to add this colour to stamped images.
Bye for now,
Kris
Product Used:


Special Night

This photo is of all of us dressed up at the Casino in Darwin for dinner on our last night. It was a beautiful night and we had an amazing view of the water, looking over the pool, from the windows in the dining room. The sunset was gorgeous and dinner was fabulous. The page is really simple because the photos are a little busy. I attached a piece of the now retired Best Route Designer Series Paper across the Whisper White 12″ x 12″ page. I attached each of the photos to Gray Granite card and then attached them to the page with two of the photos sitting slightly over the other two. I print my own photos for my scrapbooking on my Epson Picturemate photo printer and these photos were all printed at 4″ x 6″ size and then trimmed down a little to fit on the page. I cut the heading from Gray Granite card using the now retired Little Letters Thinlits Dies. I printed my journaling on the computer and cut it out using the Layering Squares Dies. I attached the journaling to a scalloped square cut from Gray Granite card. As I said a simple page but one that brings a smile to my face remembering this lovely night.
I apologise for using retired product, but when I am scrapbooking I usually look for the “best fit” with my embellishments and dies and although retired they are always Stampin’ Up! Do you do that too?
Bye for now,
Kris
Product Used:


Pretty Simple

I really love the images in the Soft Spring stamp set. This is a two-step stamp set which is only available to purchase using your Stampin’ Rewards. I cut Pretty Peacock card using one of the Stitched Nested Labels Dies and wrapped the right hand edge with Whisper White 5/8″ Polka Dot Tulle and tied a knot. The panel is attached to scored and folded Gray Granite card using dimensionals. I stamped the floral image onto Whisper White card using Memento Tuxedo Black ink. I added the leaf fill image using Pretty Peacock ink and the flower fill image using Rococo Rose ink.  I cut out the flower using a smaller Stitched Nested Labels Die and attached the image panel to the card front. The image panel is attached inside the cut out in the Pretty Peacock card straight onto the Gray Granite card. I love the way the dies “nest” inside one another!
 To decorate the inside of the card, I stamped the other floral image from the Soft Spring stamp set onto the lower left hand corner using Memento Tuxedo Black ink. I stamped the flower fill image using Rococo Rose ink and the leaf fill image using Pretty Peacock ink. I stamped the greeting from the Band Together stamp set using Pretty Peacock ink.
This card is really quite simple to make but the use of dimensionals and die cuts makes it look pretty special. I’d love to hear what you think.
Bye for now,
Kris
Product Used:


Pop Up Box Card

I have been working my way through a series of fancy fold cards and today’s card is one of those. This card is called a Pop Up Box Card and will fit into a standard envelope. My base card is Old Olive. I created the tall image panel by stamping the mermaid image from the Magical Mermaid stamp set onto Whisper White card using Memento Tuxedo Black ink. I masked the image and stamped the seaweed image from the same stamp set across the bottom of the Whisper White card using Soft Sea Foam ink. I stamped the single seaweed image from the Sea of Textures stamp set across the bottom of the card using Old Olive ink.  With the mask still in place, I stamped the dotted image from the Magical Mermaid stamp set using Balmy Blue ink. I removed the mask and coloured the Mermaid using Flirty Flamingo, Daffodil Delight and Ivory Stampin’ Blends. The image panel is attached to Basic Black card and then the card base. I stamped the greeting from the Magical Mermaid stamp set onto Whisper White card using Old Olive ink.
 I attached two small and one large star fish which I cut from Crumb Cake card using the Under the Sea Dies. This panel is attached to the panel on the front of the card. I stamped the netting image from the Sea of Textures stamp set onto two panels of Whisper White card using Crumb Cake ink. I stamped the small and large seaweed image from the Sea of Textures Stamp set over the net image using Old Olive ink. I attached a small “sand dollar” image which I cut from Crumb Cake card to each panel.
  These panels go on the side panels of the box card. I decorated three more panels the same size using the border image from the Sea of Textures stamp set and Crumb Cake ink. These panels decorate the lower part of the front and sides of the box. To decorate the back of the box, I attached Whisper White card to Basic Black card before attaching to the back of the Mermaid panel. I attached two small pieces of Old Olive card across the middle of the box. I cut the long seaweed image, the small and the large seaweed images from the Under The Sea Dies from Soft Sea Foam and Old Olive card. I attached the die cuts to the two central panels, making sure that they were different heights. To place the card in an envelope, you fold up the side and front flaps and fold it down.
This is such a clever fold. I know that this fold is one that would be fantastic for children but also for the man in your life. Men seem to love things that have a fold or mechanism to make them a little different.
Bye for now,
Kris
Product Used:


Case The Catalogue
Today’s card is one that I loved when I first received the Annual Catalogue but I have only just got around to creating my version. The catalogue sample is on page 190 of the catalogue. I embossed Grapefruit Grove card using the Eyelet Lace Embossing Folder. After the card was embossed I used the Grapefruit Grove to add colour to the raised embossing to make the pattern “pop”. You need to have a light touch with the ink pad or you will end up with colour on the background which will spoil the effect. I stamped the bird image from the Free As A Bird stamp set across Whisper White card using Memento Tuxedo Black ink.  I trimmed away the card from around the top of the image before I added some colour. I used Crumb Cake Light, Bronze, Pumpkin Pie Light, Mossy Meadow Light, Granny Apple Green Combo, Calypso Coral Combo Stampin’ Blends as well as the Colour Lifter.
  I stamped the greeting from the Free As A Bird stamp set using Memento Tuxedo Black ink. The image panel is attached to the embossed Grapefruit Grove card and then scored and folded Thick Whisper White card.
To decorate the inside of the card, I stamped the large bird and the leaf image from the Free As A Bird stamp set onto Whisper White card using Memento Tuxedo Black ink. I coloured the image using the same Stampin’ Blends as the image on the front of the card. I fussy cut the images and attached them to the lower left hand corner.
I’m pretty happy with the way this card turned out. I think it looks like the catalogue sample, what do you think?
Bye for now,
Kris
Product Used:


Global Design 198

For today’s card I decided to use the sketch challenge at Global Design Project. I really love the Band Together stamp set and co-ordinating Detailed Bands Dies. I embossed Whisper White card using the Brick & Mortar 3D Embossing Folder and attached it to Real Red card and then scored and folded Basic Black card. I stamped the flower from the Band Together stamp set twice onto Whisper White card using Memento Tuxedo Black ink.  I coloured the flowers using Cherry Cobbler and Daffodil Delight Stampin’ Blends and cut them out using the co-ordinating Detailed Bands Die. I attached the flowers to the upper left and lower right hand corners of the embossed card. I cut the label from Basic Black card using the Detailed Bands Die. I attached the outside of the die cut across the card front. I stamped the greeting from the Band Together stamp set onto Whisper White card using Cherry Cobbler ink.
  I cut out the greeting using the same die and attached the greeting to the inside of the Basic Black die cut.
To decorate the inside of the card, I stamped the same flower and two sets of leaves onto Whisper White card using Memento Tuxedo Black ink. I coloured the flower using Cherry Cobbler and Daffodil Delight Stampin’ Blends and the leaves using Old Olive Stampin’ Blends. I cut out the images using the Detailed Bands Dies. I attached the leaves to the flower and then to the lower left hand corner of Whisper White card.
I really love the Black, White and Red colour combination on this card, don’t you.
Bye for now,
Kris
Product Used:


Scrapbook Global Sketch Challenge

Scrapbook Global is a facebook page devoted to using Stampin’ Up! products on your scrapbook pages. This month they had a great sketch challenge and I knew immediately which photos I wanted to use. We recently took our grandsons away to Yeppoon and Hervey Bay and they were keen to spend some time fishing. We didn’t have much luck in Yeppoon but in Hervey Bay both boys caught fish, even if they were too small to keep. You can see by their faces they were very happy. I started by stamping the netting image from the Sea of Textures stamp set onto a Whisper White 12″ x 12″ page using Crumb Cake ink. I attached various strips of off cuts of the Come Sail Away Designer Series Paper and also a strip of 5/8″ Burlap Ribbon.  I attached my photos to Night of Navy card and attached them over the Designer Series Paper. I added a title cut from Night of Navy card using the retired Large Letters Dies. I added the date to Whisper White card cut using the Stitched Rectangle Dies and attached it to a Night of Navy rectangle cut using the same dies. I attached the panel over another strip of Come Sail Away Designer Series Paper and added a starfish cut from Soft Suede card using the Under The Sea Dies. I stamped the octopus image from the Sea of Textures stamp set onto Whisper White card using Balmy Blue ink and cut it out using the matching Under The Sea Dies. I attached it to a piece of Crumb Cake card cut using the netting die from the Under The Sea Dies and then onto the page to the right of the photos.
 I stamped the seaweed image from the Sea of Textures stamp set onto Whisper White card using Mossy Meadow ink and cut it out using the co-ordinating Under The Sea Die. I attached a small starfish to the seaweed (cut from Crumb Cake card using the Under The Sea Dies) before attaching to the page below the Octopus. I cut another seaweed image from Mossy Meadow card and attached it to a Sand Dollar image cut from Soft Suede (both cut using the Under The Sea Dies). The seaweed is attached to the Sand Dollar and onto the edge of the left hand photo. I added another Sand Dollar to the right hand photo. The journaling is hand written using the fabulous Stampin’ Up! Journaling pens.
It’s kind of a busy page for me but I think it works well with the photos, don’t you?
Bye for now,
Kris
Product Used:


Playing with Bleach
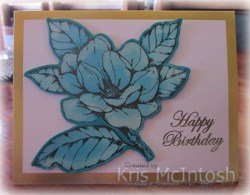
I saw a gorgeous card posted by Susan Legits using bleach on the gorgeous large flower from the Good Morning Magnolia stamp set. Susan’s cards were gorgeous and I decided to have a play with the technique. I stamped the flower onto Bermuda Bay card using Versamark ink, sprinkled the image with Gold Embossing Powder and heat set it. I found that I had a Blender Pen which was labeled “bleach” and so I put some bleach in an empty embellishment holder and painted bleach onto the image.  At first I didn’t think it was working, however, with a little patience and re-applying bleach several times, I started to see some difference. I started by applying the bleach over the complete image and then only added it in places so that I could start to see some dimension in the flower’s colour. You do need to wait until the bleach dries if you are going to do multiple applications but it is a fun project to have on your work table to come back to between other projects.
 I cut the flower out using the co-ordinating Magnolia Memory Die and attached it to a Gold Foil-Edged card using dimensionals. I stamped “happy birthday” from the Magnolia Blooms stamp set (this one is in the Experience Creativity catalogue) onto the lower right hand corner of the card using Versamark ink. I sprinkled the greeting with Gold Embossing Powder and heat set.
To decorate the inside of the card, I stamped the border image from the Good Morning Magnolia stamp set using Versamark ink, sprinkled it with Gold Embossing Powder and Heat set.
A simple card but I love how the flower turned out. This is one project that I will be trying in different colours.
Bye for now,
Kris
Product Used:


Double Fold Fun Fold Card

I saw a card by Lisa Curcio using the Sailing Home stamp set which was just lovely. Lisa had a video showing how the card was made and I decided to give it a try using the Magnolia Blooms stamp set from the Experience Creativity catalogue – aimed at beginner stampers. I cut my card base from Petal Pink card and attached a piece of the Magnolia Lane Designer Series Paper to the small front panel. I stamped the large flower from the Magnolia Blooms stamp set onto Whisper White card using Memento Tuxedo Black ink. I coloured the image using the Mossy Meadow, Petal Pink and Dark Daffodil Delight Stampin’ Blends.  I added the greeting from the same stamp set using Mossy Meadow ink. I attached the image panel to Petal Pink card and then the small front flap using dimensionals. I stamped “today blooms just for you” from the Perennial Birthday stamp set onto the inside of the Whisper White panel for the inside of the card using Mossy Meadow ink.
  I stamped the small leaf from the Magnolia Blooms stamp set on either side of the greeting using Memento Tuxedo Black ink. The leaf is coloured using the Mossy Meadow Stampin’ Blends. The Whisper White folded card is attached to the inside back panel of the Petal Pink card base. I stamped “here’s to celebrating you” from the Perennial Birthday Stamp set onto Whisper White card using Mossy Meadow ink. I stamped the small magnolia image from the Magnolia Blooms stamp set below the greeting using Memento Tuxedo Black ink. The image is coloured using Mossy Meadow and Petal Pink Stampin’ Blends. The image panel is attached to Petal Pink card and then the front of the Whisper White card, making sure that it fits behind the panel on the card front.
I really liked the way this card turned out and I was a little bit unsure which side of the Designer Series Paper to use, so I created another card in exactly the same manner but this time using Mossy Meadow for the card base and the image panels.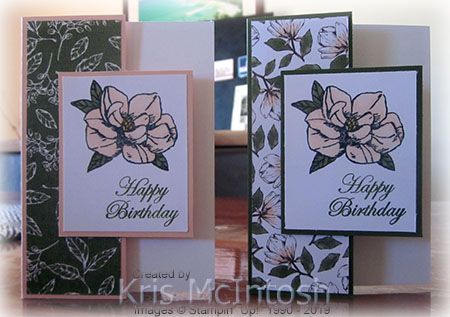
I love how they turned out. Let me know what you think.
Bye for now,
Kris
Product Used:


