Fab Friday 167

Today’s card uses the sketch challenge at Fab Friday for inspiration. I stamped the long floral image from the Beauty Abounds stamp set twice onto Whisper White card using Memento Tuxedo Black ink and coloured the image using the Dark Cherry Cobbler and LIght and Dark Mossy Meadow Stampin’ Blends. I cut a strip of Basic Black card using the scalloped edge die from the Stitched Be Mine Dies and attached it behind the right hand edge of the image panel. I also attached a narrow strip of Basic Black card behind the left hand edge of the image panel. I stamped the large circle stamp from the Beauty Abounds stamp set onto Thick Whisper White card using Cherry Cobbler ink. I stamped the small circle image from the Beauty Abounds stamp set around the large circles using Mossy Meadow ink. I attached the stamped floral panel onto the card front. I stamped “happy birthday” from the Special Celebration stamp set onto Whisper White card and cut it out using one of the Layering Ovals Dies. I cut a scalloped oval from Basic Black card using the same dies and attached the greeting before attaching to the card front using dimensionals.
 To decorate the inside of the card, I stamped the large circle image across the bottom of the Thick Whisper White card using Cherry Cobbler ink. I also stamped the small circle image using Mossy Meadow ink.
To be honest, I wasn’t sure I liked this card. However, I decided to add small Basic Rhinestones to the centres of the flowers which gave the card a bit of a lift. Then I decided to cut some butterflies from Basic Black card using the Butterfly Beauty Dies. I think the addition of the butterfly to the card front, really made all the difference. I also added one to the inside of the card. Soooo, tell me what you think.
Bye for now,
Kris
Product Used:


As Old as you Feel
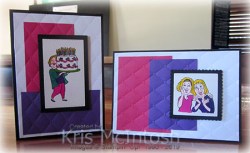
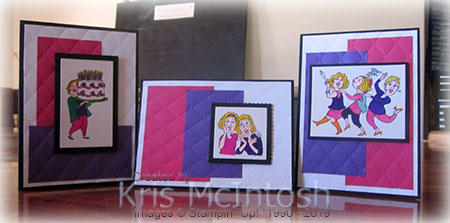
I loved the card that I made for this Try Stampin’ on Tuesday challenge and decided to use the same colours etc. to create two more cards using the images from the Young at Heart stamp set. They both use the same concept of adding the Melon Mambo and Gorgeous Grape card to the Whisper White card before embossing using the Tufted Embossing Folder. I simply used a different layout for each one.  The birthday cake image is cut out using the Rectangle Stitched Dies and the laughing ladies card is cut out using the Layering Squares Dies. The greetings on the inside of the cards come from the same stamp set Young at Heart. I have used Memento Tuxedo Black ink to stamp the images and greetings and Pigment Sprinkles to colour. To colour using the Pigment Sprinkles, I add a little of the sprinkles to a clear block and then use the Aqua Painter to add water and colour the images. You need to dilute the Melon Mambo Pigment Sprinkles to get a lighter colour for the skin. I think mine could have been a little lighter!
In any case here are all three cards.
 I simply love this stamp set. I’d love to hear what you think.
Bye for now,
Kris
Product Used:


My Great Uncle

Today’s page showcases a photo from the collection that my Dad gave me. It is a picture of my Dad’s Uncle. Not sure where the photo was taken but it was during World War II. He wrote on the back of the photo “how do you like my haircut the boys are doing a bit of sewing”. I don’t know who he sent the photo to but I am glad to be able to share it with my family. I decided to keep the page fairly simple, so I stamped onto the top left and bottom right hand corners of Very Vanilla card 12″ x 12″ using one of the images from the Gallery Grunge stamp set using Mossy Meadow ink. I attached the photo to Early Espresso card and then the card front. I cut Early Espresso card using the largest of the Rectangle Stitched Dies and attached it below and to the right of the photo. I created my journaling on the computer and printed it onto Very Vanilla card using the second largest die in the Rectangle Stitched Dies.
  I cut Sahara Sand and Soft Suede card using the smallest of the squares in the Stitched Shaped Dies and attached them into the corners around the photo and the journal block. As usual when I create these pages, the journaling is attached to the page using re-positional adhesive, just in case I need to edit and retype the story.
I don’t get as much scrapbooking done as I should but I do love it when a page comes together well. I am using these photos to help document our family history so that my grandchildren know a little bit about their heritage.
Bye for now,
Kris
Product Used:


Sunday Stamps 208

Today’s card is inspired by the sketch challenge at Sunday Stamps, although I did take just a little licence with the sketch. I found a strip of Whisper White card (left over from another project) which had been embossed using the Country Floral 3D Embossing Folder so this became the background panel for my card. I cut Poppy Parade card using one of the Delicate Lace Edge Dies and attached one piece to each side of the embossed card. The panel is attached to Whisper White card and then scored and folded Poppy Parade card. I stamped the stem image from the Daisy Lane stamp set onto Whisper White card using Granny Apple Green ink.  The panel is attached to Poppy Parade card and then the card front using dimensionals. I stamped two large daisies and four small daisies from the Daisy Lane stamp set onto Whisper White card using Poppy Parade ink and punched them out using the co-ordinating punches.
  I curled the petals of the flowers and attached the flowers one on top of the other. The large flower is attached to the top of the flower stem and the two small flowers around it using dimensonals. I added a Perennial Essence Flower Centre to each of the flowers. This the first time I have used these and they are really lovely. I cut “thanks” from Granny Apple Green card using the Well Written Dies and attached it to the image panel.
To decorate the inside of the card, I stamped the greeting from the Love What You Do stamp set onto Whisper White card using Poppy Parade ink.
This is such a bright and happy card don’t you think?
Bye for now,
Kris
Product Used:


From my Open House
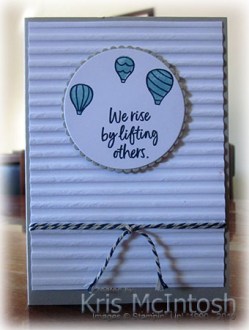
Today’s card is a really quick and easy to create. I embossed Whisper White card using the Corrugated Embossing Folder and wrapped it with the Night of Navy/Sahara Sand Baker’s Twine. I attached the embossed card to scored and folded Sahara Sand card. I stamped the three balloon outline image from the Above The Clouds stamp set onto Whisper White card using Night of Navy ink. I stamped the fill image using Balmy Blue ink. I stamped the greeting from the Above The Clouds stamp set using Night of Navy ink.  I cut out the image and greeting using the Layering Circles Dies and attached it to a Sahara Sand scalloped circle cut using the same dies. I attached the image panel to the card front using dimensionals.
 To decorate the inside of the card, I stamped the outline image of the large balloon from the Above The Clouds stamp set using Night of Navy ink. I stamped the fill image using Balmy Blue ink and masked the image. I stamped the cloud image a couple of times over the balloon using Balmy Blue ink. I removed the mask before attaching the panel.
As I said very simple but I like it. What about you?
Bye for now,
Kris
Product Used:


Classes Page

has been updated with the class for July. I know I am a little slack but better late than never. This class is going to be all about fancy folds. We will create five cards, each one with a different fold. You will also receive a template to help you recreate these cards at home any time you wish. If you are interested in attending this class, please contact me as soon as you can as space is limited.
Bye for now,
Kris
Sympathy
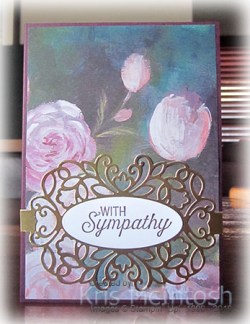
Today’s card is one of those that I hate making. It’s so hard when you get the news that someone has passed away and you know you want to send a card but it’s hard to make a start. I decided to use the Perennial Essence Designer Series Paper which I had already #loveitchopit, so it was ready to go. This paper is really gorgeous on it’s own so I didn’t add any embellishments. I simply attached the Designer Series Paper to scored and folded Blackberry Bliss card. I cut Gold Foil card using one of the dies from the Detailed Bands Dies and attached it across the Designer Series Paper.  I stamped the “with sympathy” from the Flourishing Phrases stamp set onto Whisper White card using Blackberry Bliss ink. I cut out the greeting with another of the dies from the Detailed Bands Dies and attached it to the card front.
  You can see that both these dies are made to fit together which takes the guesswork out of creating. To decorate the inside of the card, I stamped another of the greetings from the Flourishing Phrases stamp set onto Whisper White card using Blackberry Bliss ink.
So even though it’s no fun to make these cards, I was pleased with how easily it came together. Stampin’ Up! does make it easy for us with so many co-ordinating stamps and dies and beautiful designer series paper.
Bye for now,
Kris
Product Used:


Tasteful Textures

I loved the dies that are part of the Tasteful Textures bundle and couldn’t resist CASing a card that Stampin’ Up! shared in the latest Stampin’ Success magazine which is for demonstrators only. I have taken a little licence with the card but that’s what CASing is all about – you see something you love and then you create it putting your own spin on it. I cut Night of Navy card three times using the floral die from the Tasteful Background Dies. This die is easy to line up and keep die cutting to get one large pattern. I punched one end of a piece of Vellum cardstock and attached it to the die cut card.  I coloured a length of 5/8″ Gold Metallic Edge ribbon using the Dark Petal Pink Stampin’ Blend and attached it over the Vellum. The whole panel is attached to scored and folded Thick Whisper White card. I stamped the filigree image from the Tasteful Textures stamp set onto Whisper White card using Crushed Curry card. The image is cut out using one of the Stitched Nested Labels Dies. You need to use a die that is wide enough so that you get the whole image which will actually be much longer than you need.
  Sooo, you cut it once lining up the die so that the top of the image sits just inside the top of the die. Then you cut it again lining up the bottom of the image inside the die. It is very easy to line the die up so that it cuts perfectly. I stamped the greeting from the Tasteful Textures stamp set over the top using Night of Navy ink and attached the panel to the card front using dimensionals.
To decorate the inside of the card, I stamped the image from the Tasteful Textures stamp set which has the same shape as the die I used on the front, using Crushed Curry ink.
This card is so pretty! The Metallic Edge ribbon gives just enough bling to the card front. Let me know what you think.
Bye for now,
Kris
Product Used:


Come Sail Away Memories & More
To create the album I shared with you a couple of weeks ago I allowed 1/2 a packet of Come Sail Away Memories and More cards, however, I didn’t use all of them and so I decided to create a few quick and easy cards using the remaining 3″ x 4″ cards. Basically each card is the same, I embossed Whisper White card using the Sailing 3D Embossing Folder and attached it to scored and folded card in a colour to co-ordinate with the image panel. I attached a 3″ x 4″ Memories and More card to co-ordinating coloured cardstock and then the card front using dimensionals.  I used the Sailing Home stamp set to add a greeting using the co-ordinating coloured ink. The greetings are attached to cardstock and then the card front using dimensionals and snail where they overlay the image panel.
To finish off each of the cards, I stamped a co-ordinating image from the Sailing Home stamp set onto the inside of the card, in the co-ordinating coloured ink. The inks and cardstock I have used are Night of Navy, Mossy Meadow and Soft Suede.
I think they all turned out great don’t you. This is a very simple way to create lots of cards, quickly and easily using limited products. A great idea for when you are on holidays or going to long appointments. Let me know what you think.
Bye for now,
Kris
Product Used:


Another Catalogue Case

While I was still on a roll using the Tasteful Textures bundle, I decided to case a second card from the Annual Catalogue (you can find it on page 135). I have changed out the featured image on this card but I think it works well. This time I cut Whisper White card with another of the Tasteful Background Dies. This one looks a little bit like flowers. After I had die cut the card, I wrapped it with the Rococo Rose 1/2″ Scalloped Linen Ribbon and attached the card to scored and folded Rococo Rose card.  I stamped the greeting from the Tasteful Textures stamp set onto Sahara Sand card using Rococo Rose ink and punched one end using the Triple Banner Punch. I stamped the large flower from the Daisy Lane stamp set twice onto scrap Whisper White card using Rococo Rose ink. I also stamped the small flower from the same stamp set onto Whisper White card using Rococo Rose ink.
 I curled the petals of the flowers slightly and attached them together. I attached the flower to the left hand side of the greeting banner before attaching to the card front using dimensionals.
To decorate the inside of the card, I stamped one of the greetings from the Daisy Lane stamp set onto Whisper White card using Rococo Rose ink. I also stamped the smaller flower from the Daisy Lane stamp set using Rococo Rose ink.
I am feeling rather pleased with my latest creative project. What do you think?
Bye for now,
Kris
Product Used:


