Try Stampin’ On Tuesday Challenge 414

Today’s card uses the sketch challenge at Try Stampin’ On Tuesday and a fabulous stamp set called Young at Heart. I loved the recently retired You’ve Got Style and couldn’t resist this stamp set when I saw it. So much fun for ladies who are of a certain age! I attached Melon Mambo card to Whisper White card and then added Gorgeous Grape card. I embossed the whole panel using the Tufted 3D Embossing Folder. The embossed panel is attached to scored and folded Basic Black card. I stamped the image from the Young at Heart stamp set onto Shimmery White card using Memento Tuxedo Black ink. I coloured the image using the new Pigment Sprinkles.  These are similar to the Brusho crystals we had but packaged so much better and the colours match Stampin’ Up! colours. To do the colouring, I sprinkled a little onto a Clear Block and used my Aqua Painter to add water and then coloured the image.
  I used the Melon Mambo, Gorgeous Grape, Mango Melody, Daffodil Delight and Bermuda Bay Pigment Sprinkles. To colour the “skin” I just watered down the Melon Mambo until it was very pale. I think it turned out great. I attached the image panel to Basic Black card and then the card front using dimensionals.
To decorate the inside of the card, I stamped the greeting “Young at heart…just a little older in other places” which comes from the Young at Heart stamp set, onto Whisper White card using Memento Tuxedo Black ink.
I know I am going to love this stamp set and I will be back with more samples soon. I am also in love with the new Pigment Sprinkles. I love that they are packaged with a little clip lock, so you don’t have to make a hole and use the thumb tack to keep it closed. The fact that they match Stampin’ Up! colours is also a real bonus. Maybe we can look forward to more of these, (please).
Bye for now,
Kris
Product Used:
Unfortunately any 3D Embossing Folders that carried over from the last Annual Catalogue are not orderable at the moment. I will let you know as soon as they are.


Inkspire Me #395

Today’s card was inspired by the challenge at Inkspire Me and once again uses the Band Together stamp set. I embossed Whisper White card using the Eyelet Lace Embossing Folder and attached it to Whisper White card. I stamped the greeting from the Band Together stamp set onto the lower right hand corner of the Whisper White card using Terracotta Tile ink. I wrapped the bottom of the embossed card with Terracotta Tile 1/2″ Scalloped Linen Ribbon and attached the panel to scored and folded Terracotta Tile card.  I stamped the flower and the leaves from the Band Together stamp set onto the Fluid 100 Watercolour Paper using Versamark ink. I sprinkled the image with White Embossing Powder and heat set it. I used my Aqua Painter to add water inside the embossed flower.
 Once I had enough water inside the embossed image, I used the Aqua Painter to add Terracotta Tile ink to colour the petals. I cleaned the Aqua Painter and added water and Crushed Curry ink to the centre of the flower. I used the same principle to colour the leaves using Pretty Peacock ink. I used the co-ordinating dies from the Detailed Bands Dies to cut out the flower and the leaves. I attached the leaves to the back of the flower before attaching to the card front using dimensionals. To decorate the inside of the card, I stamped another of the greetings from the Band Together stamp set using Terracotta Tile ink.
I loved this card and decided to create another one exactly the same, this time using Terracotta Tile ink and Ribbon.
 Don’t they look lovely?
Bye for now,
Kris
Product Used:


Heather and Lace

This is another card I made for my catalogue launch using the A Little Lace stamp set and co-ordinating Stitched Lace Dies. I cut Granny Apple Green card using the Stitched Lace Dies and then cut one long edge using the edgelit die. The die cut panel is attached across the bottom of Whisper White card and then scored and folded Highland Heather card. I stamped the daisy image onto Whisper White card using Granny Apple Green ink. I stamped the image once more onto scrap Whisper White card using Memento Tuxedo Black ink. I coloured the flowers using the Highland Heather Stampin’ Blends and then cut out the flowers. I attached the fussy cut flowers over the stamped flowers using dimensionals. The image panel is attached to Gorgeous Grape card and then the card front using dimensionals. Lastly I added Clear Faceted Gems to the centres of the flowers.
To decorate the inside of the card, I inked the border image using Granny Apple Green and Gorgeous Grape Stampin’ Write Markers before stamping across the bottom of Whisper White card.  ( I am sorry this is such a poor photo but I just couldn’t get a great photo of the inside of the card.)
I really love the extra dimension that you get by adding the fussy cut flowers, don’t you?
Bye for now,
Kris
Product Used:


EXTRA Extra & BONUS Days

Beginning on the 1st July, so not tomorrow but the next day (Monday) Stampin’ Up! is introducing two brand new promotions.
The first one is a recruiting promotion. This will run from the 1st July to the 31st August. So what do you get. Well first of all you get to be part of my team and my girls are amazing! You will also become part of the Stampin’ Up! family, and, let me tell you that is one fantastic family. Stampin’ Up! is a great company to work for – you get to set your own hours, you decide how you want to run your business and Stampin’ Up! will offer support for whatever you want to do. So, maybe you just want to be able to buy product at a great 20% discount – that’s fine. Maybe you want to buy your product at a discount and also sell to your friends earning you a little extra cash (for more product or a few extras at home) – that’s fine too. If you want to buy product and create a business that lets you stay home and be with your family – that’s fine too. Whatever you want to do Stampin’ Up! and I will support you. Now what does it cost – well your initial starter kit costs $169.00 and you get to choose $280.00 worth of product from any current catalogue. You will also receive enough business supplies to get your business started, if that’s what you want to do. You will also earn a bonus voucher of $16.00 to redeem 1st-31st August. Now that’s really wonderful because August is the month pre-order for the Holiday Catalogue begins and you can (as a demonstrator) purchase products from that catalogue and use your bonus voucher to get another $16.00 discount. Absolutely fantastic. If you want more information regarding this great offer, then please hop on over to my Stampin’ Up! website and click on the “Join the Fun” button and follow the cues. It’s really easy. 
The second promotion is of course, Bonus Days – you will remember this promotion was run last year and I got lots of discounts, did you? Bonus Days are available to customers and demonstrators alike. This is a great time to stock up on items you want from the Annual Catalogue and earn bonus vouchers which you can redeem during the month of August and get a few more goodies for free. How does it work, well for every $90.00 you spend during 1st to 31st July, you will be emailed one $9.00 Bonus Voucher code which you can use 1st to 31st August to get a discount on your order. It’s a win win for everyone, because you all have your wish lists by now and this gives you the opportunity to purchase what you want and also use the bonus vouchers to purchase more of what you want with a discount. Who doesn’t love a bargain!
So my apologies for not having a Memory Keeping page or idea to share with you today but I thought you would all want to know about these great opportunities.
So if you have every wanted to be a Stampin’ Up! demonstrator, then July will be a great opportunity for you to give it a try.
And if you just love a bargain, don’t forget to place your orders and earn bonus vouchers to redeem during August.
Bye for now,
Kris
A Good Diaorama
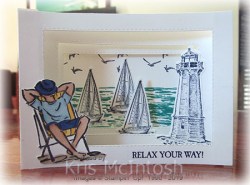
Today I am sharing a multiple layer diorama. I love the idea of these cards, however, the execution can be quite time consuming, although, the end result is totally worth it. My dimensions are slightly off and my layers tend to bow rather than stay straight but I do love the finished card.  I started by stamping the sea image from the High Tide stamp set across the back layer of the card using Bermuda Bay ink. I also stamped the bird image from the High Tide stamp set using Memento Tuxedo Black ink. I stamped the small sailing ship from the Sailing Home stamp set three times onto scrap Whisper White using Night of Navy ink. The images are cut out using the co-ordinating Come Sailing Dies.
  I attached two of the boats to the background layer but the third one is attached to the first window layer of the card. I stamped the lighthouse image from the Sailing Home stamp set onto scrap Whisper White card using Night of Navy ink and cut it out using the co-ordinating Come Sailing Die. The lighthouse is attached to the second window layer of the card. I stamped the greeting from the A Good Man stamp set onto the bottom of the front window of the card using Night of Navy ink.
  I stamped the image from the A Good Man stamp set onto scrap Whisper White card using Memento Tuxedo Black ink. I coloured the image using Night of Navy, Balmy Blue, Mango Melody, Crumb Cake, Ivory and Bronze Stampin’ Blends and cut out the image. After assembling the card, I attached the gentleman image to the left hand side of the front window.
It really is a splendid type of card to make and I am going to do some more experimenting to get my technique right, but, for a first attempt, I am really happy. I’d love to hear what you think.
Bye for now,
Kris
Product Used:


Good Things

After I created my first card with Tasteful Textures, I was drawn to re-create one of the examples from the Annual Catalogue. This time, I cut Mossy Meadow card using the die from the Tasteful Backgrounds Dies. The die cut card is wrapped with the 3/8″ White Linen Ribbon from the Magnolia Lane Ribbon Combo Pack and tied a knot. The Mossy Meadow card is attached to scored and folded Pear Pizzazz card. I stamped the greeting from the Tasteful Textures stamp set onto Sahara Sand card using Soft Suede ink. I punched one end of the card using the Triple Banner Punch.  I stamped the bird, large flower, small flower and leaves (3 times) from the Free As A Bird stamp set onto Whisper White card using Memento Tuxedo Black ink. I coloured the leaves using Mossy Meadow Stampin’ Blends and cut them out. I coloured the flowers using Flirty Flamingo Stampin’ Blends and cut them out. I coloured the bird using Crumb Cake, Soft Suede and Dark Daffodil Delight Stampin’ Blends and cut it out. I attached the bird to the left hand edge of the greeting banner and attached the leaves and flowers around the bird.
  The whole panel is attached to the card front using dimensionals.
To decorate the inside of the card, I stamped the bird image onto the lower left hand corner of Whisper White card using Memento Tuxedo Black ink. I masked the image and stamped the leaf image twice using Memento Tuxedo Black ink. I coloured the leaves using Mossy Meadow Stampin’ Blends and the bird using Crumb Cake, Soft Suede and Dark Daffodil Delight Stampin’ Blends.
I love being able to get ideas from the catalogue. It makes it easy to start creating, especially when you have loads of new product.
Bye for now,
Kris
Product Used:


Case This Sketch #327
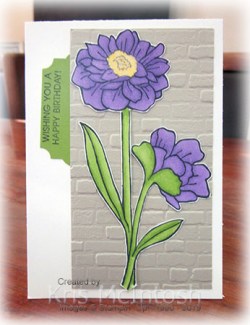
I needed to make a birthday card for a friend’s upcoming birthday and the sketch challenge at Case This Sketch gave me just the inspiration I needed. I embossed Sahara Sand card using the Brick and Mortar 3D Embossing Folder. I stamped the greeting from the Band Together stamp set onto Granny Apple Green card using Memento Tuxedo Black ink and punched it out using the Everyday Label Punch. I attached the stamped label to the back of the left hand side of the embossed panel before attaching it to scored and folded Thick Whisper White card.  I stamped the double flower image from the Band Together stamp set onto Whisper White card using Memento Tuxedo Black ink. The image is coloured using Highland Heather, Granny Apple Green and Daffodil Delight Stampin’ Blends.
  I cut out the flowers after they were coloured and attached them to the embossed panel.
To decorate the inside of the card, I stamped one of the flowers from the double flower image onto the lower left hand corner of Whisper White card using Memento Tuxedo Black ink and coloured the image using the Highland Heather and Granny Apple Green Stampin’ Blends. The panel is attached to the inside of the card.
I am really happy with this card and hope that my friend loves it too. Thanks Case The Sketch for the inspiration.
I really would love to hear what you think.
Bye for now,
Kris
Product Used:


A Little Lace

Have you seen the stamp set A Little Lace, and the co-ordinating Stitched Lace Dies, on page 42 of your 2019 Annual Catalogue. When I saw this die on pre-order, I just had to have it and of course it was a bargain to buy the stamp set (which I didn’t think I really liked) so I bought the bundle. Well was I wrong about the stamp set! It is just beautiful. It kind of fits with our existing daisy stamps but adds a whole lot more opportunities for different styles of cards. This is the first card I created using this bundle. I cut Call Me Clover card using the Stitched Lace Dies and then used the edgelit to cut the top edge of the lace panel before attaching it to Whisper White card.  The whole panel is attached to scored and folded Lovely Lipstick card. I inked the daisy image using Lovely Lipstick and Call Me Clover Stampin’ Write Markers and stamped the image onto Whisper white card. I attached the stamped panel to Lovely Lipstick card and then the card front using dimensionals. I stamped the greeting from the A Little Lace stamp set onto Whisper White card using Call Me Clover ink and cut it out using a Rectangle Stitched Die. The greeting is attached to the card front below the image panel. I added Gold Faceted Gems to the centres of the flowers.
 To decorate the inside of the panel, I inked the border image from the A Little Lace stamp set using Lovely Lipstick and Call Me Clover Stampin’ Write Markers and stamped across the top of Whisper White card.
It always makes me happy when I use products for the first time and I am totally love the result. I’d love to hear what you think.
Bye for now,
Kris
Product Used:


Cruising

Today I am sharing a mini album which I created using the Come Sail Away Product Suite which you can find on pages 144 and 145. This is a reasonably easy album to create but the papers and embellishments really bring it to life. The base of the Album is Crumb Cake and as well as the Come Sail Away Designer Series Paper I have used a few of the cards from the Come Sail Away Memories and More Card Pack as well as some of the die cuts that come this this pack.  I have also used various dies including Smooth Sailing, Stitched Labels, Stitched Shapes and the Stitched Nested Labels. The album is tied closed with 3/8″ Denim Ribbon.
  I used the album to showcase some photos from a cruise we took in 2016 with my parents, daughters, sons-in-law and grandchildren to celebrate our 40th Wedding Anniversary.
This is a project which I think would make a great class. If you are interested in learning how to create this album for yourself, contact me so we can work out the details.
Bye for now,
Kris


Celebrating You

I have been wanting to make a card like this for a long time and the birthday of a friend gave me the opportunity. I stamped the circle from the Swirly Frames stamp set onto Whisper White card using Gray Granite ink. I stamped the greeting from the Perennial Birthday stamp set onto the lower right hand corner also using Gray Granite ink. The panel is attached to scored and folded Flirty Flamingo card. I stamped the flowers from the Beautiful Bouquet stamp set onto scrap Whisper White card using Poppy Parade, Flirty Flamingo and Melon Mambo ink. I cut out the flowers using the co-ordinating Bouquet Bunch Framelit Dies.  I stamped the leaf from the Beautiful Bouquet stamp set onto scrap Whisper White card six times using Granny Apple Green ink. I cut out the leaves using the co-ordinating Bouquet Bunch Framelit Die. I attached leaves behind three of the flowers before attaching the two largest flowers flat to the circle stamp.
  The two small flowers are attached to the card front using dimensionals. I added Basic Rhinestones to the flower centres.
To decorate the inside of the card, I stamped another of the greetings from the Perennial Birthday stamp set using Gray Granite ink. I also stamped the flower stem from the Beautiful Bouquet stamp set onto the lower left hand corner. I stamped the larger flower using Poppy Parade ink and the smaller flowers using Flirty Flamingo ink (although technically the small flowers are actually flower centres).
This is a really pretty card and you could use almost any flower you wished to decorate the “wreath”. Happy Birthday Rachel.
Bye for now,
Kris
Product Used:


