Happy Anniversary

My Mum and Dad celebrated their 65th Wedding Anniversary yesterday. Such a milestone! I am so lucky to have them living close by and to be able to spend time with them. Anyway I thought I would share with you the card I made for them. I began by embossing Gray Granite card using the Tufted 3D Embossing Folder. I cut one edge of Whisper White card using the edgelit from the Stitched Lace Dies, before cutting it with the background die in this set. After I had die cut the whole piece, I then cut the opposite side of the Whisper White card with the edgelit, to give me a beautiful banner piece to go across the embossed Gray Granite card.  I wrapped the Whisper White banner with the Petal Pink 5/8″ Organdy Striped Ribbon before attaching the panel to scored and folded Thick Whisper White card. I cut Petal Pink card using the large heart image in the Stitched Be Mine Dies as well as the smaller detailed heart. I cut the large plain heart from Whisper White card using the same dies. I used dimensionals to hold the outer Petal Pink heart and plain Whisper White heart together and attached it to the card front. I attached the detailed heart to the centre of the Whisper White heart. I cut the “65” from Petal Pink using some very old sizzix dies in my stash. I stamped “happy” and “anniversary” from the Well Said stamp set onto scrap Whisper White card using Gray Granite ink.
  I punched the greetings using the Classic Label Punch and then trimmed the ends so that there is only a small amount of white space around the greetings. The greetings are attached to the card front using dimensionals.
To decorate the inside of the card, I embossed another piece of Gray Granite card using the Tufted 3d Embossing Folder. I cut the scalloped border from Petal Pink card using the Stitched Be Mine Die.
I didn’t see them yesterday but I hope that Mum and Dad had a lovely day celebrating their Anniversary.
Bye for now,
Kris
Product Used:


Pretty in Pink
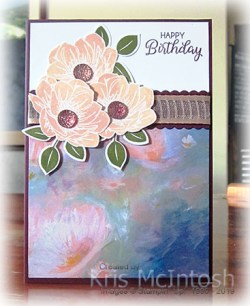
I made the card I am sharing with you today for my youngest daughter who celebrated her birthday yesterday. Happy Birthday Emma. I attached a piece of Perennial Essence Designer Series Paper to Whisper White card. I stamped the greeting from the Beautiful Bouquet stamp set onto the upper right hand corner using Blackberry Bliss ink. I cut both edges of a strip of Blackberry Bliss card using the edgelit die from the Stitched Be Mine Dies. I attached the die cut piece over the top edge of the Designer Series Paper and wrapped the panel with the Petal Pink 5/8″ Organdy Striped Ribbon before attaching to scored and folded Blackberry Bliss card.  I stamped the flower image from the Floral Essence stamp set three times onto scrap Whisper White card using Petal Pink ink and cut them out. I stamped the leaf image from the same stamp set onto scrap Whisper White card three times using Mossy Meadow ink and punched them out using the Leaf Punch. (Even though it doesn’t say so in the catalogue, this punch fits the image perfectly.)
  I attached the leaves to the back of the flowers and then to the card front. The lower two flowers and leaves are attached using dimensionals. I coloured three Clear Faceted Gems using the Dark Blackberry Bliss Stampin’ Blend and attached them to the flower centres.
To decorate the inside of the card, I stamped the smaller of the flower images onto Whisper White card using Blackberry Bliss ink. I stamped the flower centre using Petal Pink ink. I stamped the greeting from the Perennial Birthday stamp set below the flower using Blackberry Bliss ink.
I hope you had an amazing day Emma.
Bye for now,
Kris
Product Used:


A Good Man

I am not one who easily creates male themed cards but there is a stamp set in the new catalogue designed for males which makes it very easy. The two cards I am sharing today use basically the same products and I love the way both cards turned out.
To create the first one, I stamped the image from the A Good Man stamp set onto Whisper White card using Memento Tuxedo Black ink. I coloured the image using Night of Navy, Balmy Blue, Old Olive, Daffodil Delight, Sof Suede, Crumb Cake and Ivory Stampin’ Blends.  I cut out the image using the Rectangle Stitched Dies. I also cut a Rectangle Stitched Die from Night of Navy card. I embossed a piece of Old Olive card using the Curls and Swirls Embossing Folder. I stamped the greeting from the A Good Man stamp set onto the lower right hand corner of Whisper White card using Night of Navy ink.
  Then I assembled the rest of the pieces, I attached the right hand side of the stamped Whisper White rectangle to the right hand side of the Night of Navy stitched rectangle, then I slipped the Night of Navy Rectangle under the embossed card and the stamped Whisper White rectangle over the embossed card, using the stamped Whisper White card as a quide. Once positioned, I added more adhesive to the panels to attach them to the card front. The whole panel is attached to scored and folded Night of Navy card.
To decorate the inside of the card, I embossed a strip of Old Olive card using the Curls and Swirls Embossing Folder and attached it to the bottom of Whisper White card.
For the second card, I stamped the image onto Whisper White card using Memento Tuxedo Black ink and coloured it using the Night of Navy, Balmy Blue, Old Olive, Daffodil Delight and Ivory Stampin’ Blends. The image is cut out using the Rectangle Stitched Dies. I also cut a rectangle from Night of Navy card using the same dies.  I embossed a piece of Old Olive card using the Curls and Swirls Embossing Folder. I also punched a narrow strip of Night of Navy card using the Decorative Ribbon Border Punch. To assemble the card front, I attached the punched strip behind the top edge of the embossed Old Olive card. I attached the panel to Whisper White card using adhesive across the bottom of the panel and on the right and left sides but not behind the punched edge. I attached the stamped Whisper White Rectangle to the top of the Night of Navy Rectangle.
  I added more adhesive to the panels and slipped the Night of Navy Rectangle behind the embossed card to attach it to the Whisper White card. The whole panel is attached to scored and folded Night of Navy card.
To decorate the inside of this card, I stamped the greeting from the A Good Man stamp set onto Whisper White card using Night of Navy ink.
These are relatively simple cards to create but I love how they turned out. I am sure this stamp set is going to be a real favourite, not only with me, but with you also.

And don’t they look great together. There is another stamp in this set and I think you could create a great gift set of cards with this stamp set. I’d love to hear what you think.
Bye for now,
Kris
Product Used:


Another Cousins layout

This time using the May Hugs From Shellie Paper Pumpkin Kit. I know that this kit has now sold out in Australia but I created this page to share at my Open House and thought that you might like to see it. It’s a photo of my dad on the left and his cousin Marie. I haven’t added any journaling yet as I need to check the details with my Dad. I used one card and envelope from the Paper Pumpkin Kit. Firstly I cut the card in half and then cut the patterned card front in half again and attached one piece behind the top right hand corner of the photo and one behind the bottom right hand corner of the photo.  I stamped the background from the stamp set included in the Paper Pumpkin kit onto the top right and bottom left hand corners pf a Very Vanilla 12″ x 12″ card using Balmy Blue ink. I stamped several of the bird images from the same stamp set over the top using Early Espresso ink. I used removable adhesive to attach Very Vanilla card (for my journaling) to Balmy Blue card and then attached it to the page.
 I cut the label and flowers from the envelope front and added the title using my computer. The label is attached over the journaling panel using dimensionals. At this stage I haven’t removed the backing on the dimensionals behind the top of the label. It’s kind of a simple page but it let me stretch the use of the cards from the Paper Pumpkin kit, to create more than just cards. I loved this kit and I do hope that we get more of these in Australia.
Bye for now,
Kris
Product Used:


Birdie Birthday
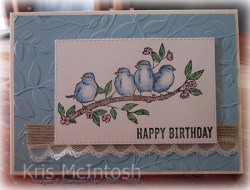
Today’s card is one that I made for a customer who celebrated her birthday earlier this week. I used the Fab Friday 165 sketch challenge as the inspiration for my card. I embossed Balmy Blue card using the Layering Leaves 3D Embossing Folder and attached it to scored and folded Thick Very Vanilla card. I attached a length of scalloped ribbon to Burlap ribbon the same length using Mini Glue Dots before attaching it to the embossed card.  I stamped the image from the Free As A Bird stamp set onto Shimmery White card using Memento Tuxedo Black ink and coloured the image using the Balmy Blue, Early Espresso, Garden Green, Daffodil Delight and Melon Mambo Watercolour Pencils and a Blender Pen. I cut out the image using a Rectangle Stitched Die and stamped “happy birthday” from the Itty Bitty Birthday stamp set onto the lower right hand corner using Memento Tuxedo Black ink. The image panel is attached to the card front using dimensionals.
 To decorate the inside of the card, I stamped the single bird image from the Free As A Bird stamp set onto the lower left hand corner using Memento Tuxedo Black ink. I coloured the bird using the Balmy Blue and Daffodil Delight Watercolour Pencils and a Blender Pen. I also stamped another of the greetings from the Itty Bitty Birthday stamp set using Memento Tuxedo Black ink.
This card is sooo pretty. I am totally in love with this stamp set. The images are just gorgeous and if you love colouring then this is for you too.
Bye for now,
Kris
Product Used:


Happy Birthday Ethan

My grandson turned 13 yesterday and I wanted to make him a special card. After watching this You Tube video by Susan Levasseur I knew what I was going to create. She used the gorgeous Good Morning Magnolia stamp set to create her card, but I decided to go with the Above The Clouds stamp set. I cut my card base from Thick Whisper White card following Susan’s directions. I must say, although it looks very complicated it is actually quite easy to create.  To decorate the focal panel, I used a little of the retired Brusho Prussian Blue crystals on Shimmer White card. I like the one of a kind background that you can create with Brusho and can’t wait until the new ones in this Annual Catalogue arrive for me to play with.
  The panel is attached to Night of Navy card and then the card base. I stamped the outline image of the balloons from the Above the Cloud stamp set using Night of Navy ink and stamped the fill image using Balmy Blue, Bermuda Bay and Pacific Point card. The balloon basket outline image is stamped in Soft Suede ink and the fill image in Crumb Cake ink. I punched out the pieces using the co-ordinating Hot Air Balloon Punch and attached them over the background created with the Brusho. The panel is attached to Night of Navy card. The smaller panel on the front of the card, as well as the large square panel and smaller triangle panels are all stamped with the Crackle Background stamp using Balmy Blue ink and then embossed using the Subtle 3D Embossing Folder. Each of these panels is attached to Night of Navy card and then the card base.
  I decided that I would add a panel to the back of the card to write my message and so I stamped the greeting from the Above the Cloud stamp set onto the inside rectangle panel using Night of Navy ink. I stamped the small balloon image from the same stamp set using Night of Navy ink and the fill image using Balmy Blue ink. This panel is also attached to Night of Navy card. I stamped “happy birthday” from the Special Celebrations stamp set using Night of Navy ink onto Whisper White card and punched it out using the Story Label Punch. The greeting is attached to the inside of the card using dimensionals, so that the front panel can stand when opened.
The finished card size is 6″ x 6″ so I had to create an envelope specifically for the card. I used Whisper White 12″ x 12″ card and the now retired Envelope Punch Board to create the envelope. I closed the card by adding 1″ circles punched from Night of Navy card, held in place with brads and Whisper White Baker’s Twine to hold it closed.
Thanks to Susan, for the instructions, this card is gorgeous. I know that Ethan loved it too.
Bye for now,
Kris
Product Used:


Thinking of You

I made today’s card using a sketch I had saved on Pinterest. I attached a piece of Magnolia Lane Designer Series Paper across the bottom of scored and folded Thick Whisper White card. I stamped the greeting onto the lower right hand corner of Petal Pink card using Memento Tuxedo Black ink before embossing the card using the Layering Leaves Dynamic Embossing Folder. The embossed panel is attached to the card front. I stamped the border image from the Good Morning Magnolia stamp set onto Whisper White card using Mossy Meadow ink.  I cut out the stamped card on both sides of the stamping using the border from the Magnolia Memory Dies. I attached the border to the card front using dimensionals. I stamped the small magnolia image onto Whisper White card using Memento Tuxedo Black ink and coloured the image using Petal Pink and Mossy Meadow Stampin’ Blends.
  I punched out the image using the 2” Circle Punch. I attached the image to a Mossy Meadow Circle punched using the Starburst Punch. The image panel is attached to the card front using dimensionals.
To decorate the inside of the card using the border image from the Good Morning Magnolia stamp set using Mossy Meadow ink.
Unfortunately at the moment you cannot order the Layered Leaves 3D Embossing Folder but it will be available soon.
Bye for now,
Kris
Product Used:


Catalogue Launch
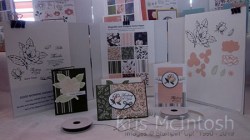
Last Saturday I held a catalogue launch. I had a good roll up of regular customers and downline as well as some previous downline and a couple of customers I probably only see once a year.  I created displays for all the items I had purchased in the catalogue pre-order (a great perk for demonstrators). Of course the ideas shared by many people on Pinterest and in a couple of online groups I belong to helped me with my creations.
 I also used the catalogue as inspiration which helps my customers to better relate to the samples. I also had a big display for the Hugs From Shellie, May Paper Pumpkin kit.
 I had several ladies purchase these kits and wanted them to see that the stamp set would be useful once they had used all of the supplies in the kit. Unfortunately, these kits are now sold out, but I am hopeful that we get more in the future.
I also have all of my retired stock for sale and the ladies love searching for a bargain. I really appreciate the friendship and support for my business that these ladies give. Thank you.
 We had a lovely time and everyone went home with a catalogue and a few goodies I had created just for them. I’ll be sharing some of these creations more closely with you over the coming weeks.
I hope you enjoy looking at the photos of my display.
Bye for now,
Kris
Magnolia Moments

Today’s page uses some of the fabulous new product in the next Annual Catalogue. The photo on this page is one that my Dad gave to me and is of my Aunty sitting on the chair and a cousin Dorothy standing. I wanted to make the page a little prettier than the photo so I used one of the Magnolia Lane Memories and More cards as the starting point. I cut Soft Sea Foam card down the length and then cut it in half. I embossed each half using the Tin Tile Embossing Folder and attached it to the left hand side of a 12″ x 12″ piece of Whisper White card.  I attached the photo to Early Espresso card and then to the page covering the gap in the embossed Soft Sea Foam card. I attached one of the 4″ x 3″ Magnolia Lane Memories and More cards below the photo. I stamped the large Magnolia from the Good Morning Magnolia stamp set using Memento Tuxedo Black ink and coloured the image using Petal Pink, Mossy Meadow and dark Soft Suede Stampin’ Blends.
  I printed my journaling onto Whisper White card and stamped the border image from the Good Morning Magnolia stamp set using Mossy Meadow ink. I stamped the small flower from the Good Morning Magnolia stamp set between the border images using Memento Tuxedo Black ink. I coloured the image using Petal Pink and Mossy Meadow Stampin’ Blends.
 The journaling panel is attached to Mossy Meadow card and then the page. I added one of the die cut magnolia’s and leaves from the Magnolia Lane Memories and More cards to the Everyday Moments card as a final touch.
So happy with this finished page. I love the Magnolia Lane Product Suite and I am sure you will too.
Bye for now,
Kris
Product Used:


Soft Spring Birthday Take 2
For today’s card, I am sharing another card made using the Soft Spring Hostess Set from the new Annual catalogue. It co-ordinates with this card I shared with you recently. I attached Whisper White card to scored and folded Terracotta Tile card. I embossed a piece of Whisper White card using the Pinewood Planks Dynamic Embossing Folder. I cut a piece of Terracotta Tile card using one of the Delicate Lace Edgelit Dies and attached it behind one long edge of the embossed card.The panel is attached to the card front. I love how the lace die cut edge stands out so beautifully on the Whisper White card.  I stamped the floral image from the Soft Spring stamp set onto Whisper White card using Memento Tuxedo Black ink. I stamped the flower fill image using Terracotta Tile ink and the leaf fill image using Pretty Peacock ink. The stamped panel is attached to Terracotta Tile card and then the card front. I stamped “happy birthday” from the Beautiful Bouquet stamp set onto scrap Whisper White card using Pretty Peacock ink.
  I cut out the greeting using the smallest of the Layering Ovals Framelits Dies and attached it to a Terracotta Tile scalloped oval cut using the same dies. The greeting is attached to the card front using dimensionals.
To decorate the inside of the card, I cut Terracotta Tile card using the same Delicate Lace Edgelit Die and attached it to Whisper White card.
This card is so pretty in real life and to show you how gorgeous this stamp set really is, here are both cards created using the same products.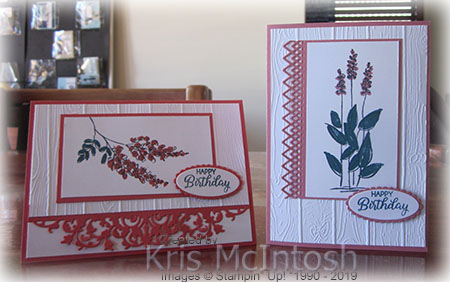
I bet you can’t wait to place an order and earn this gorgeous stamp set.
Bye for now,
Kris
Product Used:


