A little bird
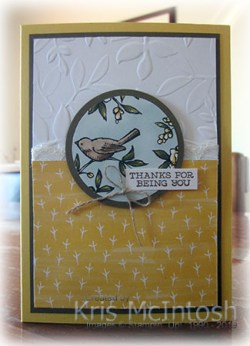
One of the new product suites that I was able to pre-order as a Stampin’ Up! Demonstrator is the Bird Ballad Suite. This is a gorgeous suite including stamps, paper, dies and embellishments which all co-ordinate together. One of the wonderful things about the Bird Ballad Designer Series Paper is that it is so easy to just simply punch the paper and use it as the main image on your projects, so that is what I have done for this card. I attached a length of Very Vanilla 3/8″ Scalloped Lace Trim behind one edge of Bird Ballad Designer Series Paper before attaching to Whisper White card embossed using the Layered Leaves 3D Embossing Folder. The panel is attached to Soft Suede card and then scored and folded Daffodil Delight card.  I used the 2″ Circle Punch to punch the bird from the Bird Ballad Designer Series Paper and attached it to a Soft Suede 2-1/4″ Circle. The panel is attached to the card front using dimensionals. I stamped the greeting from the Free As A Bird stamp set onto Whisper White card using Soft Suede ink.
  I punched the greeting using the Classic Label Punch and then trimmed off each end. The greeting is attached to the card front partially over the image circle using a dimensional. I tied a bow in a length of Linen Thread and attached it to the card front using a Mini Glue Dot. To decorate the inside of the card, I stamped the greeting from the Free As A Bird stamp set onto Whisper White card using Soft Suede ink. I fussy cut the leaves and flowers from the same sheet of Designer Series Paper that the focal image was punched from.
This is such a sweet card and I look forward to using this product suite lots and lots over the next year. If you don’t have a demonstrator already, live in northern Brisbane, and would like a copy of the new Annual Catalogue, please contact me so that we can organise to get one to you.
Bye for now,
Kris
Product Used:


Soft Spring Birthday
The card I am sharing with you today is one of two that I made using the same basic products. The stamp set featured today is one of the new Hostess sets available in the new catalogue launching today. I embossed Whisper White card using the Pinewood Planks Dynamic Embossing Folder and attached it to scored and folded Rococo Rose card. Rococo Rose is one of the new in-colours being released with the new Annual Catalogue and is a gorgeous soft pink. I cut one long edge of another piece of Rococo Rose Card using one of the Delicate Lace Edgelit Dies and attached it to the card front. I stamped the tall floral image from the Soft Spring stamp set onto Whisper White card using Memento Tuxedo Black ink. I stamped the leaf fill image from the Soft Spring stamp set using Pretty Peacock ink which is also one of the new in-colours. I stamped the flower fill image using Rococo Rose ink before attaching the image panel to the card front. I stamped “happy birthday” from the Beautiful Bouquet stamp set onto scrap Whisper White card using Pretty Peacock ink and cut it out using one of the Layering Ovals Framelits Dies.
  The greeting is attached to a Rococo Rose scalloped oval cut using the same dies and then the card front using dimensionals.
To decorate the inside of the card, I cut a strip of Rococo Rose card using the same Delicate Lace Edgelit die and attached it behind one long edge of a strip of Whisper White card embossed using the Pinewood Planks Dynamic Embossing Folder. The embossed panel is attached to the bottom of Whisper White card.
These new in-colours are just gorgeous. I know that you will love them just as much as I do.
Bye for now,
Kris
Product Used:


Magnolia Birthday
 My computer is back up and running, so hopefully I will be back on track with my posting. I can’t believe that the new catalogue is actually launching tomorrow which means that you only have to wait one more day to purchase the products I am sharing today. I made this card for my friend and neighbour who recently celebrated her birthday. It’s not the first card I have created using the Good Morning magnolia stamp set and it certainly won’t be the last. For today’s card I embossed Whisper White card using the Country Floral Dynamic Embossing Folder. I wrapped the lower part of the embossed card using the Sahara Sand ribbon from the Magnolia Lane Ribbon Combo Pack before attaching the embossed card to scored and folded Petal Pink card. I stamped the large magnolia image from the Good Morning Magnolia stamp set onto Whisper White card using Memento Tuxedo Black ink.
  I coloured the image using Petal Pink and Mossy Meadow Stampin’ Blends and then cut it out using the co-ordinating Magnolia Memory Dies. The image is attached to the left hand side of the card front. I stamped the same image once more onto Whisper White card using Memento Tuxedo Black Ink and coloured the central part of the flower only using Petal Pink and Light Daffodil Delight Stampin’ Blends. I cut out the four coloured petals and attached them to large flower using dimensionals. I used Clear Wink of Stella to add some shimmer and shine to the flower petals. I tied a bow in a length of the same Sahara Sand ribbon and attached it to the flower stem using a Mini Glue Dot.
  I stamped “Happy Birthday” from the Beautiful Bouquet stamp set onto scrap Whisper White using Mossy Meadow ink. I cut out the greeting using the Layering Ovals Framelits Dies and attached it to a Mossy Meadow scalloped oval cut using the same dies. The greeting is attached to the card front.
To decorate the inside of the card, I stamped the small magnolia image from the Good Morning Magnolia stamp set onto the lower left hand corner of Whisper White card using Memento Tuxedo Black ink. The image is coloured using Petal Pink and Mossy Meadow Stampin’ Blends. I also added some Clear Wink of Stella to the flower petals,
I really love how this card turned out and so did my friend.
Bye for now,
Kris
Product used:


Floral Birthday

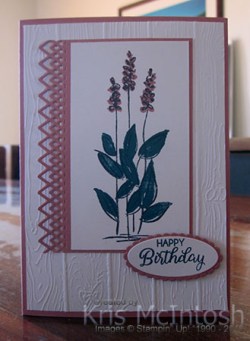
The card I am sharing today was made for a friend who celebrated her birthday recently. I decided to use the Soft Spring stamp set which is a Hostess Set in the upcoming Annual Catalogue. I teamed the stamp set with the retiring Brights 6″ x 6″ Designer Series Paper. I cut a strip of Gray Granite card using the scalloped border die from the Be Mine Framelits Dies and attached it behind one long edge of a piece of Gorgeous Grape paper from the Brights 6” x6” Designer Series Paper. The panel is attached to the left hand side of Whisper White card and then scored and folded Gray Granite card. I cut Whisper White card using the Rectangle Stitched Framelits Dies and stamped the greeting from the Perennial Birthday stamp set onto the lower right hand corner using Gorgeous Grape ink. I stamped the leaf outline from the Soft Spring stamp set using Gray Granite ink. I stamped the flower fill image using Gorgeous Grape ink and the leaf fill image using Granny Apple Green ink.
  I cut Gray Granite card using the Rectangle Stitched Framelits dies and attached the stamped Whisper White card on top. The image panel is attached to the card front using dimensionals.
To decorate the inside of the card, I cut a narrow strip of Gray Granite card using the scalloped edge die from the Be Mine Framelits Dies. The scalloped edge piece is attached behind one long edge of a piece of the same Gorgeous Grape Brights 6” x 6” Designer Series Paper. The whole panel is attached to the bottom of Whisper White card.
This is truly a lovely stamp set and one that I know I will be using many times. I am getting really excited for the launch of the new Annual Catalogue, aren’t you? Only a few days now. Yay.
I still don’t have my computer back so I apologise if this post is not formatted as it should be.
Bye for now,
Kris
Product Used:


Did You Know
 that Lovely As A Tree is retiring with this catalogue. I know this set has been around since I joined Stampin’ Up! in 2007 and I am sure long before that. However, all good things must come to an end and so this stamp set will no longer be available for purchase. It is a great all round stamp set and today I am going to share four cards I made using this set. The first one uses Garden Green and Very Vanilla along with Wood Textures Designer Series Paper and a greeting from the Piece of Cake stamp set and the Softly Falling Embossing Folder.
 I used a Soft Sea Foam Stampin’ Writ Markers to ink the leaves on the tree and then used Old Olive, Garden Green and Shaded Spruce Stampin’ Write Markers to lightly tap over the image to add some depth of colour. I used the Early Espresso Stampin’ Write Markers to ink the tree trunk. I cut out the image using the Layering Circle Framelits Dies.
The second card uses Early Espresso and Very Vanilla card and the Wood Textures Designer Series Paper.and the Softly Falling Embossing Folder. I inked the leaves on the tree using an Old Olive Stampin’ Write Markers and the trunk using an Early Espresso Stampin’ Write Markers. The image is cut out using the Rectangle Stitched Framelits Dies.
The third card uses Mossy Meadow and Very Vanilla card, Wood Textures Designer Series Paper, Softly Falling Embossing Folder and a greeting from the Colourful Seasons.Stamp set. The inks used are Mossy Meadow and Soft Suede.  The image is cut out using the Rectangle Stitched Framelits Dies.
Just to show you some of this stamp sets versatility the last card is a Christmas card. I used Cherry Cobbler and Very Vanilla card, Wood Textures Designer Series Paper and a greeting from stamp set. I stamped the trees using Garden Green ink and the greeting from the Itty Bitty Greetings stamp set using Cherry Cobbler ink. The image is cut out the image using the Layering Ovals Framelits Dies. I added Versamark ink all over the image and used my retired Heat and Stick powder mixed with Dazzling Details. Once heat set I attached it to a scalloped oval and the card
These are just a few quick and simple ideas for using this stamp set. I believe it is so popular that it has sold out, so unfortunately if you haven’t placed an order you may well have missed out on this one, however I couldn’t let it retire without celebrating it one last time.
Bye for now,
Kris
Product Used:


Yellow and Blue

This colour combination has to be one of my very favourites. The paper is the Happiness Blooms Designer Series Paper and I love the design. You will also be happy to know that I now used all of this Designer Series Papeer.  Todays cards have several different designs but all using the same basic product – Daisy Delight stamp set, Daisy Punch, Perennial Birthday stamp set and the Daffodil Delight Ribbon.
  I have also used some Clear Faceted Gems and the Layering Ovals Framelits Dies. The inks used are Daffodil Delight, Old Olive and Night of Navy. The card used is Night of Navy and Daffodil Delight.
I’m not going to go into any detail about how these cards were created as they are pretty simple and easy to recreate. The insides of the cards are decorated with more of the same Designer Series paper and ribbon on Whisper White card.
I hope you enjoy.
Bye for now,
Kris
Product Used:


More Happiness Blooms
Today’s cards are all created in the same manner but each one uses a different pattern from the Happiness Blooms Designer Series paper. I embossed the right hand side of Whisper White card using one of the folders from the Petal Pair Embossing Folders. Unfortunately this pair of embossing folders is retiring with this Annual Catalogue. I know that I will miss them, especially this folder. I attached the Designer Series Paper to the left hand side and wrapped the edge of the Designer Series Paper with the Gold Metallic Edge Ribbon.  The Whisper White panel is attached to scored and folded Lovely Lipstick card. I stamped the greeting from the Colourful Seasons stamp set using Lovely Lipstick ink and cut it out using the Layering Circles Framelits Dies.
 I attached the greeting to a Lovely Lipstick scalloped oval cut using the same dies and then the card front. The inside of the card is decorated by attaching a piece of the same Designer Series Paper across the bottom of Whisper White card.
I love that this card gave me the opportunity to use one of the patterns in this Designer Series Paper which I found a little busy and didn’t quite know what to use it for. I created two more cards Calypso Coral card and Calypso Coral ink and one using Night of Navy card and Night of Navy ink.

I think they turned out great, don’t you?
Bye for now,
Kris
Product Used:


Computer Glitch
My posts may be a little hap hazard for the next week or so as my computer crashed on Thursday. I am waiting on the technicians to retrieve the files and photos and reload them to my new computer. I am hoping that they can retrieve everything, especially my photos. Anyway, as soon as I am up and running again I will share some projects using new product.
in the meantime if you want the Everything is Rosy product medley won’t be available after the 31st of this month. This medley is gorgeous and excellent value. Also if you haven’t ordered the So Shelli Paper Pumpkin kit which is available for purchase as a one-off opportunity from the 15th of this month while stocks last. The cards in this kit are truly gorgeous and the stamp set will be very useful on all sorts of projects in the future.
So until my computer is sorted……
Bye for now
Kris
Vibrant Birthday

I needed to make a birthday card for a friend recently and thought I would share it with you. I punched a narrow strip of Basic Black card using the Decorative Ribbon Border Punch and attached it behind one edge of a piece of Garden Impressions 6″ x 6″ Designer Series Paper. I attached the designer series paper to Whisper White card which is embossed using the Country Floral Dynamic Embossing Folder. The whole panel is attached to scored and folded Basic Black card. I cut an oval from Whisper White card using the Stitched Shapes Framelits Dies and stamped “‘happy birthday” from the Best Birds stamp set using Memento Tuxedo Black ink.  I stamped the vase outline from the Vibrant Vases stamp set onto Whisper White card using Memento Tuxedo Black ink and stamped the fill image over the top using Melon Mambo ink which I had stamped off once. I punched out the vase using the Vases Builder Punch and attached it to the stamped oval. I stamped the flower outline image onto scrap Whisper White card using Memento Tuxedo Black ink. I stamped the flower fill image using Melon Mambo ink and the leaf fill image using Shaded Spruce ink.
  I cut out the flower image and attached it to the oval over the top of the vase using Mini Dimensionals. I cut a scalloped oval from Basic Black card using the Layering Ovals Framelits and attached the stamped oval. The stamped panel is attached to the card front using dimensionals.
To decorate the inside of the card, I punched a narrow strip of Basic Black card using the Decorative Ribbon Border Punch and attached it behind one long edge of a narrow strip of Whisper White card which is embossed using the Country Floral Dynamic Embossing Folder. The panel is attached to the bottom of Whisper White card.
I really love how this card turned out. So bright and pretty, don’t you think? I also want to let you know that whilst you won’t find the Country Floral Dynamic Embossing Folder in my shop just now but it will be available for purchase once the new catalogue goes live in June. The Best Birds stamp set is also on the retiring list so if you don’t have this stamp set and you need it, don’t delay in placing your order because once the catalogue ends it will no longer be available.
Bye for now,
Product Used:


Enjoy Your Special Day

Today’s card is one that once more is using up some of my soon to be retired Happiness Blooms Designer Series Paper. I stamped the greeting from the Stitched All Around stamp set onto the lower right hand corner of Whisper White card using Calypso Coral ink. The Whisper White card is attached to scored and folded Calypso Coral card. I cut a square of the Happiness Blooms Designer Series Paper and attached it to a scalloped square cut from Calypso Coral card using the Layering Squares Framelits Dies. The Designer Series Paper panel is attached to the card front.  I stamped the large flower from the Bloom by Bloom stamp set onto scrap Whisper White card using Calypso Coral ink and cut it out. I stamped the single leaf from the Bloom by Bloom stamp set onto scrap Whisper White card three times using Call Me Clover ink.
 I cut out the leaves and attached them to the flower before attaching to the card front using dimensionals.
To decorate the inside of the card, I attached a narrow strip of the same Designer Series Paper to the bottom of Whisper White card.
You know when I start using my Designer Series paper, I wonder why it has taken me so long to use it. I am truly grateful to Kylie Bertucci and her #Loveitchopit Facebook Page for the inspiration to actually use the beautiful Designer Series Papers I have on hand.
I love how this card turned out and truly it was super simple to make. I’d love to know what you think.
Bye for now,
Kris
Product Used:


