Wedding Card

Today I am sharing a wedding card I made for my neighbours who got married on the weekend. This card gave me the opportunity to use a new set from the soon to be released 2019 Annual Catalogue. The first thing I did was to decorate the inside of a Thick Whisper White card base. I stamped the small magnolia flower from the Good Morning Magnolia stamp set using Versamark ink. I sprinkled the image with Copper Embossing Powder and heat set it. I cut the bottom edge of a piece of Whisper White card using the Magnolia die to give that gorgeous shape. Next I stamped the beautiful large magnolia flower image from the Good Morning Magnolia stamp set using Versamark ink.  I sprinkled the image with Copper Embossing Powder and heat set it. I stamped Congratulations from the Flourishing Phrases stamp set using Versamark ink, sprinkled it with Copper Embossing Powder and heat set it. I attached the Whisper White card to a piece of Copper Foil card, wrapped the panel with the Copper Ribbon and tied a knot. The whole piece is attached to the scored and folded Thick Whisper White card.
 I know it is a little hard to see how pretty this is and to see the actual colour but I think you get a better idea in the photo for the card and envelope. It really is very pretty and, I think, perfect for the occasion.
Of course for such a special occasion I had to decorate the envelope and so I stamped the small flower onto the lower left hand corner using Versamark ink and embossed it using Copper Embossing Powder.
I am truly in love with this gorgeous stamp set. I bet you can’t wait to see the new catalogue. If you don’t have a Stampin’ Up! demonstrator already, please contact me so that I can organise to get one to you.
Bye for now,
Kris
Product Used:


Something old,
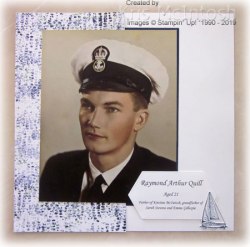
Something new! Today’s page shows off a photo of my Dad taken when he first joined the Navy at the age of 21. My Dad always wanted to go to sea and tried to join the Merchant Navy when he was 16 but his parents wouldn’t sign the papers for him to join. So he got an apprenticeship and as soon as he turned 21 he joined the Navy. I have used Whisper White 12″ x 12″ card as the base for my page. I attached a 6″ strip of Tranquil Textures Designer Series Paper to the left hand side . I attached the photo to Night of Navy card and slipped the Night of Navy card under the Designer Series Paper to offset the photo.  I printed my journaling onto Whisper White card using the Computer and used the Stitched Nested Labels to cut it out. I stamped the sailing ship image from the Sailing Home stamp set onto scrap Whisper White card using Night of Navy ink. The image is cut out using the co-ordinating Smooth Sailing Dies. The Stitched Nested Labels, the Sailing Home stamp set and the Smooth Sailing Dies will be available when the new catalogue launches in June.
This page turned out just the way I imagined it, with the photo being the main focus.
Bye for now,
Kris
Product Used:


Lacy Flowers

Today I am sharing some cards I created using the Garden Impressions Designer Series Paper and Delightfully Detailed Laser Cut Designer Series paper. I attached the pre-cut panel from the Delightfully Detailed Laser Cut Designer Series Paper to a piece of Garden Impressions Designer Series Paper and then scored and folded Early Espresso card.  I stamped the flower from the Flourishing Phrases stamp set twice onto Whisper White card using Mango Melody ink. I cut out one whole flower and the centre from the second flower. The small flower is attached to the centre of the large flower using dimensionals. I stamped the leaf image from the Flourishing Phrases stamp set onto Whisper White card using Granny Apple Green ink, cut them out and attached them to the back of the large flower.
  The flower is attached to a Whisper White circle cut using the Layering Circle Framelits Dies. The Whisper White circle is attached to an Early Espresso scalloped circle and then the card front. I added a large Clear Faceted Gem to the centre of the flower.
To decorate the inside of the card, I stamped the greeting from the Flourishing Phrases stamp set onto Whisper White card using Granny Apple Green ink. I attached a piece of the same Garden Impressions Designer Series Paper across the bottom of the stamped Whisper White card.
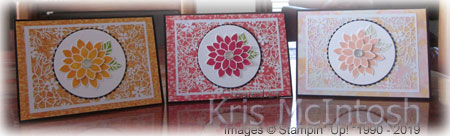 I liked the finished result and created two more cards using Melon Mambo ink and Petal Pink ink. They look pretty don’t they. I am kind of chuffed that I have created three cards today and used six pieces of designer series paper from my stash. Kind of like double dipping!
Bye for now,
Kris
Product Used:


Thinking of You
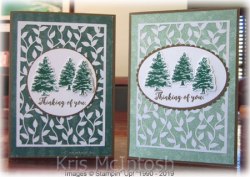
Here are another couple of card which gave me the opportunity to use two different designer series papers on the one card! I attached Delightfully Detailed Laser Cut Specialty Designer Series paper to Tranquil Textures Designer Series Paper and then Soft Suede card. I stamped the double tree image and the single tree image from the Rooted in Nature stamp set onto Whisper White card using Shaded Spruce ink.  The images were cut out using the co-ordinating Natures Roots Framelits Dies. I cut Whisper White card using the Layering Oval Framelits dies and stamped the greeting from the Colourful Seasons stamp set using Soft Suede ink.
 I attached the double tree image above the greeting and the single tree image using dimensionals. I attached the Whisper White oval to a Soft Suede scalloped oval and then the card front.
To decorate the inside of the card, I attached a piece of the same Tranquil Textures Designer Series Paper across the bottom of Whisper White card.
Simple cards, but I kind of like the masculine feel. What do you think?
Bye for now,
Product Used:


Daisy cards
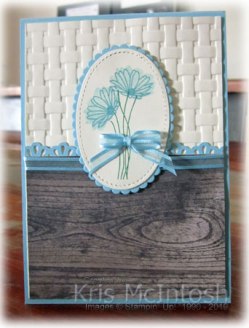
I was happy to see that the Daisy Delight stamp set will be in the next Annual Catalogue and that there will be a co-ordinating stamp set and another, slightly smaller, daisy punch. Woohoo! Anyway I am combining my determination to use up my Designer Series Paper with my passion to use stamp sets that have been a little neglected. This set of cards is one of my first results. I embossed Very Vanilla card using the Basket Weave Dynamic Embossing Folder. I punched a narrow strip of Balmy Blue card using the Decorative Ribbon Border Punch and attached it behind one long edge of Wood Textures Designer Series Paper.  I wrapped the top of the Designer Series paper with a piece of the Balmy Blue Organdy Ribbon (free during Sale-a-Bration) and attached the panel to the bottom of the embossed Very Vanilla card. The whole panel is attached to scored and folded Balmy Blue card. I stamped the stem image from the Daisy Delight stamp set using Call Me Clover ink. I stamped the solid image for the flower using Balmy Blue ink which I stamped onto scrap paper first.
  I stamped the detailed flower image over the top of the solid image using full strength Balmy Blue ink. I cut out the image using an oval from the Stitched Shapes Framelits Dies and attached it to a Balmy Blue scalloped oval cut using the Layering Ovals Dies. The image panel is attached to the card front using dimensionals. I tied a bow in the Balmy Blue Organdy Ribbon and attached it over the flower stems. To decorate the inside of the card, I punched a narrow strip of Balmy Blue card using the Decorative Ribbon Border Punch and attached it behind Very Vanilla card which I embossed using the Basket Weave Embossing Folder. The panel is attached to the bottom of Very Vanilla card.
I liked this card very much and decided to make additional cards using all the colours of the Organdy Ribbon. So I created four more cards in exactly the same way but using Lemon Lime Twist, Highland Heather, Daffodil Delight and Grapefruit Grove.
I love the way these cards turned. I think that the bright colours work perfectly with the Wood Textures Designer Series Paper.
As I said I am on a mission to use up my retiring Designer Series Paper, so you will see it featuring in lots of cards over the coming weeks.
I’d love to hear what you think? Bye for now,
Kris
Product Used:


Mother’s Day card

Wishing everyone a Happy Mother’s Day for last Sunday. Hope you all had a wonderful day. I was able to celebrate by having lunch with my Mum and my Dad. Today I am sharing the card I made for her. I embossed Whisper White card using the Layering Leaves Dynamic Embossing Folder and attached it to scored and folded Gorgeous Grape card. I cut Gorgeous Grape card using the Rectangle Stitched Framelits Dies and attached it to the right hand side of the embossed Whisper White card. I attached a strip of Gorgeous Grape, Brights 6″ x 6″ Designer Series paper to the left hand side, partially covering the Gorgeous Grape rectangle. I cut a rectangle from Whisper White card using the Rectangle Stitched Framelits Dies.  I stamped the long stem image from the Daisy Delight stamp set twice onto Whisper White rectangle using Granny Apple Green ink. I also stamped the shorter multi-stem image twice onto the rectangle. I stamped the flower onto the shorter stem image using Gorgeous Grape ink. The image panel is attached to the card front using dimensionals. I punched two daisies from Whisper White card using the Daisy Punch. I sponged the centre of the flowers using Gorgeous Grape ink and the rest of the petals using Highland Heather ink. I cut one flower into two sections, each containing four petals and the other flower into two sections, each containing three petals.
  I attached the two four section petals on top of each other before attaching the flower to the left hand stem on the card front using Mini glue Dots. I attached the two three section petals on top of each other before attaching them to the right hand stem on the card front, again using Mini Glue Dots. I punched Silver Glimmer Paper using the 1/2″ Circle punch and sponged Gorgeous Grape ink over them. I attached one circle to the centre of each of the flowers.
To decorate the inside of the card, I stamped “happy Mother’s Day” from the Strong and Beautiful stamp set onto Whisper White card using Gorgeous Grape ink. I attached two narrow strips of the same Brights 6″ x 6″ Designer Series paper across the bottom of the stamped card.
This card turned out so pretty and I love the way that you can colour the Glimmer Paper to match the colours in the card.
Once again Happy Mother’s Day to all the Mothers, Grandmothers and perhaps Great Grandmothers for last Sunday
Bye for now,
Kris
Product Used:


Memories and More

I don’t have a Memory Keeping page to share with you today but I do want to share some cards I made using the Happiness Blooms Memories and More cards and the co-ordinating Happiness Blooms Memories and More Cards and Envelopes. Did you know that the 6″ x 4″ and 3″ x 4″ cards in and of the Memories and More card packs fit the envelopes perfectly. Of course these cards are designed to co-ordinate specifically with the Happiness Blooms Memories and More cards so that you can create really beautiful cards quickly and easily using these co-ordinating products.  You can find Whisper White Memories and More cards and envelopes in the Annual Catalogue but the Happiness Blooms Memories and More Cards and envelopes are Night of Navy and the envelopes are decorated with Night of Navy stripes.
When creating your cards you can add the finishing touch by using the die cuts included with the Memories and More cards, or leave the card just the way they are. I have chosen not to add extra decorations to my cards and I think they turned out great. The cards shown in the first picture are 4″ x 6″ cards and the ones on the right are 3″ x 4″ cards. I really have to apologise for my Watermark being upside down in the photo of the 3″ x 4″ cards. Maybe this was done after a couple of glasses of Wine!
So if you have some of these cards in you stash and they are not making it into your Memory Keeping pages, this might inspire you to create some cards. I’d really love to hear what you think of these cards and maybe share some of the cards you have created using the Memories and More Cards.
Bye for now,
Kris
Product used:
Sorry the Happiness Blooms Memories and More cards have sold out.


Happy Birthday Noah

My youngest Grandson turns 12 today. Happy Birthday Noah, hope your day is amazing! I have been having fun making Bridge Fold cards and decided to create one for Noah. My card base is Thick Whisper White card 8″ x 10.5cm. I scored along the 8cm length at 1-1/4″ and 2-1/2″. I flipped the card and scored from the other end at 1-1/4″ and 2-1/2″. My bridge strip is 14cm x 1-1/4″. All of the Tranquil Textures Designer Series Paper pieces are 1″ wide. I cut Night of Navy card using the Well Written Framelits to create “happy” and “birthday”. I also cut Night of Navy card using some old non-Stampin’ Up! dies to create the “12”.  The greeting is attached to Whisper White card and then Night of Navy card. I attach this central panel before I attached the “bridge” section, just to make it easier to put together. I cut the large balloon from Night of Navy card using the Up and Away Thinlits Dies. The background pieces are cut from Crumb Cake and Fresh Fig card using the same dies. I stamped the smallest balloon and the medium balloon from the from the Lift Me Up stamp set onto Whisper White card using Fresh Fig ink and Night of Navy ink. The balloons are cut out using the co-ordinating Up and Way Thinlits. I also attached a panel to the back of the card, so that I could write my message. This was fun to create and I know that Noah loved it. Have you tried one of these, if you haven’t you really should. The best thing about this card is that it folds flat and will fit in a standard sized Australian envelope.
Bye for now,
Kris
Product Used:


Some Beautiful Examples
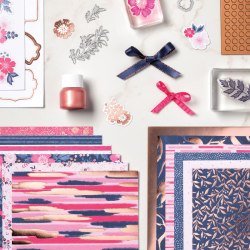
I thought I would pop in today and share some more amazing examples of the Everything is Rosy Product Medley which is only available till the 31st May or while stocks last. This Medley is amazing you get a stamp set, dies, designer series paper, foil paper, shimmer paint, ribbon, die cuts, the list goes on an on – and all for the amazing price of $139.00. I can’t believe all the gorgeous product that you get in this Bundle and it doesn’t come with instructions, so you are only limited by your imagination.
I thought I would share a couple more images that I have found on the net using this beautful Product Medley. I am not sure if you have been looking but some people have the most wonderful imaginations and have been sharing all sorts of projects, not just cards – boxes and the most amazing scrapbook album too. I hope you don’t wait too long to place your order because this Medley is selling fast. The Artisan Design Team for Stampin’ Up! shared some great projects. Here are a couple for you to enjoy.
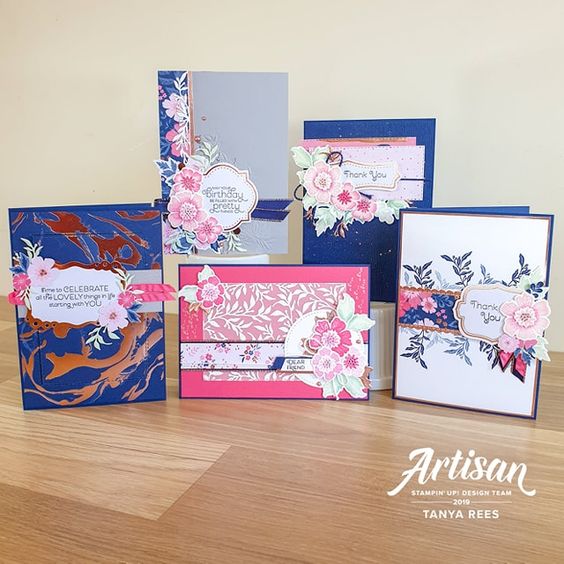
and what about this one
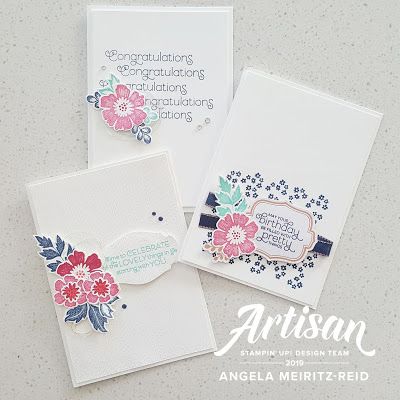
There are many, many more examples floating around on the net and you can also check out my Everything is Rosy Pinterest board where I have been madly pinning all the gorgoeus creations I can find. Thanks so much to Tanya Rees and Angela Meiritz-Reid for the inspiration in these two gorgeous examples.
As I said before this Medley is selling fast and no wonder, so don’t delay placing your order.
Bye for now,
Kris
Product Used:

Geared up 4 Ways

Today’s post is another one aimed at using up some of my Designer Series Paper. I wanted to cut some of my Classic Garage Designer Series Paper and used an old method that I have tried before. I cut four pieces of Designer Series Paper to the same size, then I cut each of the pieces into four more pieces. I swapped around the pieces until I had one piece for each design on each Basic Black layer. The panels are attached to scored and folded Basic Gray card. I stamped the car from the Geared Up Garage stamp set onto four different colours of cardstock (Crushed Curry, Real Red, Tranquil Tide and Pumpkin Pie) using Memento Tuxedo Black ink.  I cut out the cars using the co-ordinating Garage Gears Thinlits Dies. Each car is attached to a Very Vanilla oval cut using the Layering Ovals Framelits Dies.
  The Very Vanilla ovals are attached to Basic Black scalloped ovals cut using the same dies, and then the card front using dimensionals.
To decorate the inside of the cards, I cut out the large cog image from Basic Black card using the Garage Gears Thinlits Dies and attached them to Very Vanilla card. I stamped the greeting from the Geared Up Garage stamp set onto Very Vanilla card using Memento Tuxedo Black ink and punched them out using the Tailored Tag Punch. The greetings are attached over the Basic Black die cuts.
I am really happy with the way these cards turned out. All the different pieces of Designer Series Paper co-ordinate so perfectly no matter which way you use them. If you wished you could swap out some of the Designer Series Paper for coloured card which is embossed to add dimension.

And to be really kind you can download a PDF of the format I used to create these cards here. Sorry but the dimensions are in centimetres.
Just a reminder that this stamp set and co-ordinating dies will carry over to the next annual catalogue BUT the bundle will not. So if you want this stamp set and co-ordinating dies you need to purchase before the end of May to be able to save on the bundle purchase.
Bye for now,
Kris
Product Used:


