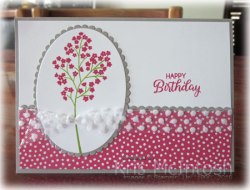
Happy Birthday
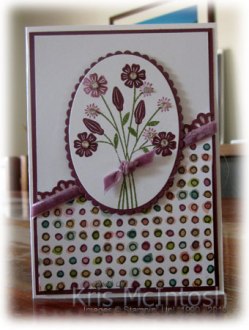
Today’s card is one that I made for Sharron who celebrated her 50th birthday last weekend. I hope you had an amazing day! I punched a narrow strip of Rich Razzleberry card using the Decorative Ribbon Border Punch and attached it behind a piece of the Share What You Love Designer Series Paper which is cut on an angle. The Designer Series Paper is attached to Whisper White card and Rich Razzleberry card before wrapping the top of the Designer Series paper using Rich Razzleberry 1/4″ Velvet Ribbon. The whole panels is attached to scored and folded Thick Whisper White card. I stamped the flower stem from the Beautiful Bouquet stamp set (this one is carrying over to the new catalogue) onto Whisper White card using Old Olive ink. I stamped various flowers from the Beautiful Bouquet stamp set onto the flower stem using Rich Razzleberry ink.  Some of the flowers were stamped off first to give a lighter impression. I cut out the image using one of the ovals from the Layering Ovals Framelits Dies and attached it to a Rich Razzleberry scalloped oval and then the card front using dimensionals. Lastly I added some Basic Rhinestones to the centres of some of the flowers.
I decorated the left hand side of the inside of the card by cutting the “happy” and “birthday” from Rich Razzleberry card using the Well Written Framelits Dies. I cut the “th” from birthday as well. The numbers are cut using some old dies from my stash.  The greeting is attached to Whisper White card before attaching the panel to the inside of the card. I decorated the right hand side by punching a narrow strip of Rich Razzleberry card using the Decorative Ribbon Border Punch. The punched piece is attached behind one long edge of a narrow strip of the Share What You Love Designer Series Paper. The designer series papeer is attached to Whisper White card before the whole panel is attached to the inside of the card.
I love how pretty this card turned out, don’t you? Once again I hope you had a lovely birthday Sharron and that you enjoyed the surprise your Mum organised.
Bye for now,
Kris
Product Used:


Summerhouse
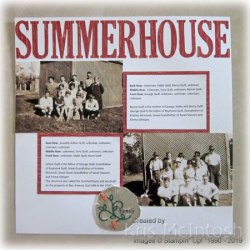
When I was a young girl growing up my Grandparents had a greenhouse next to the outdoor toilet (do you remember those?). Anyway that greenhouse was built during the early 1930’s when there wasn’t even a house. Apparently my grandparents and assorted relatives used to travel from Redfern to East Hills to have picnics in the Summerhouse. It’s amazing what you learn when you take the time to ask questions about photos that your parents have. These photos were taken on one of those picnics. I used Whisper White 12″ x 12″ card as the base for my page, which co-ordinates with the Natures Poem Designer Series Paper which I used to create the title using the Large Letters Framelits Dies. I also used the same Designer Series Paper as mats for the journaling which I created on my computer.  The journaling and the mats are cut used the Rectangle Stitched Framelits Dies. I printed the word family onto Whisper White card using my computer and stamped the image from the Rooted in Nature stamp set over the top using Sahara Sand ink. I cut out the image and then attached the filigree piece. This is cut from Shaded Spruce card using the Well Written Framelits Dies. I also cut the image from Grapefruit Grove to create the flowers. The image is attached to the page using dimensionals. I will let you in on a little secret, I do not permanently attach the journaling until I have checked it with my Dad because I find that sometimes, he might remember another name or give me a little more information to add.
I love creating these pages and guess what, it gives me another excuse to use my Designer Series Paper. My stash is gradually disappearing, slowly but surely.
Bye for now,
Kris
Product Used:


Another Forever Lovely card

This card uses the Forever Lovely stamp set and All My Love Designer Series paper, which I have to admit I am really loving. I am so happy that this stamp set will over from the Occasions Catalogue to the 2019 Annual Catalogue. I embossed the right hand side of Whisper White card using one of the Petal Pair Embossing Folders. Once embossed I attached the All My Love Designer Series Paper to the left hand side of the embossed card. The panel is attached to scored and folded Lovely Lipstick card.  I stamped the greeting from the Forever Lovely stamp set onto Whisper White card and cut it out using one of the Layering Circle Framelits Dies. The greeting is attached to a Lovely Lipstick scalloped circle cut using the same dies and then the card front.
 I stamped the large flower from the Forever Lovely stamp set onto scrap Whisper White card using Lovely Lipstick ink. I cut out the flower using the co-ordinating Lovely Flowers Edgelits Dies. I also cut the leaves from Soft Sea Foam card using one of these same dies. I attached the leaves to the back of the flower and then the greeting circle using dimensionals.
To decorate the inside of the card, I attached a piece of the same Designer Series Paper across the bottom of Whisper White card.
This is a relatively simple card but I do love it’s style. What about you?
Bye for now,
Kris
Product Used:


Everything is Rosy
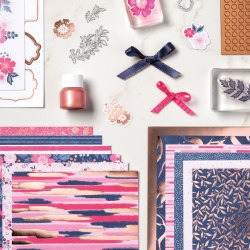
Yesterday Stampin’ Up! released the very gorgeous Everything is Rosy product medley. This product medley is only available from the 1st to the 31st May while stocks last. Considering the number of products that have far exceeded expectation, I wouldn’t wait to order this. You can only purchase the products as a medley, not individually. So you can’t just purchase the stamp set or just the Designer Series Paper, which incidentally is absolutely gorgeous. Watch this video to see what’s included in this fabulous kit.
So what do you get –
- Everything Is Rosy Photopolymer Stamp Set—18 stamps; suggested blocks: a, b, c,
- Everything Is Rosy Dies—10 dies; largest die 2-7/8″ x 1″ (7.3 x 2.5 cm)
- 6″ x 6″ (15.2 x 15.2 CM) Designer Series Paper Stack—48 sheets; 8 each of 6 double-sided designs
- 6″ x 6″ (15.2 x 15.2 CM) rose gold foil paper—8 sheets
- Printed die cuts—2 sheets
- Rose gold die cuts—4 sheets; 2 each of 2 designs
- Rose gold adhesive backed mirror embellishments—60 embellishments; 1/4″ (6.4 mm)
- Melon Mambo 1/4″ (6.4 mm) Ruched Ribbon—10 yards (9.1 m)
- Night of Navy/Rose Gold 3/8″ (1 cm) Metallic –Edge Ribbon—10 yards (9.1 m)
- Rose Gold Shimmer Paint—1/2 oz. (15 ml)
 You do not get blocks in the medley but the suggested blocks to use are our A, B and C blocks. You also do not get any ink in the medley itself but I am sure that you will be able to use lots of inks you already have on hand. Given the colours of the ribbon, I would suggest that Night of Navy and Melon Mambo would be great inks to use with this kit.
This is the first time that a kit like this has ever been offered and even demonstrators can only order from 1st May to the 31st May. So to help out with ideas for both you and me I have created a pinterest board just for this medley. So please check it out.
The price for this kit in Australia is $139.00 which is absolutely amazing value for what is included.
Don’t forget, things seem to be selling out very quickly, so don’t delay in making your purchase.
Bye for now,
Kris

Floral Thinking of You

Thought I would share this card with you I made for a friend who is having a rather difficult time of it at the moment. I cut an oval in a piece of Garden Impressions 6″ x 6″ Designer Series paper using the Layering Ovals Framelits Dies. I stamped the vase outline image from the Vibrant Vases stamp set onto Whisper White card using Shaded Spruce ink. I stamped the fill image over the top using Soft Sea Foam ink. I stamped the flower outline using Memento Tuxedo Black ink and added the flower fill using Melon Mambo ink and the leaf fill using Shaded Spruce ink.  I cut out the floral image using an oval one size larger than the one I cut in the Designer Series paper. I attached the flower image behind the opening in the Designer Series Paper before attaching to scored and folded Shaded Spruce card.
 I cut an oval in Whisper White card the same size as the one on the Designer Series Paper and cut around it using a larger scalloped oval from the Layering Oval Framelits Dies. I attached the “frame” around the floral image on the card front.
To decorate the inside of the card, I stamped “thinking of you” from the Rooted in Nature stamp set onto Whisper White card using Shaded Spruce ink.
Bye for now,
Kris
Product Used:


Sending Healing Hugs
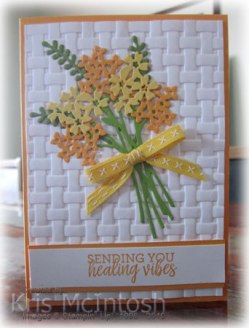
I needed to make a card for someone who is going through a rough time at the moment and decided to use the Bouquet Bunch Framelits. I embossed Whisper White card using the Basket Weave Dynamic Folder. I stamped the greeting from the Healing Hugs stamp set onto Whisper White card using Mango Melody ink. The greeting is attached to Mango Melody card and then the embossed Whisper White card. The whole panel is attached to scored and folded Mango Melody card.  I cut the leaf stem from Granny Apple Green card and the single leaves from Old Olive card. I arranged the single leaves amongst the flower stem onto the card front. I cut one of the flower dies three times from Mango Melody card and the other flower die twice from Daffodil Delight card.
  I arranged the flowers over the flower stem. To finish off I tied a bow in Daffodil Delight 1/4″ Double Stitched Ribbon.
To decorate the inside of the card, I attached a narrow strip of Mango Melody card behind one long edge of Whisper White card which is embossed using the Basket Weave Dynamic Embossing Folder.
You know, I only bought the Beautiful Bouquet stamp set and the co-ordinating Bouquet Bunch Framelits Dies because I loved all the gorgeous sentiments in the stamp set and if you bought the bundle you got a discount. Now that I have played a little more with this set, I am wondering why I haven’t used it more. I think it could easily become one of my favourites. I am happy to say that this stamp set is not retiring and will be available in the next Annual catalogue – YAY!
Bye for now,
Kris
Product Used:


Beautiful Girl

I have a stack of photos sitting on top of my printer, that I removed from old picture frames. Since we had moved a lot, I had frames from over the years and this photo has been sitting on top of that stack for a while. As you know I am on a mission to use up my DSP and when I was looking through the ones I hadn’t cut up yet, I found the Delightfully Detailed Laser Cut paper which I purchased when the catalogue first launched! Again this paper is so beautiful I didn’t quite know how to use it, but it seemed a perfect match for this photo. I attached the Delightfully Detailed Laser Cut paper to a 12″ x 12″ piece of Smoky Slate card. Then I simply attached the photo. My photo was a little damaged on to the lower right hand corner so that is where I decided to add embellishments. I created the title on my computer and printed it onto Whisper White card. The title is cut using the Rectangle Stitched Framelits Dies and attached to a Smoky Slate rectangle cut with the same dies. I stamped the flower from the Flourishing Phrases stamp set twice onto Whisper White card using Calypso Coral ink. I cut out one full flower and only the centre from the second flower. I attached the smaller flower to the full flower using dimensionals. I stamped the leaf from the Flourishing Phrases stamp set twice onto Whisper White card using Pear Pizzazz ink. I cut out the leaves and attached them to the back of the flower and then the card front. Lastly I add a Clear Faceted Gem to the centre of the flower (these will be in the new catalogue).
Since I have separated my retiring stamp sets from the ones that will be carrying over to the new catalogue, I have discovered a few favourites amongst the carrying over sets which have been neglected for a while and the Flourishing Phrases stamp set is one of those.
Again a simple page but one, I hope, inspires you to create pages to share your memories with your family and friends.
Bye for now,
Kris
Product Used:


Your Own Kind of Beautiful
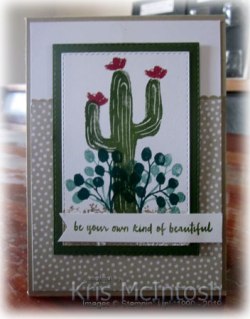
This is another card I created while having fun and using the Flowering Desert stamp set for the first time. To begin with I punched a narrow strip of Crumb Cake card using the Decorative Ribbon Border Punch and attached it behind one short edge of a piece of Crumb Cake Neutrals 6″ x 6″ Designer Series Paper. The Designer Series Paper is attached to Whisper White card and then scored and folded Crumb Cake card. I stamped the large cactus image onto Whisper White card using Mossy Meadow ink and added the smaller flower image using Tranquil Tide ink.  I did stamp the image twice each time without re-inking to create some variation in colour. The cactus flowers are stamped using Cherry Cobbler ink. I stamped the desert sand using the image from the High Tide stamp set and Crumb Cake ink. The image is cut out using one of the Rectangle Stitched Framelits Dies and attached to a Mossy Meadow rectangle cut using the same dies. The image panel is attached to the card front using dimensionals.
  I stamped the greeting from the Flowering Desert stamp set onto a strip of Whisper White card using Mossy Meadow ink. I punched one end using the Triple Banner Punch before attaching it to the card front over the bottom of the image panel.
To decorate the inside of the card, I punched another strip of Crumb Cake card using the Decorative Ribbon Border Punch and attached it behind one long edge of the same pattern of Neutrals 6″ x 6″ Designer Series Paper. The Designer Series paper panel is attached to the bottom of Whisper White card.
Well I hope you have enjoyed this card and the ones I shared earlier using the lovely stamp set. Have you used this one yet? If you have I’d love to hear what you think.
Bye for now,
Kris
Product Used:


Beautiful Bouquet #Avid Stamper
Today’s cards are the last of the Beautiful Bouquet cards I created using a simple image as the inspiration. For the first card, I cut a piece of Gray Granite card using the scalloped edge from the Be Mine Stitched Framelits Dies. I attached the scalloped edge behind one long edge of a piece of Melon Mambo Designer Series Paper from the Brights 6″ x6″ Designer Series Paper. The panel is attached to the bottom of Whisper White card. I stamped the stem image from the Beautiful Bouquet stamp set onto Whisper White card using Granny Apple Green ink.
  I stamped the flower image onto the stem using Melon Mambo ink. The image is cut out using an oval die from the Layering Ovals Framelits Dies and attached to a Gray Granite scalloped oval cut using the same dies. The image panel is attached to the card front before stamping the greeting from the Beautiful Bouquet stamp set using Melon Mambo ink. I tied a knot in the end of Whisper White 5/8″ Polka Dot Tulle, and then attached it across the card front, over the floral image and the top edge of the Designer Series Paper. The whole panel is attached to scored and folded Gray Granite card.
To decorate the inside of the card, I attached a narrow strip of the same Designer Series Paper across the bottom of Whisper White card.
I think these cards look so pretty and I love that I have created three sets of cards using the same focal image and yet they are all different. I would love to hear what you think. Do you think I have created cards to suite the #simple stamper, #casual stamper and today the #avid stamper?
Bye for now,
Kris
Product Used:


Beautiful Bouquet #Casual Stamper

You will remember the set of Note Cards that I shared with you yesterday, well today I am sharing the #Casual Stamper version. I stamped the stem image from the Beautiful Bouquet Stamp set onto Whisper White card using Granny Apple Green ink. I stamped the flowers and the greeting from the Beautiful Bouquet stamp set using Melon Mambo ink. I attached the stamped Whisper White card to Melon Mambo card and then to scored and folded Gray Granite card.
To complete the inside of the card, I stamped the greeting from the Perennial Birthday stamp set onto Whisper White card using Melon Mambo ink. So to complete the set, I created the same card using Melon Mambo, Daffodil Delight and Gorgeous Grape ink and cardstock.
 Don’t they look lovely and still relatively quick and easy to whip up at the last minute. I still have my #Avid Stamper version of this card to share so check back soon.
Bye for now,
Kris
Product Used:


