Cactus Three Ways

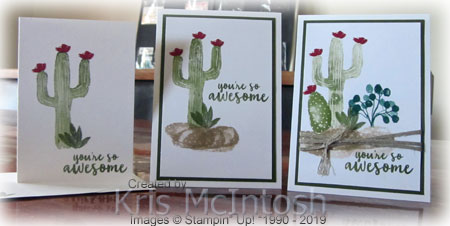
I recently attended a fund raiser and one of the things I received when I attended was the Flowering Desert stamp set. I have always admired this in the Occasions Catalogue but often wondered if I would use it very much. Well today I got it out to have a play and decided to do a Simple, Casual and Avid Stamper card. I began by using Whisper White Note Card. I can’t tell you how wonderful these are as a starting point when you want to use a new stamp set. I find that once I begin stamping, I start to think of all the different ways I can use the images. So I began by stamping the large Cactus plant from the Flowering Desert stamp set using Old Olive ink. I added the small leafy plant using Mossy Meadow ink. The flowers are stamped in Cherry Cobbler ink and the greeting in Mossy Meadow ink. I stamped the small leafy plant onto the front of the envelope. Simple but sweet.
For the next card, I stepped it up just a little. I stamped the large cactus image onto Whisper White card using Old Olive ink. I added the small leafy plant using Mossy Meadow ink. The flowers are again stamped in Cherry Cobbler and the greeting in Mossy Meadow ink.  I added a little “desert like sand” below the images using one of the other cactus images and Crumb Cake ink. The stamped panel is attached to Mossy Meadow card and then scored and folded Thick Whisper White card.
 To decorate the inside of the card, I stamped the small cactus plant in Old Olive, the leafy plant in Mossy Meadow ink, the flower in Cherry Cobbler ink and the ground using Crumb Cake ink. A little more detailed but still relatively simple.
 For the last card, I added a couple more images, one stamped in Tranquil Tide and the small cactus again using Mossy Meadow in. I wrapped the stamped Whisper White card with Braided Linen Trim and tied a knot.
  I attached the stamped panel to Mossy Meadow card and scored and folded Thick Whisper White card. I also frayed out the ends of the Braided Linen Trim.
The inside is decorated with some of the smaller cactus type images using Old Olive, Mossy Meadow and Tranquil Tide ink, with the ground using Crumb Cake ink.
You can see that each card has additional features and images from the Flowering Desert stamp set. Making more than one card at a time with a stamp set is a great way to get your creative juices flowing. I’d love to hear how you go about creating when using a stamp set for the first time.
 This was a fun stamp set to use and I have a few more ideas to share with you over the coming weeks.
Bye for now,
Kris
Product Used:


Pre-cut Kits

I had quite a few of the card kits for this card we made at Beachmere recently and thought that I would use them up, creating several slightly different layouts for the same product. You can see the original card here. The first variation has a piece of Crumb Cake card punched using the Decorative Ribbon Border Punch behind one long edge of the Gingham Gala 6″ x 6″ Designer Series paper.  I have wrapped the Designer Series paper with the Lemon Lime Twist Organza Ribbon and tied a knot before attached to the top of Whisper White card. I stamped the greeting from the Fable Friends stamp set onto the lower right hand corner of the Whisper White card using Crumb Cake ink.
  The rabbit image from the Fable Friends stamp set is stamped onto Whisper White card using Memento Tuxedo Black ink and coloured using Crumb Cake, Balmy Blue and Petal Pink Stampin’ Blends.
  The image is cut out using one of the Layering Ovals Framelits Dies and attached to a Crumb Cake scalloped oval cut using the same dies. I attached the image panel to the card front using dimensionals.
Since the first card was a portrait orientation, the Designer Series paper for the inside of the card was cut to fit the narrow width of the card. To make it work, I simply attached the punched Crumb Cake card behind one long edge and attached the panel to the left hand side of the Whisper White card.
The second card is also a landscape orientation with all the same ingredients as before. For the last card, I trimmed the Gingham Gala Designer Series Paper so that it would sit across the Whisper White card in the portrait orientation.
 I love how every one of these cards turned out. This bunny is just too cute and I am sure will be useful for many occasions other than Easter. What do you think?
Bye for now,
Kris
Product Used:


Finally Darwin

Today’s page shows a few photos from our arrival in Darwin. It is a very looooong way from Brisbane to Darwin and we had finally made it. The park where we stayed in at Howard Springs has an amazing pool which the kids and Ron had to try immediately. It also has a great water park so I am sure that we will survive the heat and humidity. One of its other attractions were a large population of peacocks who were not shy about showing off their magnificent tails. We had such a short drive today (compared to some of our days) and after a swim and some lunch we took a drive into Darwin. Sean, my son-in-law had lived in Darwin for about 9 months while he did some work on the new Goal. He took us all around and about and we had a lovely time. It was also nice to get home early and relax and just spend time together. To showcase the photos, I attached a piece of Best Route Designer Series Paper to a 12″ x 12″ Whisper White page. The title is cut from Blueberry Bushell card using the Large Letters Framelits Dies. I printed the journaling onto a 3″ x 4″ Best Routes Memories and More card which matched the Designer Series Paper perfectly.
I hope you are enjoying these pages as much as I am enjoying sharing them. My pages are usually very simple, although I can get a bit fancy on occasion, but I do believe that the most important thing is to get your pictures onto a page so that it can be shared and enjoyed by everyone. My grandchildren and I have a lovely time, looking at the photos and telling stories and reminding each other about the things we did and saw. I hope I am inpiring you to do the same.
Bye for now,
Kris
Product Used:


Up, Up and Away
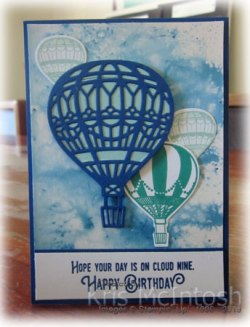
Today’s card features a product I haven’t used in a while – Brusho. I wanted to create a card using the balloons from the Lift Me Up stamp set. I sprinkled a small amount of the Prussian Blue Brusho onto Shimmer Paper and spritzed it with water. I used a paper towel to soak up some of the water and then left the paper to dry. Once it was dry I attached the Shimmer Paper to scored and folded Blueberry Bushell card. I stamped two of the small balloons from the Lift Me Up stamp set onto scrap Whisper White card using Pool Party ink and cut them out using the co-ordinating Up & Away Thinlits Dies. I attached one balloon to the top left corner of the Brusho piece and one to the right hand side just above the middle.  I stamped the large balloon from the Lift Me Up stamp set onto scrap Whisper White card using Bermuda Bay ink and cut it out using the co-ordinating Up and Away Thinlits Die. The large balloon is attached to the card front partially covering the bottom of the small balloon on the right hand side of the card front. I cut Blueberry Bushell card using the large detailed balloon from the Up and Away Thinlits Dies. I cut the backing pieces for the balloon from Pool Party card and attached them to the back of the detailed balloon die cut. The detailed balloon is attached to the card front using dimensionals.
  I stamped the greeting from the Lift Me Up stamp set onto Whisper White card using Blueberry Bushell ink. I attached a narrow strip of Blueberry Bushell card behind one long edge before attaching the greeting to the card front.
To decorate the inside of the card, I stamped the large balloon from the Lift Me Up stamp set onto the lower left hand corner of Whisper White card using Bermuda Bay ink. I covered the stamped balloon with a post-it-note mask and then stamped the small balloon twice using Pool Party ink so that the images would sit partially on top of the large balloon. I removed the post-it-note mask and attached the stamped panel to the inside of the card.
I’m pretty happy with the way this card turned out. I think I am going to have to play some more with my Brusho.
Bye for now,
Kris
Product Used:


Side Step Fold
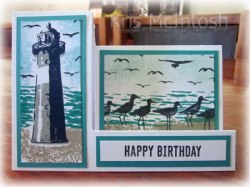
Today’s card is a fancy fold called a Side Step card. This is a relatively simple, but fun fold to create. I cut my card base from Thick Whisper White card. To decorate the long panel on the left, I stamped the lighthouse image from the High Tide stamp set onto Whisper White using Smoky Slate ink with Night of Navy ink over the top. I stamped the sand image from the same stamp set using Crumb Cake ink.  I masked the lighthouse image with a post-it-note and stamped the sea image from the High Tide stamp set over the top using Bermuda Bay ink. To create the sky, I used a sponge to dab Pool Party ink around the lighthouse. Lastly I stamped some of the bird image from the High Tide stamp set around the lighthouse image using Memento Tuxedo Black ink. The image panel is attached to Bermuda Bay card and then the card front. To decorate the right hand back panel, I stamped the sand image from the High Tide stamp set across the bottom of the Whisper White card using Crumb Cake ink.
 I stamped the sea image from the same stamp set across the middle of the Whisper White card using Bermuda Bay ink. I stamped the seagull image across the panel using Memento Tuxedo Black ink. I used a sponge to dab Pool Party ink across the top of the card to represent the sky before stamping the bird image across the panel. The stamped panel is attached to Bermuda Bay card and then the card front. I stamped “happy birthday” from the Itty Bitty Birthday stamp set onto Whisper White card using Memento Tuxedo Black ink and attached it to Bermuda Bay card before attaching it to the card front.
I love this card, every time I walk past it, it makes me smile.
Bye for now,
Kris
Product Used:


Two kinds of Lovely
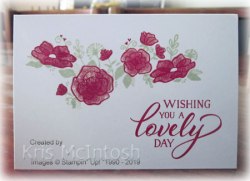
I was inspired by a card shared on Pinterest to get out my Forever Lovely stamp set and have a play. I have had this set out once before which I shared with you here but this time I was determined to create more than one card. I began by doing some simple stamping onto a Note Card. I stamped the floral image onto the Whisper White Note Card using Lovely Lipstick ink. I stamped the leaf image around the flowers using Soft Sea Foam ink.  The greeting from the Forever Lovely stamp set is stamped using Lovely Lipstick ink as well. A simple card but sometimes it takes simple to get your brain into action to start thinking about all the ways you can use the images in a stamp set.
My next card has a little bit more to it. I wanted to use some of the beautiful co-ordinating All My Love Designer Series Paper. I stamped the floral image from the Forever Lovely onto the upper part of Whisper White card using Lovely Lipstick ink and once more stamped the leaf image using Soft Sea Foam ink.  I attached a piece of the All My Love Designer Series Paper across the bottom of the card. I wrapped the top of the Designer Series Paper and tied a knot using the Lovely Lipstick ribbon from the All My Love Ribbon Combo Pack. I stamped the greeting using Lovely Lipstick ink.
  I wanted to create an additional layer over the flowers using the Lovely Flowers Edgelit Die which could be a little tricky, so I will tell you how I did it. I cut a piece of Whisper White card wider and longer than I needed and used the die to cut along one edge. Then I placed the die cut over the stamped image and trimmed away any extra card. There are probably more exact ways to do this but my way worked which is the important thing. Once I had trimmed the card, I attached the whole panel to scored and folded Lovely Lipstick card. To decorate the inside of the card I stamped across the bottom of Whisper White card, firstly the floral image using Lovely Lipstick ink and the leaf image using Soft Sea Foam ink.

So there you have it. I love that you can use the same product suite and create lots of variations. You can find all of the co-ordinating products on pages 5 and 6 of the Occasions Catalogue. We have just finished Sale-a-bration and you saw how quickly some of the products sold out, so I can’t emphasise enough that if you want anything from these limited time catalogues, you need to order them sooner rather than later.
Bye for now,
Kris
Product Used:


Happy Birthday Ava
Yesterday was my youngest Granddaughter’s birthday. I like to make something that is a little different for my family so for Ava I created a Z-Fold card. I have to apologise that just about all of the product on this card was only available during Sale-a-bration which finished yesterday. So I hope that you all put your orders in early because some of this product has been unavailable for a while. I can’t emphasise enough that when Stampin’ Up! says “While Stocks Last”, that is exactly what they mean.
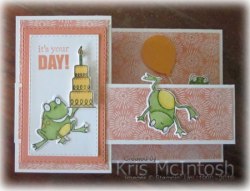
You can find lots of instructions on Pinterest and other places on the net to create this kind of card. I cut my card base and the co-ordinating strip of card from Thick Whisper White card. I cut pieces of the Painted Seasons Designer Series paper and attached them to the panels on the card base and the narrow strip of card. I stamped all three of the frogs from the So Hoppy Together stamp set , one of them four times, onto scrap Whisper White card. I coloured the frogs using the Granny Apple Green and Daffodil Delight Stampin’ Blends. I cut out the images using the co-ordinating Hop Around Framelits Dies. After they were cut out, I cut away the bike from four of the images. I cut Grapefruit Grove card using the Rectangle Stitched Framelits Dies and also Whisper White using a slightly smaller rectangle.  I stamped the greeting from the Itty Bitty Birthdays stamp set onto the top right hand corner of the Whisper White rectangle using Grapefruit Grove ink. I attached one frog to the base of the stamped Whisper White card. I stamped the birthday cake from the Amazing Life stamp set onto scrap Whisper White card using Memento Tuxedo Black ink and coloured the image using Mango Melody and Granny Apple Green Stampin’ Blends. I cut out the cake image and attached it to the Whisper White rectangle using Mini Dimensionals. I wanted it to look like the frog is carrying the cake. I attached the four images of the frog that is now not sitting on a bike so that it looks like he is turning a somersault. I punched out a balloon from Mango Melody card using the Balloon Bouquet Punch and attached a piece of Whisper White Bakers Twine behind it using Mini Dimensionals.
 I attached the last frog over the small flap on the right and side making sure that the end of the twine is attached behind his outstretched hand. I cut Whisper White card using the second largest of the rectangles from the Rectangle Stitched Framelits. I stamped Wishes from the More than Words stamp set using Grapefruit Grove onto the top right hand corner. I added the detail to the wishes using Crumb Cake ink. I also stamped “birthday” from the same stamp set using Crumb Cake ink. The Whisper White rectangle is attached to a Grapefruit Grove rectangle cut using the largest die from the Rectangle Stitched Framelits Dies. The panel is attached to the back of the card to give me somewhere to write my message.
Wishing you a Happy Birthday for yesterday Ava , hope your day was amazing!
Bye for now,
Kris
Product Used:


Batchelor
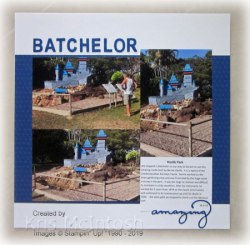
Batchelor is a small town just outside Litchfield National Park in the Northern Territory. We noticed what we thought was a giant doll’s house on our way in to Litchfield and decided to stop and have a look on our way out. We were surprised to find an exact replica of the Czechoslovakian Karlstejn Castle. It was built by Bernie Havlik who worked on the garden maintenance crew in Batchelor for a few years and was always frustrated by the large stone outcrop in this park. After he retired he set to work building the castle. It took five years from 1978 to 1983 to complete the castle and he continued to maintain it up until his death in 1990. It is truly a fabulous structure and certainly worth a look if you are ever up that way. To showcase these memories I began with a 12″ x 12″ Whisper White page and attached a piece of Best Route Designer Series paper across the middle. I attached my photos and the journaling card which I created on my computer and printed onto Whisper White card. I cut the title from Blueberry Bushell card using the retired Little Letters Thinlits Dies and attached it across the top left hand side of the page. I also cut Blueberry Bushell card using the Celebrate You Thinlits Dies. Again, as is my style, a very simple page, but one that will always make me remember this amazing castle.
Bye for now,
Kris
Product Used:

Same but Different

I cased today’s card from Carolyn King and after I created it, I decided to do a little upgrade. Soo, the first card has a piece of Needlepoint Nook Designer Series Paper attached to Poppy Parade card. The whole panel is attached to scored and folded Thick Whisper White card. I cut Whisper White card using one of the Rectangle Stitched Framelits Dies and stamped the greeting from the Needle and Thread stamp set using Poppy Parade ink before attaching it to the card front. I cut the banner from Blushing Bride card using the Needlepoint Elements Framelits Dies and attached it to the Whisper White rectangle. I stamped the double leaf image from the Needle and Thread stamp set onto Whisper White card using Old Olive ink and cut it out using the co-ordinating Needlepoint Elements Framelits Die. The leaf image is attached over the Blushing Bride banner. I stamped the large flower onto scrap Whisper White card using Blushing Bride ink, cut it out using the co-ordinating Needlepoint Elements Framelits Die and attached it over the leaf image using a couple of dimensionals.
 I stamped the small flower onto scrap Whisper White card using Poppy Parade ink, cut it out using the co-ordinating die and attached it to the centre of the large flower using a couple of dimensionals. I cut the open leaf image twice from Old Olive card using the Needlepoint Elements Framelits Die. The leaves are attached over the stamped leaf and under the large flower using Multipurpose Glue.
 Lastly I stamped the small butterfly from the Needle and Thread stamp set onto scrap Whisper White card and used the Butterfly Duet Punch to punch it out. I attached the butterfly to the card front using a Mini Glue Dot in the centre and 1/2 Mini Dimensional under each wing.
To decorate the inside of the card, I stamped the large flower onto the lower left hand corner using Poppy Parade ink. I stamped the double leaf image around the flower using Old Olive ink.
 I was pretty pleased with the end result for this card, so a big thank you to Carolyn King for the inspiration. However, I decided to recreate the card once more with a couple of small extras. This time I used the die in the Needlepoint Elements Framelits Dies to decorate the Poppy Parade card and I did use a different paper from the Needlepoint Nook Designer Series Paper. The rest of the card is exactly the same, except for the addition of one of the Needlepoint Nook Mini Buttons to the centre of the small Poppy Parade flower.

I really love the way the Poppy Parade card makes the Needlepoint Nook Designer Series Paper pop off the page, don’t you? Let me know what you think.
Bye for now,
Kris
Product Used:


Easter Greetings

Today I am sharing a card we made last week at Beachmere. The ladies all loved this and I did too. How can you not love this cute little rabbit? I punched Crumb Cake card using the Decorative Ribbon Border Punch and attached it behind a piece of Lemon Lime Twist Gingham Gala 6″ x 6″ Designer Series Paper. I wrapped the bottom of the panel using the Lemon Lime Twist Organdy Ribbon and tied a bow. (This ribbon was available Free with a qualifying order during Sale-a-bration but has already sold out.) I stamped the greeting from the Fable Friends stamp set onto the lower right hand corner of Whisper White card using Crumb Cake ink.  The Designer Series Paper panel is attached to the left hand side of the stamped Whisper White card before attaching the whole piece to scored and folded Crumb Cake card. I stamped the rabbit from Fable Friends onto Whisper White card using Memento Tuxedo Black ink. I coloured the image using Crumb Cake, Balmy Blue and Petal Pink Stampin’ Blends.
  I cut out the image using one of the Layering Ovals Framelits Dies and attached it to a Crumb Cake scalloped oval cut using the same dies. The image is attached to the card front using dimensionals.
To decorate the inside of the card, I punched a strip of Crumb Cake card using the Decorative Ribbon Border Punch and attached it behind one long edge of a narrow strip of the Lemon Lime Twist Gingham Gala 6″ x 6″ Designer Series Paper. The panel is attached to the bottom of Whisper White card.
I love the pop of brightness that the Lemon Lime Twist Designer Series Paper gives to this card. I think someone special will have to receive this gorgeous card.
Bye for now,
Kris
Product Used:


