Folding Get Well Soon

I have been playing around with fancy folds lately and I thought I would share with you my latest version of a Bridge Fold card. You will laugh at my dimensions but I often make cards using both inches and centimetres! I cut my card base from Thick Whisper White card to measure 8″ x 10.5cm. This will mean my card will fit in a standard envelope. I scored along the 8″ length at 1-1/4″, 2-1/5″, 5-1/2″ and 6-3/4″. I cut 14cm x 1-1/4″ piece to create the bridge. I attached pieces of Garden Impressions 6″ x6″ Designer Series Paper to each of the 1-1/4″ panels on the card base and also on the bridge piece. To decorate the centre of the card, I stamped “Get Well Soon” from the Healing Hugs stamp set onto Whisper White card 2-1/2″ x 9.5cm using Night of Navy ink. The stamped Whisper White card is attached to Night of Navy card and then to the large central panel. The bridge panel is attached to the two outside 1-1/4″ panels.  I cut a large circle from Whisper White card using the Layering Circle Framelits Dies and embossed it using the Subtle Dynamic Embossing Folder. I attached the embossed card to the left hand side of the card front. I stamped the flower from the Healing Hugs stamp set onto scrap Whisper White card using Mango Melody ink and cut it out by hand. I stamped the leaf image from the same stamp set onto scrap Whisper White card twice using Shaded Spruce ink and cut them out by hand. I attached the leaves to the back of the flower and then the whole piece to the embossed Whisper White card.
You can’t actually write a message onto the central panel unless you do it before you put your card together, however, a message can easily be written on the back of the central panel. I love how these cards come together and all you do is fold the left panel flat (or the right panel) and the card will go into your envelope.
You can find a million ideas and tutorials for these cards on Pinterest, however, my inspiration came from a post by Song of My Heart Stampers.
Bye for now,
Kris
Product Used:


Oh The Possibilities
Stampin’ Up! has been talking about sharing some new storage options for the new style ink pads since they were released and now they are finally (almost) here. From the 1st April you can purchase several options to create storage not only for your ink pads, markers and re-inkers but also your Stampin’ Blends and other assorted bits and pieces.
These pieces stack together and you can create custom storage to suit your desk or shelves or anywhere you like. I am really excited. I have the old style carousel for my ink pads but I find the new ones like to slide out whenever they can. The new storage will free up some desk space and add some options for the Spectrum Pads and other bits and pieces I like to have close by when I am crafting.
And if you aren’t excited enough now, just take a look at this short video and you will be.
You can download the PDF to get prices and start ordering on the 1st April. These items are not going away they will be featured in the next Annual Catalogue.
Happy Shopping!
Bye for now,
Kris
Welcome Baby

I recently purchased the Fable Friends stamp set after seeing so many gorgeous creations on Pinterest and Facebook. I am really glad I did, the images are so cute. For today’s card, I punched a strip of Sahara Sand card using the Decorative Ribbon Border Punch and attached it behind one long edge of a strip of Daffodil Delight Gingham Gala 6″ x6″ Designer Series Paper. I wrapped the top of the Designer Series paper with Daffodil Delight Organdy Ribbon (unfortunately this Sale-a-bration freebie has already sold out) and tied a knot. The panel is attached to Whisper White card and then scored and folded Sahara Sand card.  I stamped the image with the three ducks from the Fable Friends stamp set onto Whisper White card using Memento Tuxedo Black ink. The image is coloured using Daffodil Delight, Flirty Flamingo and Balmy Blue Stampin’ Blends. I cut out the image using one of the Rectangle Stitched Framelits Dies. The image is attached to a rectangle of Sahara Sand card cut using the same dies. The image panel is attached to the card front using dimensionals. I stamped “Welcome Baby” from the Special Celebrations stamp set onto Whisper White card using Sahara Sand ink and cut it out using one of the Rectangle Stitched Framelits Dies.
 The greeting is attached to a Sahara Sand rectangle cut using the same dies before being attached to the card front.
To decorate the inside of the card, I punched a strip of Sahara Sand card using the Decorative Ribbon Border Punch. The punched card is attached behind one long edge of a narrow strip of Daffodil Delight Gingham Gala 6″ x 6″ Designer Series Paper. The Designer Series paper panel is attached to the bottom of Whisper White card.
Aren’t these ducks just adorable and absolutely perfect for a baby card? I’d love to hear what you think.
Bye for now,
Kris
Product Used:


Try Stamping on Tuesday Sketch Challenge 400

Today’s card has been created using the sketch challenge at Try Stamping on Tuesday as inspiration. I embossed Whisper White card using the Country Floral Dynamic Embossing Folder and attached it to scored and folded Basic Black card. I took one of the card front pieces of Botanical Butterfly Designer Series Paper which I already had chopped and trimmed off two pieces of the front of the card. I rounded the corners of the pieces using the Envelope Punch Board. I attached the designer series paper to the embossed card using both sides of the paper. I stamped the greeting from the Beauty Abounds stamp set onto Whisper White card using Memento Tuxedo Black ink.  I also stamped one of the butterflies from the same stamp set using the same ink. To colour the butterfly, I stamped the small dotted bokeh image from the Beauty Abounds stamp set over the butterfly using Lemon Lime Twist ink. I rounded the corners of the Whisper White card using the Envelope Punch Board and attached it to Basic Black card which also has the corners rounded. The image panel is attached to the card front using dimensionals.
To decorate the inside of the card, I trimmed the piece of Designer Series paper left after cutting the pieces for the front. I attached a strip of Basic Black card behind one long edge of the Designer Series Paper before attaching to the bottom of Whisper White card.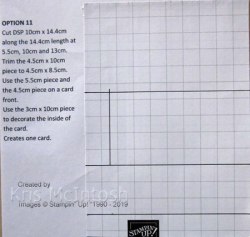
So to make it clear, I cut a piece of Designer Series paper 14.4cm x 10cm along the 14.4cm length at 5.5cm, 10cm and 13.5cm. I rounded the corners of the 5.5cm x 10cm piece of Designer Series Paper and this is the Black and White Butterfly piece on the card front. The 4.5cm x 10cm piece I trimmed to 4.5cm x 8.5cm and then rounded the corners. This is the Lemon Lime Twist piece of Designer Series Paper on the card front. The 3cm x 10cm piece was used on the inside of the card. There was a narrow strip of about 1.4cm which was wasted from the Designer Series paper piece. I truly love being able to grab a piece of Designer Series Paper which is cut to card front size and then play with it to suit the needs of my creation.
Edited to Add: Just found out this card was picked as one of the top 3 entries for this challenge at Try Stamping on Tuesday. I am feeling very honoured.
Bye for now,
Kris
Product Used:


Litchfield
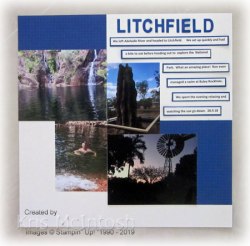
Here is another page from our holiday to Darwin. We spent one night at Litchfield National Park in the Northern Territory and had almost a full day of exploring. What a wonderful place. Although we were a little late in the season, we were lucky that the waterfalls were still flowing and there was plenty of swimming holes. I used Very Vanilla 12″ x 12″ and attached a couple of piece of the Best Route Designer Series Paper. I attached my photos and added a title cut from Blueberry Bushel card using the retired Little Letters Framelits Dies. I created my journaling on the computer and printed it onto Very Vanilla card. I cut the journaling into strips and attached them to Blueberry Bushel card before attaching to the card front. Again this is a very simple page but one that will always bring a smile to my face when I remember this beautiful place.
Bye for now,
Kris
Product Used:


#Love it Chop it
Do you know about Kylie Bertucci’s amazing facebook page Love it Chop it? If you don’t, I suggest you hop onto the page and have a look at Kylie’s videos to show you how to get the most out of your Designer Series Paper. In her last video she had shared how to create a one sheet wonder without a template by using each piece of card front sized DSP as a starting point and then cutting the pieces to suit your needs. I was away recently having a wonderful time in Toowoomba, (Queensland, Australia) and took some Designer Series Paper with me to cut.  I obviously didn’t take enough because I had some spare time on my hands and decided to create a few templates to cut the Designer Series Paper in a few different ways. I have decided to draw myself a template and write a few simple instructions to get started using up my Designer Series Paper. For the most part, I am going to create a card front using my diagrams and keep them in one of 6″ x8″ Memories and More Albums.
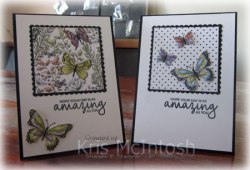
 I used one of Kylie’s ideas for this first card. I cut the Botanical Butterfly Designer Series Paper into card front pieces and then trimmed off 7cm. I cut the 7cm strip at 7cm and 14cm to create two squares. I attached each square to a Basic Black scalloped square cut using the Layering Squares Framelits Dies and then a piece of Whisper White card, I used both sides of the Designer Series paper. I stamped the greeting from the Incredible Like You stamp set using Memento Tuxedo Black ink.
  For the card with the polka dot Designer Series Paper, I attached butterflies which I had punched from one of the other patterns in the Botanical Butterfly Designer Series Paper using the Butterfly Duet Punch. I stamped the antennae using the image from the Butterfly Gala stamp set onto the butterflies once they were attached using Memento Tuxedo Black ink. For the butterfly patterned piece of Designer Series Paper, I attached one of the punched butterflies to the bottom left hand corner of the card front.
  The card bases are created using Basic Black card. To decorate the inside of the card, I cut the remaining 3cm strip in half and attached each piece to the bottom of Whisper White card, using the two different sides of the paper (I did have to waste just a little paper). I attached a butterfly just above each panel and stamped the antennae as before.
I am really excited about this way of using my Designer Series Paper and can’t recommend highly enough that you check out Kylie’s page. I know you will be just as excited as I am.
Bye for now,
Kris
Product Used:


Thanks For Everything

I recently found myself needing some Thank You cards and decided to use the Painted Seasons Product Suite. To create the card, I embossed Whisper White card using the Country Floral Dynamic Embossing Folder which is one of the products you can have for FREE with a qualifying order during Sale-a-Bration. I attached a narrow strip of Painted Seasons Designer Series paper to the bottom of the embossed card, wrapped the top using the 5/8″ Whisper White Polka Dot Tulle Ribbon and tied a knot. The embossed panel is attached to scored and folded Pool Party card.  I stamped “For Everything” from the Well Written stamp set using Early Espresso ink and cut it out using one of the circles from the Stitched Shapes Framelits Dies. I cut “thanks” from Early Espresso card using the Well Written Thinlits Dies. I attached “thanks” to the circle just above the stamped greeting. I stamped the flower from the Painted Autumn stamp set onto scrap Whisper White card using Pool Party ink and cut it out using the co-ordinating Four Seasons Thinlits Dies. I stamped the leaves from the Painted Autumn stamp set onto scrap Whisper White card using Lemon Lime Twist ink.
 I attached the leaves to the back of the flower and then to the Whisper White circle. I cut a scalloped circle from Early Espresso card using a die from the Layering Circle Framelits Dies. The greeting panel is attached to the scalloped circle and then the card front using dimensionals.
To decorate the inside of the card, I stamped the leaves from the Painted Autumn stamp set onto the lower left hand corner of Whisper White card. I stamped the flower onto scrap Whisper White card using Pool Party ink and cut it out using the co-ordinating Four Seasons Framelits Dies. The die cut flower is attached over the stamped leaves.
The second card is embossed using the same Country Floral Dynamic Embossing Folder and a different piece of the Painted Autumn Designer Series Paper and the5/8″ Whisper White Polka Dot Tulle Ribbon  This time I decorated the greeting circle using the “pinecone” stamp from the Painted Autumn stamp set.
To decorate the inside of the card, I stamped the “pinecone” stamp twice onto the lower left hand corner of Whisper White card. I stamped the “pinecone” image onto scrap Whisper White card using Early Espresso ink and cut it out using the co-ordinating Four Seasons Thinlits Dies. The die cut image is attached over the stamped images.
The third card is embossed using the same Country Floral Dynamic Embossing Folder with a different piece of Painted Autumn Designer Series Paper and the 5/8″ Whisper White Polka Dot Tulle Ribbon. The flower is stamped onto scrap Whisper White card using Lovely Lipstick ink and cut it out using the co-ordinating Four Seasons Framelits Die.  I also stamped the leaf from the Painted Autumn stamp set onto scrap Whisper White card using Call Me Clover ink. The leaf is cut out using the co-ordinating Four Seasons Framelits Die.
To decorate the inside of the card, I stamped the leaf from the Painted Autumn stamp set onto the lower corner of Whisper White card using Call Me Clover ink. I stamped the flower onto scrap paper using Lovely Lipstick ink and cut it out using the co-ordinating Four Seasons Framelits Die. The flower is attached over the ends of the leaves.
I am really happy with the way the cards turned out. I wanted them to be special because the recipients are special people. If you love these cards, then don’t delay placing your qualifying order to be eligible for these gorgeous FREE products. During this month only you can earn the Painted Autumn Designer Series Paper as a stand alone product as well as part of the bundle with the Painted Seasons stamp set. Stampin’ Up! has also let us know that the beautiful Country Floral Dynamic Embossing Folder will be included in the next Annual Catalogue. Yay!
Bye for now,
Kris
Product Used:


Happy Birthday Sean
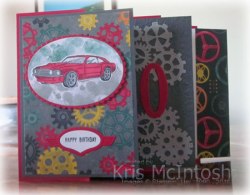
My son-in-law Sean recently celebrated a milestone birthday for which I had to create a special card. I was inspired by this card on Pinterest by Rose Marie. I did change the dimensions a little bit to accommodate my ideas. I created the card base from Real Red card which I scored following Rose Marie’s instructions. The front panel has a piece of Classic Garage 6″ x 6″ Designer Series paper attached to Basic Gray card.  I stamped “happy birthday” from the Itty Bitty Greetings stamp set onto Whisper White card using Memento Tuxedo Black ink. I cut out the greeting using the die from the Garage Gears Thinlits Dies and attached it inside a frame cut from Real Red card using the same die. I cut an oval from Whisper White card using one of the Layering Ovals Framelits Dies and stamped across the bottom using the “smoke” image from the Geared Up Garage stamp set and Smoky Slate ink. I stamped the same image across the top of the oval using Tranquil Tide ink which I stamped onto scrap paper twice before stamping onto the oval.
  I stamped the car image from the Geared Up Garage stamp set onto Whisper White card using Memento Tuxedo Black ink and coloured it using Real Red and Smoky Slate Stampin’ Blends. I cut out the image and attached it to the stamped oval. I cut a scalloped oval from Real Red card using the Layering Ovals Framelits Dies and attached the stamped oval. The image panel is attached to the card front using dimensionals.
To decorate the second panel I embossed Basic Gray card using the large cog wheel die from the Garage Gears Thinlits Dies and the Embossing Mats. I cut Smoky Slate card twice using the same die. The die cuts are attached over the embossed card. I cut the No. 40 from Real Red card using the retired Large Numbers Framelits Dies and attached them over the die cuts.
To decorate the last panel, I attached a strip of Classic Garage 6″ x 6″ Designer Series Paper to the right hand side of Whisper White card. This left somewhere for me to write a message.
Since I had altered the dimensions of the panels somewhat I needed to create an envelope. I used Real Red 12″ x 12″ card and the Envelope Punch Board. I cut the letters from Whisper White card using the Large Letters Framelits Dies and attached them to the front of the envelope. I stamped the car image from the Geared Up Garage stamp set onto Whisper White card using Real Red ink and cut it out using the co-ordinating Garage Gears Thinlits Die. The car is attached to the lower right hand corner of the front of the envelope.
I am so happy with the way this card turned out, so thank you to Rose Marie for the inspiration.
Bye for now,
Kris
Product Used:


Same card three looks

Today’s cards feature the Lovely Lattice stamp set which is available FREE with a qualifying purchase during Sale-A-Bration (ends 31.3.19). For the first card, I stamped the large floral image from the Lovely Lattice stamp set onto the top left and the bottom right corners of Whisper White card using Memento Tuxedo Black ink. I coloured the flowers using Real Red, Shaded Spruce and Dark Daffodil Delight Stampin’ Blends.  The Whisper White panel is attached to scored and folded Smoky Slate card. I stamped the greeting from the Colourful Seasons stamp set onto Whisper White card using Smoky Slate ink.
  I cut out the greeting using one of the circles from the Layering Circles Framelits Dies before attaching to a Smoky Slate scalloped circle cut using the same dies. The greeting is attached to the card front using dimensionals.
  To decorate the inside of the card, I stamped the floral image from the Lovely Lattice stamp set onto the lower left hand corner of Whisper White card using Memento Tuxedo Black ink. The image is coloured using the same Stampin’ Blends.
The second card uses the same principal as the first but has an extra layer. I attached a smaller piece of Whisper White card onto the larger piece using repositional glue before stamping the floral image from the Lovely Lattice stamp set onto the upper left and lower right hand corners. This time I only coloured the image on the smaller piece of Whisper White card using the Real Red, Shaded Spruce and Dark Daffodil Delight Stampin’ Blends.
  The smaller piece of Whisper White card is attached to Smoky Slate card and then the other stamped piece of Whisper White card. the whole panel is attached to scored and folded Smoky Slate card. I stamped the same greeting from the Colourful Seasons stamp set onto Whisper White card using Smoky Slate ink.
  The greeting is cut out and attached to a Smoky Slate scalloped circle and then the card front using dimensionals. To decorate the inside of this card, I stamped the small flower from the Lovely Lattice stamp set onto the top right and bottom left corners of Whisper White card. The flowers are coloured using the Real Red, Shaded Spruce and Dark Daffodil Delight Stampin’ Blends.
For the third card, I changed it up a little by stamping the large floral image from the Lovely Lattice stamp set onto Whisper White card using Memento Tuxedo Black ink. I coloured the image using the Real Red, Shaded Spruce and Dark Daffodil Delight Stampin’ Blends. I cut out the image and attached it to the top left hand corner of Whisper White card before attaching the panel to scored and folded Smoky Slate card. I stamped the greeting from the Colourful Seasons stamp set onto Whisper White card using Smoky Slate ink. The image is cut out and attached to a Smoky Slate scalloped circle and then the card front using dimensionals. To decorate the inside of the card, I stamped the large floral image onto scrap Whisper White card using Memento Tuxedo Black ink. I coloured the largest flower using the Real Red, Shaded Spruce and Dark Daffodil Delight Stampin’ Blends, cut it out and attached it to the lower right hand corner of Whisper White card.
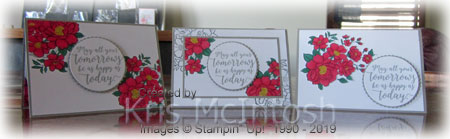
I love the way these cards turned, the colour combination really makes the images pop out from the white background, don’t you think?
Bye for now,
Kris
Product Used:


A Happy Day

Today’s page shows off a photo of my husband and I with my eldest granddaughter on her birthday last year. It isn’t the best photo of either myself or my husband but it is the only photo I had and I wanted to remember this special day. I attached pieces of the Botanical Butterfly Designer Series paper, which you can still earn for FREE with a qualifying order till the end of this month, to a 12″ x 12″ Whisper White page. I stamped the greeting from the Strong and Beautiful stamp set onto Whisper White card. I cut out the greeting using one of the Rectangle Stitched Framelits Dies.  I attached the greeting to a Basic Black rectangle also cut using the Rectangle Stitched Framelits Dies. I added a Basic Black mat to the photo and attached the photo and the greeting to the page. I wanted to make sure that the greeting panel was partially hidden behind the photo. I attached a butterfly which I had punched from the Botanical Butterfly Designer Series Paper using the Butterfly Duet Punch to the right hand corner of the greeting panel. I used a journaling pen to add the date.
This was truly a simple page to create but I think it is simply gorgeous. Do you? I’d love to hear what you think.
Bye for now,
Kris
Product Used:


