Beauty Abounds

Lori Gray posted a card onto the Demonstrator only Facebook page to which I susbscribe and I thought it was absolutely gorgeous, so I had to make one of my own. Lori’s blog is pretty new but I am sure you will find some great ideas there. Anyway, here is my version of Lori’s card. I stamped the large flowery image from the Beauty Abounds stamp set across the middle of Whisper White card using Memento Tuxedo Black ink. I stamped the large bokeh image from the same stamp set over the top using Daffodil Delight ink.  I attached the stamped card to Daffodil Delight card and then scored and folded Smoky Slate card. I used the smallest stitched circle from the Stitched Shapes Framelits Dies to cut Whisper White card. The Whisper White circle is attached to a Daffodil Delight scalloped circle cut using the Layering Circle Framelits Dies before attaching to the card front.
  I stamped the butterflies from the Butterfly Gala stamp set onto Whisper White card using Memento Tuxedo Black ink. I inked the fill images using the Pumpkin Pie/Daffodil Delight of my Spectrum Pad. (Please visit Patty Bennett’s blog to see how to ink your Spectrum Pad.) The butterflies were punched out using the Butterfly Duet Punch. I curled the butterfly wings on the larger butterfly using my bone folder and attached it to the centre of the Whisper White circle using a glue dot in the centre of the body and mini dimensionals under each wing. Once attached I stamped the antennae image using Memento Tuxedo Black ink.
To decorate the inside of the card, I stamped the flowering image down the left hand side of Whisper White card.  I gave the wings of the small butterfly some dimension using the bone folder and attached the butterfly using a glue dot in the centre of the body.
I love this card, it is just so pretty and so quick and easy to create. It got me thinking about Simple Stamping and I just had to create a note card to match. This time I stamped the large flowery image from the Beauty Abounds stamp set onto the left hand side of the front of a Whisper White note card using Memento Tuxedo Black ink. I stamped the large bokeh image from the same stamp set over the top using Daffodil Delight ink. I stamped the butterfly from the Beauty Abounds stamp set using Memento Tuxedo Black ink and then stamped the small bokeh image over the top using Daffodil Delight ink. To finish off I stamped the greeting from the Beauty Abounds stamp set using Memento Tuxedo Black ink. Of course I had to decorate the envelope as well.
Thank you Lori for the inspiration.
Bye for now,
Kris
Product Used:


One for the Boys

I am one of those card makers who would rather do a flowery female card than one designed for males. I have to work really hard to do them. Today I worked on using the Geared Up Garage stamp set and some of the co-ordinating Designer Series Paper. For the first card I stamped the car image from the Geared Up Garage stamp set oto the top of Whisper White card using Tranquil Tide ink. I stamped the “smoke” image from the same stamp set behind the car using Basic Gray ink which I had stamped off onto scrap paper first. I attached a narrow strip of basic black behind one edge of a piece of the Classic Garage 6″ x 6″ Designer Series Paper before attaching the panel to the bottom of the stamped card. I used the Triple Banner Punch to punch one short end of two small pieces of the same Designer Series Paper. These banners are attached to the left hand side of the card front.
  I stamped “Happy Birthday” from the Itty Bitty Birthdays stamp set onto Whisper White card using Tranquil Tide ink. I punched one short end of the Whisper White card using the Triple Banner Punch. The stamped card is attached to Basic Black card which also has one short end punched using the Triple Banner Punch.
  The banner is attached to the card front of the designer series paper.
To decorate the inside of the card, I attached a narrow strip of Basic Black card behind one long edge of a piece of the same Classic Garage Designer Series Paper. I attached the designer series paper panel to the bottom of Whisper White card. I stamped the greeting from the Itty Bitty Birthdays stamp set using Memento Tuxedo Black ink.
The second card uses the same layout but I stepped it up a bit. The large panel of Designer Series Paper is embossed using the Tin Tile Dynamic Embossing Folder. Instead of adding a strip of Basic Black card, I cut the Basic Black card using the border die from the Be Mine Stitched Framelits Dies. The car is stamped onto scrap Whisper White card, cut out using the Garage Gears Thinlits Dies and attached to the card front using dimensionals. I also cut the three cog die from Basic Black card and attached it to the card front.
To decorate the inside I once more cut the Basic Black strip with the border die from the Be Mine Stitched Framelits Dies. The Designer Series Paper is also embossed using the Tin Tile Dynamic Embossing Folder. I also cut the three individual cogs from Basic Black card using dies from the Garage Gears Thinlits Dies and attached them around the stamped greeting.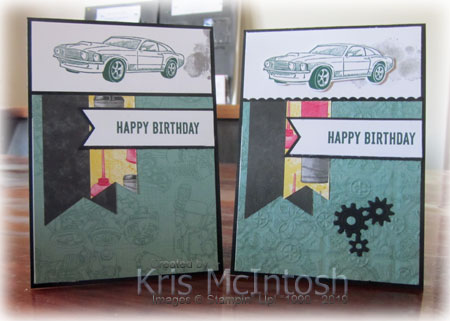
I think both cards turned out great but I think the second one is just a little bit more special. What about you? Which one do you like the best?
Bye for now,
Kris
Product Used:


Happy Birthday Butterflies

Today’s card was created for a friend who loves butterflies. I decided to create an easel card. If you do not know how to create one of these cards, you can see some directions here on Splitcoast Stampers. The base of the card is Basic Black and I attached a Whisper White panel which I embossed using the Lace Dynamic Embossing Folder. I stamped the greeting from the Picture Perfect Birthday stamp set onto Whisper White card using Memento Tuxedo Black ink. The greeting is cut out using one of the Rectangle Stitched Framelits Dies and attached to a Basic Black rectangle cut using the same dies.  The greeting is attached to the card front. I cut basic black using the multiple butterfly die from the Butterfly Beauty Thinlits Dies. I also cut a piece of Lovely Lipstick Foil card using the larger multiple butterfly die. This gorgeous foil card is Free with a qualifying order during Sale-a-Bration.
  I trimmed two of the butterflies from the multiple die and attached the Basic Black die on top of the Lovely Lipstick Foil butterfly. The butterflies are attached to the card front using dimensionals so that the butterflies will sit partially over the greeting panel.
To create the easel, I embossed a narrow strip of Whisper White card using the Lace Dynamic Embossing Folder. I punched a strip of Basic Black card using the Decorative Ribbon Border Punch. The Basic Black border is attached behind one long edge of the embossed card. The embossed panel is attached to the bottom of Whisper White card using dimensionals. The edge of the embossed panel is what holds the easel upright.
I think this card is so pretty.
Bye for now,
Kris
Product Used:
The Poppy Parade Foil can be viewed here. It is free with a qualifying order during Sale-A-Bration.


Seagulls By The Bay

By The Bay is one of the stamp sets that you can earn for FREE with a qualifying order during Sale-A-Bration. I love the images in this set but I have struggled with how to use them. So today I am sharing one of my creations. I stamped the seagull image from this stamp set across Whisper White card using Smoky Slate ink. I used my Balmy Blue and Crumb Cake Stampin’ Blends to colour everything, except the seagull images.  I punched two strips of Balmy Blue card using the Decorative Ribbon Border punch and attached one strip behind the top edge and one behind the bottom edge of the stamped and coloured card. I stamped the greeting from the By The Bay stamp set onto the lower right hand corner of Whisper White card using Smoky Slate ink. After stamping the Whisper White card, I attached the seagull panel.
 The Whisper White panel is attached to Balmy Blue card and then scored and folded Thick Whisper White card. To decorate the inside of the card, I stamped the seagull image across the width of the card using Smoky Slate ink.
I like the way the seagull’s stand out from the coloured background, but not as starkly as they would if I had stamped them in Memento Tuxedo Black ink. What do you think? Do you like it?
bye for now,
Kris


Cutta Cutta Caves
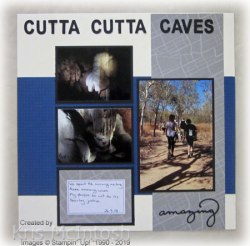
While we were staying in Katherine, we took the opportunity to tour the Cutta Cutta Caves. These caves are amazing and so beautiful. The formations are all crystalised and they are very sparkly, not that my photos show that! To get there you walk through some very unremarkable bushland to reach the stairs that descend into the cave. Apparently during WWII the soldiers from nearby camps would come down into the cave to be cool and relax – there wasn’t much else to do on your time off. This page is created on Very Vanilla 12″ x 12″ card. I attached one piece of Best Route Designer Series Paper across the page and one piece of the same Designer Series Paper down the right hand side. The photos are attached to Basic Black card and so is the Best Route 4″ x 3″ Memories and More card. I hand wrote my journaling this time (apparently you are supposed to do this to preserve it for your descendents – not sure mine is worth preserving!). The title is cut from Basic Black card using the retired Timeless Type Thinlits Dies. I used the Celebrate You Thinlits to cut out “amazing” from Basic Black card as well.
So again this is a very simple page and one that you could easily recreate using Designer Series Paper from your stash. I hope I have inspired you to get your photos out and begin Memory Keeping.
Bye for now,
Kris
Product Used:


Butterfly Birthday

The card I am sharing with you today was made following a video by Jan B. She calls this a “W” fold card. You can watch her video on You Tube here to learn how to create this card. The base of my card is made with Thick Whisper White card. The front is decorated with a Whisper White panel embossed using the Lace Dynamic Embossing Folder, which is attached to Basic Black card. Before you attach the Basic Black card to the card front you need to attach some ribbon so that the card can be tied closed. I used the Black/Silver 1/4″ Metallic Ribbon. I stamped the greeting from the Picture Perfect Birthday stamp set onto Whisper White card using Memento Tuxedo Black ink.  The greeting is cut out using one of the squares from the Layering Squares Framelits Dies. The greeting is attached to a Basic Black scalloped square cut using the same dies and then the front of the card using dimensionals. The butterflies from the Butterfly Gala stamp set are stamped onto Whisper White card using Memento Tuxedo Black ink. I inked the fill images for the butterflies using a Spectrum Pad which I had inked using the following colours – Poppy Parade, Pumpkin Pie, Daffodil Delight, Calypso Coral and Real Red. To see how to ink these Spectrum Pads and how to create colour combos then visit this post on Patty Bennet’s Blog.
  The fill image for the top section of the large butterfly is inked using the Poppy Parade/Pumpkin Pie sections of the Spectrum Pad. The fill image for the bottom section of the butterfly is inked using the Pumpkin Pie/Daffodil Delight sections of the Spectrum Pad. The fill image for the small butterflies is inked using the Poppy Parade/Pumpkin Pie sections of the Spectrum Pad. The butterflies are punched out using the Butterfly Duet Punch. I used my bone folder on the wings of the butterflies to add some dimension. The butterflies are attached to the card front using a Glue Dot in the centre of the body and dimensionals under the wings. After attaching the butterflies to the greeting panel, I stamped the antennae for the butterflies using Memento Tuxedo Black ink. The back of the card is decorated with Whisper White card embossed using the Lace Dynamic Embossing Folder which is attached to Basic Black card.
  Before attaching to the back of the card, I attached a piece of Black/Silver 1/4″ Metallic Ribbon to tie the card shut. The left panel of the inside of the card is decorated by embossing Whisper White card with the Lace Dynamic Embossing Folder which is attached to Basic Black card. The right panel on the inside of the card is decorated with un-embossed Whisper White card and Basic Black card. A 1″ wide panel of Basic Black card is scored and folded. The last section on each side is attached to the inside of the card.
  I cut four pieces of Whisper White card with a square from the Layering Squares Framelits Dies and embossed with the Lace Dynamic Embossing Folder. The embossed panels are attached to Basic Black card cut using the Layering Squares Framelits Dies. One panel is attached to each of the four sections of the Basic Black card. I stamped four large butterflies from the Butterfly Gala stamp set onto Whisper White card using Memento Tuxedo Black ink. The fill images for the top section of the butterflies are inked using the Poppy Parade/Pumpkin Pie section of the Spectrum Pad. The fill images for the bottom section of the butterflies are inked using the Pumpkin Pie/Daffodil Delight section of the Spectrum Pad. I punched out the butterflies using the Butterfly Duet Punch.
  I used my bone folder to add a little dimension to the butterfly wings. I attached a Glue Dot to the centre of the butterfly and then added a little piece of gold twine to represent to butterfly antennae. I also added dimensionals under each wing before they were attached to each of the embossed panels.
When you close the card, the middle of the 1″ black strip of card folds towards the outside edge of the card, creating the “W”. I didn’t emboss the right hand panel of the inside of the card so that I would have somewhere to write my message. You do need to tie the card shut, because it is more bulky on the open side of the card than on the fold side of the card.
I am sure I will be making more of these cards in the future. What about you? Are you going to make one too?
Bye for now,
Kris
Product Used:


Shells
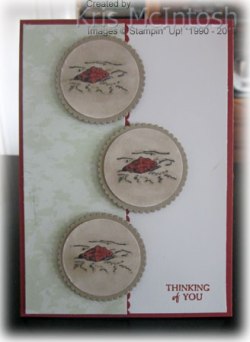
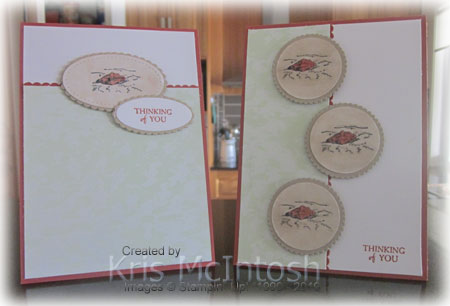
Today’s cards use the seashell image from the By The Bay stamp set. This stamp set is FREE with a qualifying order during Sale-a-bration. For the first card I punched a strip of Cajun Craze card using the Decorative Ribbon Border Punch. The punched piece is attached behind one long edge of a piece of Tranquil Textures Designer Series paper. The panel is attached to the left hand side of Whisper White card. I stamped the greeting from the By The Bay stamp set using Cajun Craze onto the lower right hand corner of the Whisper White card. The whole panel is attached to scored and folded Cajun Craze card.  I stamped the seashell image from the By The Bay stamp set three times onto scrap Whisper White card using Memento Tuxedo Black ink. I coloured the shell using the dark Cajun Craze Stampin’ Blend and the sand using Crumb Cake Stampin’ Blends.
  I cut out the image using the Layering Circles Framelits Dies and attached each image to a Crumb Cake scalloped circle cut using the same dies. The image panels are attached to the card front using dimensionals.
To decorate the inside of the card, I punched a strip of Cajun Craze card using the Decorative Ribbon Border Punch and attached it behind one long edge of a strip of the same Tranquil Textures Designer Series Paper. The panel is attached to the bottom of Whisper White card.  I stamped the seashell image from the By The Bay stamp set using Memento Tuxedo Black in onto the left hand side of the Whisper White card just above the designer series paper.
For the second card, I punched a narrow strip of Cajun Craze card using the Decorative Ribbon Border Punch and attached it behind one short edge of Tranquil Textures Designer Series Paper. The panel is attached to Whisper White card and then scored and folded Cajun Craze card. I stamped the seashell image from the By The Bay stamp set onto Whisper White card using Memento Tuxedo Black ink.  I coloured the seashell using the dark Cajun Craze Stampin’ Blend and the sand using the Crumb Cake Stampin’ Blends.
 The image is cut out using an oval from the Stitched Shapes Framelits Dies and attached to a Crumb Cake scalloped oval cut using the Layering Ovals Framelits Dies. The image panel is attached to the card front using dimensionals. I stamped “thinking of you” from the By The Bay stamp set onto Whisper White card using Cajun Craze ink and cut it out using the Layering Ovals Framelits Dies. The greeting is attached to a Crumb Cake scalloped oval cut using the same dies and then the card front using dimensionals.
To decorate the inside of the card, I punched a strip of Cajun Craze card using the Decorative Ribbon Border Punch and attached it behind one long edge of a piece of the same Tranquil Textures Designer Series Paper. The panel is attached to the bottom of Whisper White card. I stamped the seashell image across the Whisper White card above the Designer Series paper using Memento Tuxedo Black ink.
They look lovely don’t they. The designer series paper kind of gives the cards a very tranquil look (sorry about the pun). I did make a slight error on one of these cards, can you spot it?
Bye for now,
Kris
Product Used:


Another Set of Cards

This time using the Oh So Eclectic stamp set from the Annual Catalogue. I cut Calypso Coral card using the Rectangle Stitched Shapes Dies and attached it to scored and folded Thick Whisper White card. I cut Whisper White card using a slightly smaller Rectangle Stitched Framelits Die and at the same time using the die from the Eclectic Layers Thinlits Dies inside the rectangle shape. The Whisper White card is attached to the centre of the Calypso Coral card. I stamped the greeting from the Itty Bitty Greetings stamp set using Pear Pizzazz ink onto the lower right hand corner of the card front. I stamped the leaf from the Oh So Eclectic stamp set three times onto Whisper White card using Pear Pizzazz ink.  The leaves are cut out using the co-ordinating die from the Eclectic Layers Thinlits Dies. I stamped the small flower head onto Whisper White card three times using Calypso Coral ink. I cut out the flowers using the co-ordinating die from the Eclectic Layers Thinlits Dies. I also cut the complete detailed flower from Calypso Coral card. The flower head image is attached to the back of the detailed flower. I attached the leaves and two of the flowers to the card front using liquid glue. I attached the third flower using dimensionals underneath the flower head and liquid glue on the stem.
 I used the Calypso Coral Stampin’ Write Marker to colour the Whisper White 1/8″ Sheer Ribbon. I let the ribbon dry and tied a bow which is attached over the flower stems using a glue dot.
To decorate the inside of the card, I stamped the leaf image twice onto the lower left hand corner without re-inking. I stamped the flower onto scrap Whisper White card using Calypso Coral ink. I stamped the detailed image over the top using Calypso Coral ink. The image is cut out using the co-ordinating Eclectic Layers Thinlits Die and attached over the leaves.
The remaining cards are created using Blushing Bride, Petal Pink and So Saffron ink and card. The ribbon is coloured in the same manner as for the first card using the co-ordinating Stampin’ Write Marker.
These cards were inspired by one I saw on Pinterest (sorry I can’t find the original to give credit, let me know if it is yours) and I just love how pretty they are. I would really love to hear what you think. I have been sharing lots of sets of cards recently and I wonder if you are enjoying them or maybe not?
Bye for now,
Kris
Product Used:


Try Stampin’ on a Tuesday 395

Today’s card is created using the current sketch challenge at Try Stampin’ on a Tuesday. I began by stamping the palm tree trunks from the Beach Happy stamp set onto Shimmery White card using Soft Suede ink. I stamped the palm leaves from the same stamp set using Old Olive ink. The sand image from the High Tide stamp set is stamped using Crumb Cake ink. The sea image, also from the High Tide stamp set, is stamped using Bermuda Bay ink.  I stamped the chair and umbrella image from the Beach Happy stamp set onto scrap Shimmery White card using Memento Tuxedo Black ink. I stamped the chair fill image using Mango Melody ink and the umbrella fill image using Poppy Parade ink. I cut out the image and attached it to the stamped panel using dimensionals.
 I wrapped Very Vanilla card twice using the 3/16″ Braided Linen Trim and attached it to scored and folded Crumb Cake card. I attached the stamped panel over the top of the 3/16 “Braided Linen Trim using dimensionals. I tied a bow onto the left hand side of the card using the same 3/16″ Braided Linen Trim and frayed out the ends.
To decorate the inside of the card, I stamped the palm tree from the Beach Happy stamp set using Soft Suede and Old Olive inks. I added the greeting from the Beach Happy stamp set using Soft Suede ink.
Simple really but I like the way it turned out. I’d love to hear what you think.
Bye for now,
Kris


Cousins – Family
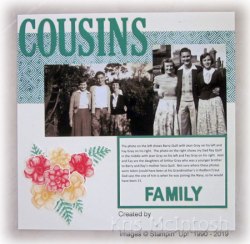
I am running a little late today with my post, sorry! These photos are of my Dad and his brother, taken with their cousins. Dad isn’t sure where the photos are taken but says that that picture of him was taken when he was joining the Navy so he was 21. My Dad is the one in the photo on the right. Anyway I couldn’t resist using the gorgeous Painted Seasons Designer Series Paper as the backdrop for the photos. I decided to use this lovely pattern and attached it across a Very Vanilla 12″ x 12″ page. I cut the main title from Call Me Clover card using the Large Letters Framelits Dies. I used the retired Little Letters Thinlits Dies to cut the second title from Call Me Clover card.  The journaling was created on my computer and attached to Call Me Clover card before attaching to the page. To decorate the left hand corner I stamped the flowers from the Painted Seasons stamp set onto Very Vanilla card using Poppy Parade ink and also Mango Melody ink. I stamped the leaves from the Painted Seasons stamp set onto Very Vanilla card using Call Me Clover ink. The flowers and leaves are cut out using the Four Seasons Framelits Dies which will be available for purchase on the 1st March. I layered the leaves and flowers onto the left hand corner with the flower in the centre attached using dimensionals. Don’t forget that this gorgeous paper and the Painted Seasons stamp set is available FREE with a qualifying order during Sale-a-Bration.
Once more this is a relatively simple page but one that emphases the photos and the story for my girls and their children.
Bye for now,
Kris
Product Used:


