Inkspire. Create. Challenge 35
I spent some time using my blends on the flower from the Beautiful Day stamp set recently. I thought it was about time, I used some of the gorgeous stamp sets from the Annual Catalogue. Anyway, I had the images stamped and cut out and then I saw the challenge at Inkspire. Create. which suited my images perfectly. So I embossed Whisper White card using one of the Petal Pair Embossing Folders, a pair of embossing folders which has been sadly neglected for too long. However, before embossing the Whisper White card, I attached a strip of Highland Heather.  This kind of “welds” the cards together and creates a unique look. The panel is attached to scored and folded Highland Heather card. I attached the flower which is coloured using the Highland Heather and Granny Apple Green Stampin’ Blends to the card front using dimensionals. I stamped the greeting from the Beautiful Day stamp set onto Whisper White card using Highland Heather ink and attached it to the card front, partially over the flower, using dimensionals.
To decorate the inside of the card, I embossed a narrow strip of Whisper White card using the same Petal Pair Embossing Folder. The embossed card has a narrow strip of Highland Heather attached to one long edge before the panel is attached across the bottom of Whisper White card.
This is kind of a simple card but I love it. So much so that I used the rest of the flowers I had coloured to create three more cards. The colours are – Real Red, with Real Red, Old Olive and Dark Daffodil Delight Stampin’ Blends – Flirty Flamingo with Flirty Flamingo, Granny Apple Green and Dark Daffodil Delight Stampin’ Blends – Daffodil Delight with Daffodil Delight, Old Olive and Light Real Red Stampin’ Blends. The sentiments on the Real Red and Flirty Flamingo cards also comes from the Beautiful Day stamp set.
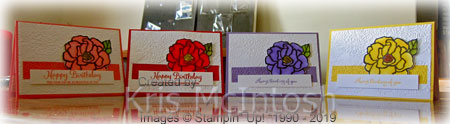
I am getting a collection of sets of cards which I will box up and have ready to give as gifts to my family and friends.
Bye for now,
Kris
Product Used:


Hello Cupcake
 Isn’t that a cute saying!.. and now it’s the name of a stamp set that you can earn for Free during Sale-a-bration with a qualifying order. The stamp set is photopolymer which makes it really easy to layer the different stamps together. I began by stamping a simple or beginner card onto a Whisper White Note card. I stamped the cupcake base using Petal Pink ink and the icing using Berry Burst ink. I also stamped the greeting which is from the Hello Cupcake stamp set using Berry Burst ink. The envelope is decorated to match.
  I normally don’t decorate my envelopes but in this case, I think it is the type of card that would be hand delivered.
The second card I stamped is for the more casual stamper – someone who stamps and gives out their own greeting cards. This time I embossed the top two-thirds of Whisper White card using the Sparkle Embossing Folder. I wrapped the end of the embossing with the Berry Burst 3/8″ Metallic Edge Ribbon and tied a knot. I stamped the greeting from the Hello Cupcake stamp set onto the bottom right hand corner of the card using Berry Burst ink. The embossed panel is attached to scored and folded Berry Burst card. I stamped the cupcake using Petal Pink and Berry Burst ink and cut it out using one of the circles from the Layering Circles Framelits Dies.
  The image is attached to a Berry Burst scalloped circle cut using the same dies. The image is attached to the card front using dimensionals. I decorated the inside of the card by stamped another of the greetings from the Hello Cupcake stamp set using Petal Parade ink. I stamped two small flowers from the Hello Cupcake stamp set using Berry Burst ink.
 The last card is for the avid stamper or in other words someone, like me, who has to have it all. This is the type of stamper who should take advantage of the great offers for signing up to be a new demonstrator during Sale-a-bration (contact me to get more details). So for this card, I cut a narrow Whisper White panel (7cm or 2-3/4″) wide and embossed the top two-thirds using the Sparkle Embossing Folder. I wrapped the bottom of the embossing with Berry Burst 3/8″ Metallic Edge Ribbon and tied a knot.
  I stamped the greeting from the Hello Cupcake stamp set using Berry Burst ink. I punched strips of Berry Burst card using the Decorative Ribbon Border Punch and attached the pieces to the sides of the embossed card before attaching to another Whisper White panel.
  The whole piece is attached to scored and folded Berry Burst card. I stamped the cupcake from the Hello Cupcake stamp set using Petal Parade and Berry Burst ink and cut out the image using one of the circles from the Stitched Shapes Framelits Dies. I attached the image to a Berry Burst scalloped circle cut using the Layering Circles Framelits Dies. The image panel is attached to the card front using dimensionals. To decorate the inside of the card, I stamped the greeting from the Hello Cupcake stamp set onto Whisper White card using Petal Parade ink. I stamped two small flowers from the same stamp set using Berry Burst ink. I punched a strip of Berry Burst card using the Decorative Ribbon Border Punch and attached it behind one long edge of Whisper White card embossed using the Sparkle embossing folder. The panel is attached to the bottom of the stamped Whisper White card.

So there you have it, another example of how you can create simple or beginner, casual and avid type cards using the same stamp set and basic colours. The difference being the amount of added supplies in the case of casual and avid cards.
I would love to hear what you think of these cards.
Bye for now,
Kris
Product Used:


Fab Friday 155
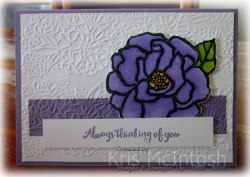
I used the sketch at Fab Friday to create a birthday card for a lady who is celebrating her birthday soon. I did turn the sketch so that I could have a tall instead of wide card. I embossed Whisper White card using the Lace Dynamic Embossing Folder and attached it to scored and folded Berry Burst card. I stamped the flower image from the Forever Lovely stamp set onto Whisper White card using Berry Burst ink and stamped the leaf image around it using Lemon Lime Twist ink. I cut the co-ordinating Lovely Flowers Edgelits Die from Whisper White card and layered it on top of the stamped image. I cut Berry Burst card using the scalloped edge die from the Be Mine Stitched Framelits Dies. I attached one scalloped edge behind the top and bottom edges of the stamped card. The whole panel is attached to the card front.  I cut Berry Burst card using the banner die from the Needlepoint Elements Framelits Dies and attached it to the card front using dimensionals.
  I stamped the greeting from the Itty Bitty Birthday stamp set onto Whisper White card using Berry Burst ink. I punched out the greeting using the Classic Label Punch and added it to the centre of the Berry Burst Banner.
To decorate the inside of the card, I stamped the single flower from the Forever Lovely stamp set using Berry Burst ink and added the leaves using Lemon Lime Twist ink.
Thanks for the inspiration Fab Friday. I hope my friend likes her card.
Bye for now,
Kris
Product Used:


Happy Birthday Karyn

My sister recently celebrated her birthday and today I thought I would share the card that I made for her. The card base is Highland Heather and the front is cut down to about half so that you can see the inside panel when the card is closed. I coloured some of the butterflies on the Botanical Butterfly Designer Series Paper using the dark Petal Parade Stampin’ Blend. One piece is attached to the front panel of the card and the other is attached to Whisper White card and then attached to the inside back panel of the card. I stamped “Happy Birthday from the Special Celebrations stamp set onto Whisper White card using Highland Heather ink and punched out the greeting using the 1-3/4″ Circle Punch. The greeting is attached in an off-set manner to a 2-1/4″ Circle of Highland Heather card. The greeting is attached to the front panel so that it overhangs by about half. I stamped the butterflies from the Butterfly Gala stamp set onto Whisper White card using Highland Heather ink and punched them out using the matching Butterfly Duet Punch.
  I also stamped and punched out one more small butterfly. One small butterfly is attached to the inside of the card before I stamped the antennae using Highland Heather ink. The second small butterfly is attached to the greeting panel before I stamped the antennae using Highland Heather ink. The large butterfly is also attached to the greeting panel but for this one I didn’t stamp the antennae. Each of the butterflies on the greeting panel have had the wings curled slightly using the bone folder and they are attached in the centre of the body only using Tombow Multipurpose glue. I added a mini dimensional under each of the wings of the small butterfly and two dimensionals under the left wing of the large butterfly.
I love the look of this card and I certainly love this Designer Series Paper. It is absolutely gorgeous and free with a qualifying order during Sale-a-Bration.
Once more Happy Birthday Karyn, hope your day was amazing.
Bye for now,
Kris
Product Used:


Simply Memory Keeping
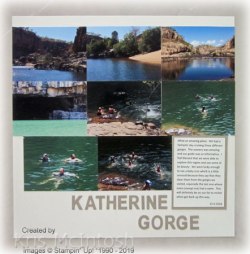
Today I am going to share with you a couple of very simple Memory Keeping pages. I know that when I first started to create pages, it took me ages to add the photos, embellishments and ribbons etc. I would spend anything up to a week, moving the pieces and adding and taking away embellishments. I finally realised that it’s the photos that are the star of the page not what you add. Sometimes, you need to add something in the way of an embellishment but not always. Today’s pages do not have any embellishments as the photos speak for themselves. The first page is of the cruise through Katherine Gorge we took on our trip to Darwin. The scenery is just so beautiful I didn’t think it needed anything more than a little information about where we were and what we did, and the date, of course. I love the photos of the family swimming in the gorge. A never to be forgotten experience. I placed my photos (all 4″ x 3″) onto a Very Vanilla 12″ x 12″ page. I cut the title from Crumb Cake card using the Little Letters Thinlits Dies (retired, but I find these dies are so often just the right size for my memory keeping). The journaling was created on my computer and printed onto Very Vanilla card which is attached to Crumb Cake card before being attached to the page.
 The second page shows some photos from the War Cemetery at Adelaide River. Again the photos are all that is necessary to recall our visit to this beautiful place which commemorates the ultimate sacrifice by so many from Darwin and surrounds during WWII. This time the photos are attached to Early Espresso card and then a 12″ x 12″ Whisper White page. The title is hand written onto a pocket card which is not Stampin’ Up! using one of our journaling pens.
So you see Memory Keeping doesn’t need to be time consuming or even very costly. I know that when my family and I look at these pages, we will be flooded with memories of our visits to these special places. I hope this inspires you to get more of your photos onto pages that can be shared and admired by your family and friends.
Bye for now,
Kris
Product used:


Varied Vases

Today’s card once more uses the Stamparatus to create the image panel. I placed a piece of Whisper White card into the corner of the Stamparatus which was larger than I needed. I set up the outline images on one plate and stamped them in Memento Tuxedo Black ink. I flipped the plate and stamped the fill images using Mint Macaron ink. I set up another plate with the outline images for the flowers and stamped them in Memento Tuxedo Black ink. I flipped the plate and set up the flower fill images and stamped them in Grapefruit Grove ink.  The images are cut out using one of the squares from the Stitched Shapes Framelits Dies. I attached the image panel to a Mint Macaron Scalloped Square, cut using the Layering Squares Framelits Dies. I stamped the greeting from the Varied Vases stamp set onto Whisper White card using Mint Macaron ink. The stamped card is attached to scored and folded Mint Macaron card. I attached the image panel to the card front using dimensionals.
To decorate the inside of the card, I stamped the flower outline using Memento Tuxedo Black ink and the flower fill images using Grapefruit Grove ink.
This card was made so much easier by using the Stamparatus. Watch this video to see how easy it is.
Shannon does a great job of showing us how easy it is to use this great tool to create some fantastic looks.
I just ran a technique class and my ladies learned 12 different techniques using this fabulous tool. Contact me if you want some more information or if you would like to take this class and learn more about the Stamparatus.
Bye for now,
Kris


Hinge or Step Stamping

is just so easy when you use the Stamparatus.
I stamped “Thank you” from the Love What You Do stamp set using Lovely Lipstick ink. I stamped it four times moving the hinge down one step each time without re-inking. So not only do I have a lovely lined up image but I also have a beautiful ombre look.  I attached the stamped card to scored and folded Lovely Lipstick card. I stamped the flower image onto Whisper White card using Memento Tuxedo Black ink. I stamped the flower fill image using Lovely Lipstick and added a few leaves in Call Me Clover ink. The image is cut out using the Layering Ovals Framelits Dies. I cut out a scalloped oval from Lovely Lipstick card using the same dies and attached it to the left hand side of the card front.
  I attached the image panel over the top using dimensionals.
To decorate the inside of the card, I stamped the flower image onto the lower left hand corner of Whisper White card using Memento Tuxedo Black ink and Lovely Lipstick.
Have I made you curious as to how I created this card? Maybe you should watch this video by Shannon from Stampin’ Up! to see how this technique is made super simple with the Stamparatus.
My card doesn’t get quite as fancy as Shannon’s however I could never do this without the Stamparatus. If you don’t have a demonstrator and you live in Australia, please contact me so that we can organise to get one into your hands.
This is quite a simple card but the hinged stamping takes it to another level.
Bye for now,
Kris
Product Used:


Happiest Birthday

This card was created quite some time ago for a friend of mine who celebrated her birthday at the end of December! I was a little late getting this in the post, which is why I am only now sharing it with you. I began by embossing Whisper White card using the Lace Dynamic Embossing Folder. Oh my, how pretty is this in real life. The pictures in the catalogue don’t do it justice. The embossed card is attached to scored and folded Gorgeous Grape card. I cut Gorgeous Grape card using the die from the Needlepoint Elements Framelits Dies and attached it to the embossed card. I stamped the greeting from the Picture Perfect Birthday stamp set onto Whisper White card using Highland Heather ink and cut it out using one of the Stitched Shapes Framelits Dies.  I stamped the small butterfly image from the Butterfly Gala stamp set using Gorgeous Grape ink. I added the body and the antennae using the same ink. The fill image was stamped using Highland Heather ink. I attached the greeting to a Gorgeous Grape scalloped circle cut using one of the Layering Circles Framelits Dies and then the card front using dimensionals.
 I stamped the large and small outline butterfly images (they come as one image) onto Whisper White card using Gorgeous Grape ink. I stamped the fill images using Highland Heather ink and the body images using Gorgeous Grape ink. The butterflies are punched out (at the same time) using the Butterfly Duet Punch – amazing! I attached the small butterfly to the centre of the large butterfly using a Glue Dot. The butterflies are attached to the card front using a mini dimensional. Once they were attached to the card front, I stamped the antennae image using Gorgeous Grape ink. I think you are going to love this Gingham Gala suite. It has co-ordinating Designer Series Paper, ribbon and sequins in the Occasions Catalogue and to complete the suite, you can earn more Designer Series Paper and co-ordinating ribbon free from the Sale-A-Bration catalogue.
To decorate the inside of the card, I stamped and punched out the same butterflies using the same ink. I attached the small butterfly to the centre of the large butterfly and attached them to Whisper White card. Once they were attached, I stamped the antennae.
I’d love to hear what you think?
Bye for now,
Kris
Product Used:


Try Stamping on Tuesday 391
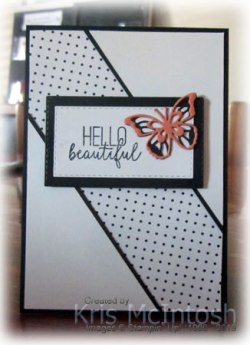
Today’s card is created using the sketch challenge at Try Stamping on Tuesday. The great thing about these challenges is that you have a couple of weeks to complete your project before the challenge ends. So today’s card is pretty clean and simple, but I think, kind of elegant. I love black and white! I attached a piece of Botanical Butterfly Designer Series Paper across Whisper White card. I attached pieces of Whisper White on either side each of which has a narrow edge of Basic Black to cover the edges of the Designer Series Paper. The whole panel is attached to scored and folded Basic Black card. I stamped “Hello Beautiful” from the Butterfly Gala stamp set onto Whisper White card using Memento Tuxedo Black ink.  I cut out the greeting using one of the Rectangle Stitched Framelits Dies and attached it to Basic Black card cut using the same dies. The greeting is attached to the card front using dimensionals. I cut the solid butterfly die from the Butterfly Beauty Thinlits Dies from Basic Black card. I cut the detailed overlay butterfly die from the same die set from Grapefruit Grove card.
  I did attach a piece of Multipurpose Adhesive Sheet to the back of the he Basic Black card and the Grapefruit Grove card before they were die cut. I removed the adhesive sheet backing and attached the Grapefruit Grove butterflies to the Basic Black butterflies, then I set about cutting the butterflies apart. This creates five separate butterflies and you really don’t have to do a lot of trimming. I removed the adhesive backing from one of the butterflies and attached it to the greeting panel.
To decorate the inside of the card, I attached another of the butterflies to the top left hand corner of Whisper White card.
You know what, I think I am in love with the Botanical Butterfly Designer Series Paper. It really is very pretty and you can obtain this paper free with a qualifying order during Sale-A-Bration. Most of the patterns contain butterflies but there are three of the black and white designs which do not and could be used for so many different kinds of card.
I do have some butterflies left, so I will be back with more butterfly cards.
Bye for now,
Kris
Product Used:


A Merry Memory Keeping page

Today’s page uses a sketch challenge from a facebook group I belong to – Scrapbooking Global – Stampin’ Up!. This group is open to anyone, Demonstrator or non-demonstrator. The quality of the inspiration shared by the members of this group is fabulous. I didn’t join the blog hop but the sketch allowed me to finish documenting the photos from Christmas Day. I cut down a Whisper White 12″ x 12″ page and added a strip of Real Red card punched using the Decorative Ribbon Border Trim to each side before attaching to the centre of another 12″ x 12″ Whisper White page. The Designer Series Paper used is Under the Mistletoe which is available from the Annual Catalogue. The stamped hearts are stamped in Real Red using an image from the Forever Lovely stamp set.  This is one of the stamp sets in the current Occasions Catalogue. The “merry” is cut from Real Red card using the Merry Christmas to All Thinlits Dies which is a carry-over item from the Holiday Catalogue. The smaller title pieces are punched using the Classic Label Punch. The “playtime” was created on my computer and printed onto Whisper White card. The date is stamped using the image from the Tabs for Everything stamp set. The ribbon on this page is the Real Red 3/8″ Mixed Satin Ribbon (now retired). I love this photo which shows my grandchildren playing with their cousin Jack who is the youngest and of course the centre of attention.
If you are looking for some more inspiration for your memory keeping, I really suggest you join this group. You will be amazed at the beautiful work being shared from all around the world. Thanks to the admin team at Scrapbook Global for a great challenge.
Bye for now,
Kris
Product Used:


