Rose Birthday

My card today was made for a dear friend who is celebrating her birthday today. Happy Birthday Gwen. I attached one of the panels from the Delightfully Detailed Laser Cut Specialty Designer Series papers to Gray Granite card. The whole piece is attached to scored and folded Very Vanilla card. I stamped the image from the Petal Palette stamp set onto Whisper White card and coloured the image using the Poppy Parade and Granny Apple Green Stampin’ Blends.  I cut out the image attached the flower to the card front inside the lacy frame. I added a Basic Rhinestone to the centre of each flower.
To decorate the inside, I stamped, coloured and cut out the floral image from the Petal Palette stamp set using the same Stampin’ Blends.  This time, I cut away one of the flowers and sets of leaves. I attached the image to the inside of the card and added the greeting from the Beautiful Bouquet stamp set.
Now I know that I did make a mistake stamping the image onto Whisper White and not Very Vanilla card, however, I don’t actually think that it is that noticeable and I still love the result. What about you? Once again Gwen, hope you have an amazing day.
Bye for now,
Kris
Product Used:


Peaceful Thinking of You

When I created this card for the Freshly Made Sketch, I found that I was thinking of other ways to used the basic layout. This card kind of grew from that idea. I stamped the sand image from the High Tide stamp set across Whisper White card using Sahara Sand ink. I stamped the lighthouse from the same stamp set using Gray Granite and Basic Gray ink. I masked the lighthouse image and stamped the sea image using Coastal Cabana ink. While the mask was in place, I used a sponge to add Balmy Blue ink to the sky, just kind of dabbing it on, I didn’t want it to be too smooth.  I removed the mask and stamped the sea birds using Memento Tuxedo Black ink. I stamped the grass using Mossy Meadow ink and the greeting from the Colourful Seasons stamps set using Memento Tuxedo Black ink.
  The stamped panel is attached to Coastal Cabana card and then scored and folded Gray Granite card.
To decorate the inside of the card, I stamped the sand image across the bottom of Whisper White card using Sahara Sand ink. I stamped the grass image over the top using Mossy Meadow ink.
Not really defined like the sketch, but it did inspire me. Sometimes, we just need a little push to get started.
Bye for now,
Kris
Product Used:


Inkspire Me 366

I am sure that I am not in the minority when I say that making a Sympathy card is the hardest kind of card to make. I needed one for a good friend of mine and used the sketch at Inkspire Me to create it. The sketch is one that could be used in lots of different ways, perhaps you might like to join the challenge this week also. I attached a piece of the Frosted Floral Specialty Designer Series Paper to scored and folded Soft Sea Foam card. I stamped the greeting from the Flourishing Phrases stamp set onto Whisper White card using Shaded Spruce ink. The greeting panel is attached to the card front using dimensionals.  I stamped the leafy image from the First Frost stamp set onto Whisper White card using Shaded Spruce ink and cut it out using the co-ordinating Frosted Boutique Framelits Dies. I stamped the large flower from the First Frost stamp set onto Whisper White card using Blushing Bride ink and cut it out using the co-ordinating Frosted Boutique Framelits Dies.
  The leaf is attached to the left hand side of the greeting panel. I used a dimensional under the very top of the leaf and snail across the middle of the leaf so that it would sit flat over the panel. The flower is attached over the top.
To decorate the inside of the card, I stamped the large leafy image onto the lower left hand corner of Whisper White card using Shaded Spruce ink.
The First Frost stamp set is a very versatile stamp set that I am sure I will be reaching for very often.
Bye for now,
Kris
Product Used:


Case this Sketch 288
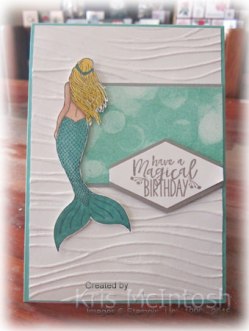
Today’s card was inspired by the sketch challenge at Case This Sketch. I decided to use the Magical Mermaid stamp set, which I bought because I have four granddaughters and it has so many applications for girls. It is also a great stamp set to combine with several others in the Annual Catalogue including High Tide. I embossed Whisper White card using the Seaside Embossing Folder before attaching to scored and folded Coastal Cabana card. I stamped one of the images from the Bokeh Dots stamp set onto Whisper White card using Coastal Cabana ink. The stamped panel is attached to Gray Granite card and then the embossed Whisper White card.  I stamped the mermaid image from the Magical Mermaid stamp set onto Whisper White card using Memento Tuxedo Black ink. The mermaid is coloured using Dark Daffodil Delight, Bermuda Bay, Ivory and Bronze Stampin’ Blends. I fussy cut the image and attached it to the left of the Bokeh Dots panel using dimensionals. I stamped the greeting from the Magical Mermaid stamp set onto Whisper White card and used the Tailored Tag Punch to punch it out.
  However, I did punch it twice, once so that the top edge of the greeting fitted inside the punch and once so the bottom edge of the greeting fitted inside the punch. I attached it to a Tailored Tag punched from Gray Granite card and you can see that I am left with a nice border around the greeting. The greeting is attached to the card front using dimensionals.
To decorate the inside of the card, I stamped the sand image from the Magical Mermaid stamp set across the bottom of Whisper White card using Gray Granite ink. I stamped the seaweed image from the same stamp set over the top of the sand across the whole panel using Coastal Cabana ink, making sure to stamp several times without re-inking.
I am so happy with the outcome using this sketch. I am sure one of my granddaughters will love this card.
Bye for now,
Kris
Product Used:


Finally – Cooktown

The first page I am sharing today shows our stop at Bob’s Lookout on the way to Cooktown. As far as you can see it is just scrub – not a house or even an animal. We arrived in Cooktown in time for lunch and then headed up to the Lighthouse so that the girls could see how truly beautiful this place is. We also visited Finch Bay, a great spot on the coast with a small creek running out to sea. We were a little worried about what might be hiding in the scrub! The second page shows us exploring the waterfront in town.  There is lots of history about Captain Cook and also the corresponding story provided by the local indigenous people. The girls enjoyed playing on the Musical Ship and visiting the Museum. We were able to spend some time relaxing in the afternoon and catching up with our friends Bob and Beryl. The third page shows our last day in Cooktown.
  We spent the morning fishing with Bob and Beryl before enjoying a lovely lunch at the Hotel. We spent a quiet afternoon but headed up to the Lighthouse at sunset to watch the sun go down. The last page shows Abigail with the two flathead that she caught while fishing. She not only caught two fish but she was the only one to catch any fish. We enjoyed them on the BBQ for dinner. Brisbane to Cooktown is a long way and now we have to head back.
I didn’t have any of the Delightfully Details Memories and More cards left to fit these pages, however, I did use the Tabs for Everything stamp set to add a couple of words and the date.  I used the retired Timeless Type Alphabet Dies for the headings, which were cut from Blackberry Bliss card. The last page showing off Abigail’s catch uses the Tranquil Tide Designer Series paper and a layout you have seen me share before. I cut Night of Navy card using the Decorative Ribbon Border Punch to cover the edge of the Designer Series Paper. I also stamped the small fish from the All The Good Things stamp set down the left hand side of the page using Night of Navy ink. I printed the journalling on the computer, cut it into strips and attached the strips to Night of Navy card.
Such a beautiful town and one that I am sure Ron and I will revisit. There is so much more to see than we could fit into 3 days.
Bye for now,
Kris
Product Used:


Checkered Christmas
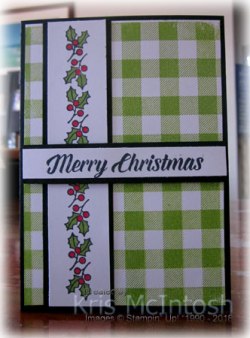
I saw a card on Pinterest that used the holly image from the Blended Seasons stamp set in a panel across the top of a card and it gave me an idea to try using the Peaceful Poinsettia stamp set and the Buffalo Check background stamp. I stamped the Buffalo Check background onto Whisper White card using Granny Apple Green ink and attached it to scored and folded Basic Black card. I stamped the holly image from the Peaceful Poinsettia stamp set twice onto a strip of Whisper White card, once at the top and once at the bottom. I coloured the image using the Dark Real Red and Dark Granny Apple Green Stampin’ Blends. I attached the stamped panel to Basic Black card and attached it to the left hand side of the card front. I stamped the greeting from the Timeless Tidings stamp set onto Whisper White card using Memento Tuxedo Black ink.
  I attached the greeting to Basic Black card and then the card front using dimensionals.
To decorate the inside of the card, I stamped the holly image from the Peaceful Poinsettia stamp set twice onto the left hand side of Whisper White card, once at the top and once at the bottom. The images are coloured using the Dark Real Red and Dark Granny Apple Green Stampin’ Blends.
This is not what you would call a traditional Christmas card, but I love how bright and cheery it is even though I have used Basic Black card. I’d love to know what you think.
Bye for now,
Kris
Product Used:


First Frost First card

I haven’t shared this card with you previously, but in honour of the Holiday Catalogue launching yesterday, I thought I would show you the first card that I made using the First Frost stamp set and my own design. This is a favourite layout of mine which is very simple to adapt to lots of stamp sets and occasions. I embossed the bottom two thirds of Whisper White card using the Basket Weave Dynamic Embossing Folder. I stamped the greeting from the First Frost stamp set onto the top part of the embossed card using Tranquil Tide ink. I wrapped the top of the embossing with the beautiful Tranquil Tide 1/4″ Velvet Ribbon and tied a knot with another piece of the ribbon. The whole panel is attached to scored and folded Tranquil Tide card. I stamped the large leafy image from the First Frost stamp set onto Whisper White card using Tranquil Tide ink. The image is cut out using the co-ordinating Frosted Bouquet Framelits Dies. I also stamped the large flower from the First Frost stamp set onto Whisper White card using Berry Burst ink and cut it out using the co-ordinating Frosted Bouquet Framelits Die.  I trimmed off the stem and some of the leaves and attached the remaining leaves behind the flower. The flower is attached to the card front using dimensionals.
To decorate the inside of the card, I stamped and cut out one more large leafy image and one more large flower. I trimmed the leaves in the same manner, attached them to the back of the flower and then the lower left hand corner of Whisper White card.
I truly love this stamp set and I have discovered that the flowers give the best impression if you lay the stamp on its back and gently add some ink with a soft tapping motion.  You do not get such a beautiful image if you tap the stamp onto the ink pad. In fact, I believe by adding the ink to the stamp you get a much better application of ink with any image. I have found in my classes that once people start inking this way, there is much less need to clean the stamps and people don’t get so much ink on themselves. For those of you who like to be thrifty, using your stamps and ink pads this way means you don’t have to re-ink them so often because there isn’t so much waste of ink. Try it and see what you think.
As I said at the beginning of this post, yesterday was the first day that you as customers can begin purchasing from this amazing Holiday Catalogue. If you do not have a catalogue you can click on the link on the right hand side of this page to view it OR if you do not have a demonstrator and you live in Australia, please contact me so that I can arrange for you to have one. I held my first class yesterday using these products and the ladies were all very impressed. Why don’t you let me know what you think.
Bye for now,
Kris
Product Used:


Case this Sketch 287

Today’s card uses the sketch challenge at Case This Sketch as the starting point. I am going to share a new stamp set with you – First Frost from the Holiday Catalogue. The products in this catalogue can be purchased beginning tomorrow. It is an amazing catalogue, one that you are going to love.
To create my card I started by cutting a square of Whisper White card and then cutting it in half on the diagonal. I embossed the pieces using the Layering Leaves Dynamic Embossing Folder. (You really must experiement with these folders and try spritzing with water, it makes such a difference to the embossed effect. Try it, I am sure you will be amazed.) I attached a narrow strip of Soft Sea Foam card behind the diagonal edge on each piece and attached them to a piece of Soft Suede card. The whole panel is attached to scored and folded Real Red card. I stamped the greeting from the First Frost stamp set onto Whisper White card using Soft Suede ink and cut out the greeting using the Frosted Bouquet Framelits Dies.  I also cut out Real Red card using the layering framelit from the Frosted Bouquet Framelits Dies and attached them together. I love that you can cut out a greeting and then cut a mat to give a perfect layer. I stamped the large leafy image from the First Frost stamp set twice onto Whisper White card using Soft Sea Foam ink. I cut out the images using the co-ordinating Frosted Bouquet Framelits Die. I cut Soft Sea Foam card using the leafy die from the Frosted Bouquet Framelits Dies. I stamped the large flower and the small flower from the First Frost stamp set onto Whisper White card using Real Red ink and cut them out using the co-ordinating Frosted Bouquet Framelits Dies. I attached the stamped and die cut leaves behind the greeting panel and attached the whole piece to the card front. The flowers are attached over the greeting panel and the leaves.
 To decorate the inside of the card, I stamped the large leafy image from the First Frost stamp set onto the lower left hand corner of Whisper White card using Soft Sea Foam ink. I stamped the large flower from the First Frost stamp set onto Whisper White card using Real Red ink and cut it out using the co-ordinating Frosted Bouquet Framelits Dies before attaching over the stamped leaf.
I love this stamp set because has so many possibilities including Christmas. I am sure that it is going to be a favourite from the Holiday Catalogue. One of the things I love about being a demonstrator is the fact that we can access new product earlier than our customers, which gives us a chance to “play” with new product before anyone else. If you have ever thought about being a demonstrator, then my advice would be to just do it. You will soon find out what a great “family” Stampin’ Up! is. If you would like more information, please do not hesitate to contact me. Also if you don’t have a demonstrator and you want a copy of this catalogue, and you live in Australia, then contact me so that I can get one out to you.
Kris
Product Used:


Happy Father’s Day

In Australia we celebrated Father’s Day yesterday so I thought I would share with you the card I made for my Dad. I was inspired by some cards posted by Carolyn King (an Aussie Demonstrator) which used the Wood Textures Designer Series Paper. This card is pretty much an exact case of Carolyn’s card. I didn’t read Carolyn’s post properly so I did not create a template for my card, I just winged cutting on the angles. I first cut the Very Vanilla card and attached a piece of Early Espresso card behind, using the Paper Trimmer to cut away the excess Early Espresso Card.  I attached the Wood Textures Designer Series Paper behind the trimmed card to create just right sized panel for the card front. I cut Early Espresso card using the Happy Birthday Thinlits Die and trimmed away the “birthday”. I attached the “happy” to the card front. I created “fathers” and “day” by stamping on scrap Very Vanilla card using the Stamparatus, Labeller Alphabet and Early Espresso ink. The Stamparatus makes it so easy to create any word you want using this lovely stamp set. I trimmed the words from the Very Vanilla card and attached them to the card front.
  I stamped the outline leaf from the Colourful Seasons stamp set using Early Espresso ink and stamped the fill image using Crumb Cake. I also stamped a small leaf from the same stamp set onto scrap Very Vanilla card using Crumb Cake ink. The leaves are cut out using the Seasonal Layers Thinlits Dies. I also used these dies to cut the detailed leaf from Early Espresso card. I attached the leaves to each other and then the card front. I tied a bow using Linen Thread and attached it to the stem of the leaves.
To decorate the inside of the card, I attached a narrow strip of the same Wood Textures Designer Series Paper to the bottom of Very Vanilla card.
I hope all the Father’s out there had a wonderful day yesterday.
Bye for now,
Kris
Product Used:


Cairns

Today we left Charters Towers and travelled to Cairns. We left the inland and hit the coast at Cardwell a very beautiful spot. We spent some time there stretching our legs. Both the girls loved it there and wanted to stay. Such a pity we were on a tight schedule. Anyway we continued on our travels and reached Lake Placid mid afternoon. We set up and spent a relaxing time playing charades and sharing stories.  I kept this page simple because the photos bring back many memories and big smiles to the girls faces. I have used the Delightfully Detailed Memories and More cards once more as well as the Tabs for Everything stamp set in this case just to add the date. I trimmed the photo in the lower right hand corner to sit on top of the laser cut card. Once more the title has been cut from Blackberry Bliss card using the retired Timeless Type Alphabet Dies.
  Page two details our visit the next morning to Lake Placid and the Barron Gorge and again uses the Delightfully Detailed Memories and More cards. I added the “happy life”, small heart and date using the Tabs for Everything stamp set. The third page shows our visit into Cairns itself and the beautiful St. Monica’s church which has the most stunning stained glass windows depicting creation. We had a lovely lunch along the esplanade before heading back to the caravan park. Two of my favourite chefs cooked a lovely BBQ dinner. The page once more uses the Delightfully Detailed Memories and More cards.
I hope you are enjoying my pages, showing off photos from our holiday. You can see that I am a fairly simple scrapbooker, preferring to let the photos tell the story. I hope that by sharing these pages, you will see that scrapbooking or Memory Keeping as I prefer to call it doesn’t have to be complicated. Hopefully, I may even inspire you to start creating your own pages to share your memories. I’d love to know what you think.
Bye for now,
Kris
Product Used:


