May this Season

be filled with peace. Isn’t that a lovely greeting for Christmas? This is one more case from the Holiday Catalogue, this time I created a card using the little gift box as inspiration. I cut each of the four corners of Soft Sea Foam card using the small corner die from the Detailed Poinsettia Thinlits Dies. I stamped the greeting onto the centre of the card using Shaded Spruce ink. The die cut panel is attached to scored and folded Shaded Spruce card.  I stamped the image from the Peaceful Poinsettia stamp set twice onto Whisper White card using Memento Tuxedo Black ink. The images are coloured using the Real Red and Shaded Spruce Stampin’ Blends before being cut out using the co-ordinating Detailed Poinsettia Thinlits Die.
  You can see that in some of the flower I have used the Light and Dark Real Red Stampin’ Blends togehter and in some sections just the Light or the Dark Stampin’ Blend, to give a bit more dimension to the flower. The images are attached to the card front above and below the greeting.
To decorate the inside of the card, I have once more elected to use the small corner die from the Detailed Poinsettia Thinlits Dies to cut the top left and bottom right hand corner of Whisper White card.
To finish off the card, I added Basic Pearls to the leaves instead of colouring in the berries and also to the centres of the flowers. I think the pearls are just the finishing touch needed for this card. What do you think?
Bye for now,
Kris
Product Used:


Accented Birthday
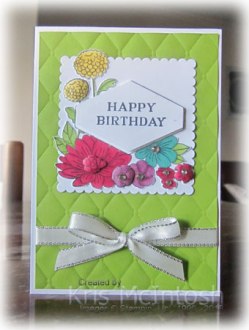
Today’s card was made as a special order for my Mum to give to a friend of hers. I embossed Granny Apple Green card using the Tufted Dynamic Embossing Folder. This time instead of spritzing with water, I spritzed with a mixture of Frost White Shimmer Paint and rubbing alcohol (Isopril in Australia). This gave a hint of shimmer to the card when it was dry. I don’t think you can see it in the photos but it is there. I attached Silver Metallic Edge Ribbon to either side of the embossed card before attaching to scored and folded Thick Whisper White card. Once the embossed card was attached, I tied the ribbon in a bow. I cut Whisper White card using the largest scalloped square from the Layering Squares Framelits Dies and attached it to the card front.  I stamped the floral image from the Accented Blooms stamp set twice onto Whisper White card using Memento Tuxedo Black ink. I coloured one image completely and just a few of the flowers on the second one using Bermuda Bay, Daffodil Delight, Granny Apple Green, Rich Razzleberry and Cherry Cobbler Stampin’ Blends.
  I cut out one complete image and just the select sections from the second image – the centre of the Cherry Cobbler flower, one Rich Razzleberry small flower, one Cherry Cobbler small flower and the smaller of the yellow flowers. I attached the full image to the Whisper White scalloped square. I decided to use my new Take Your Pick tool, selecting the large stylus to give the individual cut pieces a little extra dimension before attaching them to the full image using mini Dimensionals. I stamped “happy birthday” from the Perennial Birthday stamp set onto Whisper White card using Memento Tuxedo Black ink. I punched the greeting using the Tailored Tag Punch. The greeting is attached to the card front using dimensionals. For the final touch I added some Basic Rhinestones to the centres of some of the flowers.
I kept the inside of the card pretty simple, stamping the leaf image from the Accented Blooms stamp set across the bottom of Whisper White card. I coloured the leaves using the dark Granny Apple Green Stampin’ Blend before attaching the panel to the inside of the card.
Bye for now,
Kris
Product Used:


Eastern Birthday

Today’s card uses a template that was shared by Julie Burt on a Demonstrator only Facebook page. Unfortunately Julie does not have a blog or facebook page at this stage, but when she does I will be sure to let you know. I followed Julie’s template to cut Thick Whisper White card to create the card base and added Smoky Slate card to each panel. The main panel is decorated with a large motif from the retired Eastern Gold Vinyl Stickers. I also used another of the stickers on Melon Mambo card and cut it out using the co-ordinating Eastern Medallions Thinlits Dies.  The Sticker is attached to Whisper white card with the Melon Mambo flower in the centre. The middle panel on the card has a medallion cut from Melon Mambo card using the Eastern Medallions Thinlits Dies with a retired Eastern Gold Vinyl Sticker in the centre. I decorated four of the remaining small panels by cutting Whisper White card using the two smallest circles in the Eastern Medallions Thinlits Dies. Once the Whisper White card is attached to the Smoky Slate card, it is really quite pretty. The last two small panels have been stamped with a small star image from the Eastern Beauty stamp set using Melon Mambo ink. The last large panel has the largest medallion from the Eastern Medallions Thinlits Dies cut from Melon Mambo card.
  To release this image and create a single piece, I cut around the medallion using one of the Layering Circle Framelits Dies. I stamped “happy birthday” from the Thoughtful Banners stamp set onto Whisper White card using Melon Mambo ink and cut out the greeting using the die in the Stitched Labels Framelits Dies. The greeting is attached to the centre of the Melon Mambo medallion.
To decorate the inside of the card, I stamped the image from the Eastern Beauty stamp set using Melon Mambo ink. I love the way this card stands up like a tri-shutter card but it has that cute little closed card on the left, so you can write a message. The card is a little oversized so you will have to create your own envelope but that is easy using the Envelope Punch Board. So thank you once again Julie for your wonderful template.
This card is for a lovely friend who is celebrating her birthday today. Happy Birthday Gloria. She loves this stamp set, so although I have used some retired product on this card, I know that she will love it.
Bye for now,
Kris
Product Used:


Merry Little Christmas

Here is another card I cased from the Holiday Catalogue. I embossed a piece of Crumb Cake card using the Corrugated Dynamic Embossing Folder and attached it to another piece of Crumb Cake card before attaching to scored and folded Crumb Cake card. I stamped the greeting from the Peaceful Poinsettia stamp set onto Whisper White card using Real Red ink and cut it out using the Layering Ovals Framelits Dies. I used the Detailed Poinsettia Thinlits Dies to cut two poinsettia flowers from Real Red card. I also used the dies to cut the leaves from Garden Green card.  I attached one flower and one set of leaves to the back of the greeting panel on the top left and the bottom right. I attached the whole piece to the card front using dimensionals. I stamped the small holly image from the Peaceful Poinsettia stamp set onto Whisper White card using Memento Tuxedo Black ink.
  The image is coloured using Real Red and Old Olive Stampin’ Blends before being cut out using the co-ordinating Detailed Poinsettia Thinlits Die. I attached one image to the top left and the other image to the bottom right of the greeting panel.
To decorate the inside of the card, I embossed a narrow strip of Crumb Cake card using the Corrugated Dynamic Embossing Folder which is attached across the bottom of Whisper White card. I cut Garden Green card using the leaf die from the Detailed Poinsettia Thinlits Dies. I also cut Real Red card using the same die. I attached the green leaf over the corrugated Crumb Cake card and then using my Take Your Pick, I added the Real Red circles to represent the berries. I must say I love having this tool on my desk, it certainly helps with the “fiddly” things on my creations.
Bye for now,
Kris
Product Used:


Day 10

These two pages depict our travels from Mission Beach to Rollingstone. We rose early and managed to see the sun come up over the water which was pretty spectacular. Again a short day so we had time for a little sight-seeing along the way. We stopped in at Tully – the town re-knowned for its very high rainfall – to see the Big Gumboot. You climb to the top of the Gumboot which gives an amazing 360 degree view of the town and its surrounds. After leaving Tully we made another stop at Cardwell. This time we stopped in at the Bakery and tried out the pies as we sat and took in the beautiful view. We were very surprised when we arrived at Rollingstone, what a beautiful park. Ron and I had been told many times to stay there but this was the first time we managed it. I am sure it won’t be our last visit.
These are simple pocket pages with one pocket for journaling. I cut a narrow strip from a 6″ x 4″ Delightfully Detailed Memories and More card to add to the bottom of the journaling card. I stamped the date and “remember” from the Tabs for Everything stamp set. The title is cut using the retired Timeless Type Alphabet Dies. The “sweet moments” on the page is from the retired Remember This stamp set.
When a stamp set or accessory retires, I usually keep anything that I think will fit in with my Memory Keeping. Sometimes you just need a word or an image that will finish the page off beautifully. So my apologies if you do not have these specific sets or dies but I am sure if you love to Memory Keep, Scrapbook or whatever you call it, you will have your own stash to use.
Bye for now,
Kris
Product Used:


Christmas Wishes

Today’s card features another stamp set from the Holiday Catalogue – Peaceful Poinsettia. Another stamp set that I just had to have because I love Poinsettias and they are always in flower at Christmastime here in Australia. Again I am using the catalogue for inspiration to create this card.  I used the Detailed Poinsettia Thinlits Dies to cut the corner die from Shaded Spruce card. I also used the poinsettia die which is designed to sit inside the corner piece – well done Stampin’ Up!. The die cut panel is attached to scored and folded Soft Sea Foam card. I stamped Christmas Wishes from the Peaceful Poinsettia stamp onto Soft Sea Foam card using Shaded Spruce ink.
  The greeting is cut out using one of the frame dies from the Frosted Bouquet Framelits Dies. I attached a length of Gold Metallic Edge Ribbon behind the greeting before attaching to the card front using dimensionals.
To decorate the inside of the card, I cut the small corner die from the Detailed Poinsettia Thinlits Dies from the top left and bottom right hand corners of Whisper White card.
Simple, but the die cutting is so pretty. I am especially loving these two colours together, I think it will be a favourite colour combination for my cards this year.
Bye for now,
Kris
Product Used:


Mossy Meadow Christmas

For this card, I have used the same principle as the two previous cards I shared but this time I am using the Winter Woods stamp set. I stamped the row of trees from the Winter Woods stamp set across the top of Whisper White card using Mossy Meadow ink. I stamped the single tree over the top using the same ink. I stamped the greeting from the Winter Woods stamp set at the bottom of the panel using Mossy Meadow ink. I attached a length of Real Red 3/8″ Mixed Satin Ribbon to the back of each side of the stamped panel and tied a bow.  I stamped the single tree from the Winter Woods stamp set onto scrap Whisper White card and used the co-ordinating In The Woods Framelits Die to cut out the tree. This die cuts the outside of the tree but it also cuts little windows all over the tree so that you get a real 3D effect.
  The die cut tree is attached over the stamped tree using Tombow Multipurpose Glue on the outside edges and between the windows. I cut Mossy Meadow card using the Delicate Lace Edgelits Dies and attached it behind the right hand edge of the stamped card. The panel is attached to Whisper White card and then scored and folded Mossy Meadow card.
To decorate the inside of the card, I cut Mossy Meadow card using the the same Delicate Lace Edgelit die and attached it to the left hand side of Whisper White card.
I think I love the detail and the colour of this card the most of the three I have made. What about you?
Bye for now,
Kris
Product Used:


Navy and Lace
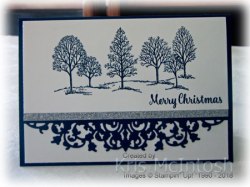
Today’s card once more uses the Delicate Lace Edgelits Dies and also the Lovely As a Tree stamp set. I stamped the trees from the Lovely As A Tree stamp set onto Whisper White card using Night of Navy ink. I stamped “Merry Christmas” from the Star of Light stamp set below the trees using Night of Navy ink. I cut Night of Navy card using one of the Delicate Lace Edgelits Dies and attached it behind the stamped card. I attached the panel to a larger piece of Whisper White and then scored and folded Night of Navy card. I attached a narrow strip of Silver Glimmer Paper below the stamped Whisper White card, covering some of the Night of Navy Edgelit.
 To decorate the inside of the card, I cut the same Delicate Lace Edgelit Die from Night of Navy card and attached it across the top of Whisper White card.
Another simple card but one that I am more than happy with. I love Navy and White Christmas cards. Not really, traditional I know, but beautiful I think. What about you, what’s your favourite colour for Christmas cards?
Bye for now,
Kris
Product Used:


Delicate Christmas Tree

Today I found the Delicate Lace Edgelits Dies tucked away in my cupboard and since this is one of the first items I bought from this year’s Annual Catalogue, I thought it about time to get them out and use them. My first card is a simple one but I like the effect. I stamped the tree from the Lovely As A Tree stamp set onto Whisper White card using Call Me Clover ink. I stamped the greeting from the Timeless Tidings stamp set below the tree using the same ink.  I wrapped the panel with Lovely Lipstick 1/8″ Grosgrain Ribbon and tied a knot. I cut the beautiful lace edgelet from Call Me Clover card and attached it behind the stamped panel. The whole piece is attached to Whisper White card and then scored and folded Call Me Clover card.
To decorate the inside of the card, I cut the same lace edgelit from Call Me Clover card and attached it to the left hand side of Whisper White card.
As I said pretty simple really. I have a couple more versions of this card to share with you over the next few days. I’d love to know which one you like the best.
Bye for now,
Kris
Product Used:


South Mission Beach

Today’s page shows some photos from our stopover at South Mission Beach. Ron and I love this place and try always spend a little time there if we are up that way. One of the things that we wanted the girls to be able to see was a Cassowary and we knew that our best chance was at South Mission Beach. The girls were not disappointed, we had hardly set up when a young Cassowary wandered onto our site and picked up a couple of biscuit crumbs that had fallen on the ground.  This was a little startling but even more so when the Mum wandered in after her. We soon got used to the idea that if you didn’t bother them, they didn’t bother you, but I certainly wouldn’t be leaving any food or scraps laying around during our stay. To create my page I added a piece of Natures Poem Designer Series paper across a 12″ x 12″ Whisper White page. I attached the photos to Blackberry Bliss card and the journalling panel is attached to one of the Delightfully Detailed Memories and More 6″ x 4″ cards. The date stamp comes from the Tabs for Everything stamp set and the title is cut from Blackberry Bliss card using the retired Timeless Type Alphabet Dies. A simple page but one that represents a wonderful time in our journey.
Bye for now,
Kris
Product Used:


