Beauty of the Season

Today’s card is very simple but uses some product from the Annual Catalogue and some from the Holiday Catalogue. I embossed Shaded Spruce card using the Tin Tile Dynamic Embossing Folder. I attached a piece of the Under The Mistletoe Designer Series Paper to the bottom of the embossed card and attached a strip of Gold Glimmer Paper across the top. The whole panel is attached to scored and folded Thick Whisper White card. I stamped the greeting from the Merry Christmas to All stamp set onto Whisper White card using Shaded Spruce ink.  I cut out the greeting using one of the Layering Ovals Dies. I attached the greeting to a scalloped oval cut from Gold Glimmer Paper using the same dies.
  The greeting panel is attached to the card front using dimensionals.
To decorate the inside of the card, I attached a narrow strip of the same Under the Mistletoe Designer Series Paper to the bottom of Whisper White card. I attached a narrow strip of Gold Glimmer paper across the top of the Designer Series paper.
I believe I cased this card from one that I saw somewhere on the internet but I really don’t know where or who (please let me know if it is yours so that I can give credit). I love how simple it is, but, how truly stunning it is as well. I think I am going to make this card in a rainbow of colours, co-ordinating with my Christmas Designer Series papers to use for my family and friends this Christmas.
Bye for now,
Kris
Product Used:


Golden Baubles

Today’s card is one that I Cased from the Holiday Catalogue. I love any stamp set that has ornaments in it for Christmas and so this one was a must buy for me. I attached Real Red card to scored and folded Shaded Spruce card. I stamped the multiple bauble image from the Beautiful Baubles stamp set across Whisper White card using Versamark ink. I sprinkled the stamped image with Gold Embossing Powder and heat set it before attaching the stamped panel across the centre of the card front.  I stamped the same image once onto Real Red card and once onto Shaded Spruce card using Versamark ink, sprinkled with Gold Embossing Powder and heat set. I used the co-ordinating Detailed Baubles Thinlits Dies to cut out the baubles from the Real Red and Shaded Spruce card. I attached three Real Red and three Shaded Spruce baubles to the card front using mini dimensionals. I stamped the greeting from the Beautiful Baubles stamp set onto Shaded Spruce card using Versamark ink, sprinkled it with Gold Embossing Powder and heat set it.
  I used the Everyday Label Punch to punch out the greeting and then used the Paper Trimmer to cut away to top and bottom sections, leaving this lovely label shape with rounded ends, before attaching to the card front.
To decorate the inside of the card, I stamped the multiple bauble image from the Beautiful Baubles stamp set onto the top left hand corner of Whisper White card using Versamark ink, sprinkled it with Gold Embossing Powder and heat set it.
Casing the catalogue is a great way to get a feel for a stamp set. I have started stamping all the images onto Whisper White card. I attach any pieces that are die cut with the co-ordinating dies and keep them in a folder. I find that by doing this I am really inspired to start creating using the products.
Bye for now,
Kris
Product Used:


Beauty in the Details
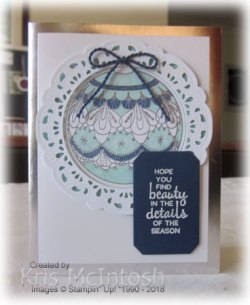
Here is another cased card from the Holiday Catalogue using the Beautiful Baubles stamp set and co-ordinating Detailed Baubles Thinlits Dies. I loved the look of this card in the catalogue but changed it up a little bit. I cut Pool Party card using the frame die in the Detailed Baubles Thinlits Dies to cut Pool Party card. I used the two frame dies to cut Whisper White card. I attached the Whisper White frame over the top of the Pool Party Card using Mini Dimensionals.  I stamped the large bauble image from the Beautiful Baubles stamp set onto Whisper White card using Versamark ink which I sprinkled with Silver Embossing Powder before heat setting. I coloured the image using Pool Party and Night of Navy Stampin’ Blends. I trimmed around the top part of the bauble and then used the co-ordinating die to cut out the bauble.
  I attached the bauble to the Pool Party card inside the Whisper White frame. The whole piece is attached to a Silver Foil Edged Card. These cards come in packs of 20 with matching envelopes. I stamped the greeting from the Beautiful Baubles stamp set onto Night of Navy card using Versamark ink. I sprinkled the ink with White Embossing Powder and heat set it. I used one of the frame dies in the Frosted Bouquet Framelits Dies to cut out the greeting which is attached to the card front using dimensionals. I tied a bow using Night of Navy trim and attached it to the top of the frame.
To decorate the inside of the card, I stamped another of the greetings from the Beautiful Baubles stamp set using Night of Navy ink.
I love this gorgeous frame and if you look carefully through the catalogue, you will notice that it is used quite a lot with other stamp sets.
Bye for now,
Kris
Product Used:


From our home to yours

This is another card I made using the Farmhouse Christmas stamp set and the co-ordinating Farmhouse Framelits Dies. I stamped the trees from the Lovely As A Tree stamp set across Whisper White card using Shaded Spruce ink. I masked the “sky” and also a little path and dabbed Shaded Spruce ink across the Whisper White card to represent grass. I removed the masks and sponged some Crumb Cake ink to represent the pathway. I masked the “grass” and dabbed Balmy Blue ink across the sky. I stamped the house image from the Farmhouse Christmas stamp set onto Whisper White card using Memento Tuxedo Black ink.  I stamped the “bauble” image from the same stamp set across the verandah and the top floor of the house also using Memento Tuxedo Black ink. I coloured the house and the baubles using Smoky Slate and Real Red Stampin Blends. I attached the house image over the stamped and sponged background. I cut two pieces of Whisper White card using the fence die from the Farmhouse Framelits Dies. The fence pieces are attached either side of the pathway. I attached the stamped panel to Shaded Spruce card and then Whisper White card. I stamped the greeting from the Farmhouse Christmas stamp set onto the lower right hand corner of the Whisper White card before attaching the panel to scored and folded Gray Granite card. I stamped the wreath image from the Farmhouse Christmas stamp set onto Whisper White card and coloured the image using the Shaded Spruce and Real Red Stampin’ Blends.
  I cut out the image using the co-ordinating Farmhouse Framelits Die and attached the wreath to the house.
To decorate the inside of the card, I stamped the greeting from the Farmhouse Christmas stamp set onto Whisper White card using Shaded Spruce ink. I stamped the greeting once more onto scrap Whisper White card using Real Red ink and cut out the “Merry Christmas” using the frame from the Farmhouse Framelits Dies. I attached the “Merry Christmas” banner over the stamped image.
I really enjoyed making this card, it was fun to build up the scene to create a somewhat different Christmas card. I am beginning to think that I like this stamp set and co-ordinating dies because the fence die reminds me of the picket fence we had on our front yard when I was growing up!
Bye for now,
Kris
Product Used:


Ayr
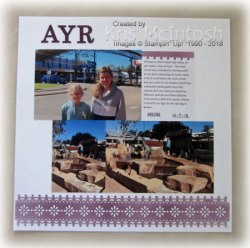
Ayr is not far south of Townsville and a lovely place to stop and stretch your legs or even stay a while. We didn’t have time to stay a while, so we had a wander around the town to stretch our legs. The main street has this fantastic arch with the town name which was a great backdrop for a photo of the girls. Even after all this road tripping they still look happy! The theatre area has a fabulous display of animals and their habitats. It was fun for the girls to spot all this different animals. My page for these photos is once more 12″ x 12″ Whisper White. I took a piece of the Delightfully Detailed Laser Cut Designer Series Paper and coloured it using the Sponge Brayer and Blackberry Bliss ink before attaching it across the bottom of the page. I also used a piece to create a mask for the journaling card to add more Blackberry Bliss ink across the top. The alphabet dies are once more the retired Timeless Type Alphabet Dies.  I know that these are retired and I use them a lot but the alphabet dies which are current would have been just too large to use on most of my pages. The letters are cut from Blackberry Bliss card. I have also used the Tabs for Everything stamp set to add the date and “amazing”.
Bowen was our stop-over town for the night and after we arrived and set up we took the girls up to the lookout so that they could get 360 degree views of the islands along the coast and the town. It is such a pretty place. The girls loved exploring the rocks along the beach at Horseshoe Bay. The journaling card is created using Whisper White card with a narrow strip of one of the Delightfully Detailed Memories and More cards across the bottom. I have used the Tabs for Everything stamp set to add the date. The title is cut from Blackberry Bliss using the retired Little Letters Thinlits Dies.
I hope you are still enjoying seeing these pages.
Bye for now,
Kris
Product Used:


Farmhouse Christmas
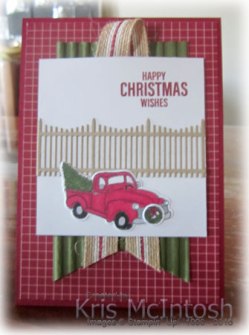
You will find the Festive Farmhouse Product Suite on pages 12 and 13 of the Holiday Catalogue. I like the images in the Farmhouse Christmas stamp set because they are adaptable to use for Australian Christmas cards. This card is my version of one of those on page 12. I attached the Festive Farmhouse Designer Series Paper to scored and folded Cherry Cobbler card. I cut a “v” in one end of Mossy Meadow card and then embossed it using the Corrugated Dynamic Embossing Folder. I attached the embossed card to the card front and added a layer of the 5/8″ Striped Burlap Trim. I cut a strip of Crumb Cake card using the fence die in the Farmhouse Framelits Dies, which I attached across the centre of the Whisper White card.  I stamped the greeting from the Farmhouse Christmas stamp set onto the top right hand corner of the Whisper White card using Cherry Cobbler ink. I stamped the car image onto Whisper White card and coloured it using a Mossy Meadow and Basic Black Stampin’ Write Markers and Cherry Cobbler and Smoky Slate Stampin’ Blends. The image is cut out using the co-ordinating Farmouse Framelits Die. I also stamped the small wreath image onto Whisper White card using Memento Tuxedo Black ink and coloured it using the Dark Cherry Cobbler Stampin’ Blend and the Mossy Meadow Stampin’ Write Marker.
  The image is cut out using the co-ordinating Farmhouse Framelits Dies. I attached the wreath to the front of the car before attaching the whole piece to the stamped Whisper White card. The image panel is attached to the card front using dimensionals.
To decorate the inside of the card, I attached a narrow strip of the same Festive Farmhouse Designer Series Paper across the bottom of Whisper White card.
Aren’t the images in this stamp set fun. I love the car and that tiny wreath. Oh and let’s not forget that gorgeous fence. One great thing about the Farmhouse Framelits Dies is that it contains two dies to cut out the wreath and there is also a die which will cut 6 cute little bows all at the same time. So it will be easy to create multiples of the small images in this stamp set.
Bye for now,
Kris
Product Used:


More Winter Woods

This card was inspired by another of the cards in the Holiday Catalogue but I have changed it up a little. I stamped the tree trunk image across Crumb Cake card using Soft Suede ink before embossing using the Corrugated Dynamic Embossing Folder. The embossed card is attached to scored and folded Merry Merlot card. I stamped the tree image across Very Vanilla card using Mossy Meadow ink before embossing the top two-thirds using the Softly Falling Embossing Folder.  I stamped the greeting from the Winter Woods stamp set onto the lower right hand corner using Merry Merlot ink before attaching the piece to the card front using dimensionals. I cut another piece of Very Vanilla card using the edgelit die in the In The Woods Framelits Dies. The Very Vanilla card is attached to the card front using dimensionals.
  I stamped the single tree image onto Very Vanilla card twice using Mossy Meadow ink. I used two different dies from the In The Woods Framelits Dies to cut out the trees – the outline die to cut out one tree and the detailed die to cut out the other tree. The detailed die cuts the tree slightly smaller but with little pieces that you can raise to give more texture. I attached the detailed tree to the full tree and then attached it to the card front, using dimensionals where necessary.
To decorate the inside of the card, I stamped the tree trunk image from the Winter Woods stamp set across a narrow strip of Crumb Cake card using Soft Suede ink. The panel is embossed using the Corrugated Dynamic Embossing Folder before attaching to the bottom of Very Vanilla card.
This card has a fair bit going on but I am loving the way it all came together, what about you?
Bye for now,
Kris
Product Used:


A Winter Wreath

This card is loosely based on another of the cards in the Holiday Catalogue using the Winter Woods stamp sets. I stamped the greeting from the Winter Woods stamp set onto Very Vanilla card using Merry Merlot ink. The stamped panel is attached to Mossy Meadow card and then scored and folded Merry Merlot card. I used the Stamparatas and small leaf image in the Winter Woods stamp set to create a wreath on Very Vanilla card using Mossy Meadow ink. I cut out the wreath panel using one of the dies in the Layering Squares Framelits Dies and attached it to a Merry Merlot scalloped square cut using the same dies. The image panel is attached to the card front using dimensionals. I stamped two more leaves onto Very Vanilla card using Mossy Meadow ink and cut them out using the In The Woods Framelits Dies.
 I stamped the pine cone onto Very Vanilla card using Soft Suede ink and cut it out using the co-ordinating In The Woods Framelits Die. The pinecone and leaves are attached to the stamped wreath. I cut a bow from Merry Merlot card using the die from the Bouquet Bunch Framelits. The bow is attached over the leaves and pine cone.
To decorate the inside of the card, I stamped the leaf image from the Winter Woods stamp set three times onto the top right hand corner of Very Vanilla card using Mossy Meadow ink. I stamped a pine cone onto scrap Very Vanilla card using Soft Suede ink and cut it out using the co-ordinating In The Woods Framelits Die. The pine cone is attached over the ends of the leaves.
This card doesn’t really look like the one in the catalogue, but it certainly gave me the inspiration to create this card.
Bye for now,
Kris
Product Used:


Simple Winter Woods

When I saw the Winter Woods stamp set in the Holiday Catalogue (page 27), I couldn’t help but be drawn to the beautiful Christmas Tree image, although it doesn’t feature on this card. This is my version of one of the cards in the catalogue. I stamped the tree trunk image across Crumb Cake card using Soft Suede ink before embossing using the Corrugated Dynamic Embossing Folder.  I wrapped the card using the Very Vanilla Festive Farmhouse Bakers Twine around the card before attaching to Merry Merlot card. The whole panel is attached to scored and folded Thick Very Vanilla card. I cut the leaf from Mossy Meadow card using the In The Woods Framelit Die and then embossed the leaf in the die using the Embossing Mats to give it some great texture.
 I stamped the greeting from the Winter Woods stamp set onto Very Vanilla card and punched it out using the Everyday Label punch. I attached the leaf behind the greeting panel and attached the whole piece to the card front using dimensionals.
To decorate the inside of the card, I cut a leaf from Mossy Meadow card and embossed it using the Embossing Mats. The leaf is attached to the lower left hand corner.
I absolutely adore this card, the texture is amazing even though it is a simple card. What do you think?
Bye for now,
Kris
Product Used:


Sunrise

We got up early the morning we left Rollingstone to watch the sun rise over the water. It was freezing cold and a little cloudy on the horizon but it was worth it. Even the girls didn’t stay in bed!
I created the page by using the Pattern Party Decorative Masks and the Shimmery White Embossing Paste to add interest in the top left and bottom right hand corners of the 12″ x 12″ Whisper White page. I’m not sure if you can see it in the photos but this Paste not only gives dimension but it also gives great sparkle. Once the Embossing Paste was dry, I add the photos.  The title is cut from Basic Black card using the retired Timeless Type Alphabet Dies. The journaling is printed onto Whisper White card, cut into strips and attached to Basic Black card before attaching to the page.
Another simple page, but one that I love. The photos bring back some happy memories. I love how I can create pages using traditional style Memory Keeping and use them alongside pocket pages to create my holiday stories.
Bye for now,
Kris
Product Used:


