More Snow is Glistening

Since this suite will soon be available for you to purchase, I thought you might want to see a few more examples of how to use this product suite. I did purchase a set of tutorials from Create with Connie and Mary and my card today features one of the cards. It begins with a piece of Gray Granite card embossed with the Curls and Swirls Embossing Folder. The embossed card is attached to scored and folded Coastal Cabana card. A piece of Coastal Cabana paper from the Brights 6″ x 6″ Designer Series paper is attached across the embossed card. The tree image from the Snow is Glistening stamp set is stamped onto Whisper White card using Granny Apple Green ink. I cut around the tree using my paper trimmer.  I stamped the tree trunk image onto Whisper White card using Gray Granite ink and cut it out. I attached the tree trunk to the tree and then the card front using dimensionals. I stamped the greeting from the Snow is Glistening stamp set onto the right hand edge of a strip of Granny Apple Green card using Memento Tuxedo Black ink. The greeting panel is attached to the card front over the tree using dimensionals.
  I cut one tiny snowflake and one larger snowflake from Silver Glimmer Paper using the Snowfall Thinlits Dies. The small snowflake is attached to the top of the tree and the larger one is attached to the left hand side of the greeting panel. I tied a bow using Silver Baker’s Twine and attached it to the centre of the larger snowflake.
To decorate the inside of the card I attached a narrow strip of Coastal Cabana card behind one long edge of Gray Granite card which is embossed using the Swirls and Curls Embossing Folder. The panel is attached to the bottom of Whisper White card.
This is a very pretty card and not overly snowy for an Aussie Christmas. What do you think?
Bye for now,
Kris
Product Used:


Snowfall CASE
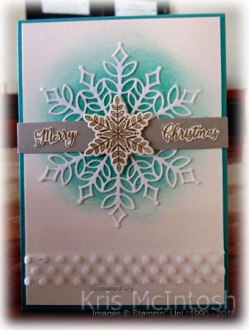
Today’s card is my version of a card shared by Stampin’ Up!. I started by sponging Bermuda Bay ink onto Shimmer Whtie card in a rough circle. I wrapped the bottom of the Shimmer Whtie card with 5/8″ Whisper White Polka Dot Tulle Ribbon and attached it to scored and folded Bermuda Bay card. I cut the large snowlake from a White Velvet sheet. Wow, this paper has to be seen and felt to be believed. So soft and pretty and – yes – velvety! The snowflake is attached to the card front on top of the sponged area. I cut a banner from Gray Granite card and attached it across the centre of the snowflake. I stamped the “Merry Christmas” from one of the greetings in the Snow is Glistening stamp set onto scrap Shimmer White card using Versamark.  I sprinkled the greeting with Gold Embossing Powder, heat set it and then cut out the individual words. The words are attached to the Gray Granite Banner.
  I stamped the leafy image from the Snow is Glistening stamp set onto Shimmer Whtie card using Versamark, sprinkled it with Gold Embossing Powder and heat set it. The image is cut out using the matching Snowfall Thinlits Die. The image is a perfect match for the “white space” in the large snowflake. The image is attached using dimensionals.
To decorate the inside of the card, I sponged Bermuda Bay ink onto Whisper White card in a smallish circle. I cut the snowflake from the White Velvet sheet and attached it over the sponged area.
This product suite is going to be a big hit when it becomes available in November, so if you want this product suite you do not want to delay purchasing it.
Bye for now,
Kris
Product Used:


It’s Our Birthday

Sooo, Stampin’ Up! is holding a one-day only sale today. The sale ends just before midnight tonight for online orders. There is an amazing array of stamp sets which are discounted by 15% for one day only. Please note that if a stamp set is part of a bundle, the discount applies to the stamp set only, NOT the bundle.
You can download the the PDF here. Or you can visit my online store and place your order directly. So don’t miss out on this opportunity to add to your stamp collection and save %15! I know that I am going to be saving a bundle on some sets I have had my eye on for a while. Have fun shopping.
Bye for now,
Kris
Something New

Have you heard? Stampin’ Up! are releasing an amazing product bundle which will only be available for customers to purchase during the month of November. As a demonstrator I was able to order this product suite in October and so I have been having a little play over the last week or so. Today’s card is inspired by the sketch challenge at Freshly Made Sketches and the colour challenge at the Paper Craft Crew. It is a simple card but shows off some of the images in the Happiness Surrounds stamp set and also the co-ordinating dies from the Snowfall Thinlits Dies.
 I started by stamping the large image from the Happiness Surrounds stamp set onto Whisper White card using Gorgeous Grape ink. The stamped panel is attached to scored and folded Gorgeous Grape card. I stamped the medium flower from the Happiness Surrounds stamp set onto scrap Whisper White card using Mango Melody ink.
  The colour challenge let you pick one colour yourself and I chose to stamp the small flower onto scrap Whisper White card using Poppy Parade ink. Both the large flower and the small flower have been cut out using the co-ordinating Snowfall Thinlits Dies. I also cut Granny Apple Green with the two leaf dies from the Snowfall Thinlits Dies. The leaves are attached to the back of the large flower before attaching to the card front. I attached the small Poppy Parade flower to the centre of the larger flower using dimensionals. I stamped the greeting from the Happiness Surrounds stamp set using Poppy Parade ink. I added a large Basic Rhinestone to the centre of the flower and a couple more around the greeting.
To decorate the inside of the card I stamped the border image from the Happiness Surrounds stamp set across the bottom of Whisper White card. I used the hinged stamping capablity of the Stamparatus to make sure that the border image was perfectly aligned.
To check out the products available for purchase watch this video by Stampin’ Up!.
These products will only be available for purchase during the month of November so don’t wait, if you want them order them as soon as you can to make sure you don’t miss out.
Bye for now,
Kris
Product Used:


Croc Farm
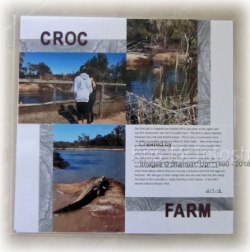
Today’s pages show off a couple of photos from our visit to the Croc Farm at Yeppoon. This is a commercial farm where the crocodiles are grown for their skin and incidentally their meat. We learned a lot about crocodiles and also the business of farming. This Croc Farm will also remove crocodiles from places where they are causing a nuisance or becoming a danger to humans.
To create the first page I cut one of the 6″ x 4″ Delightfully Detailed Memories and More cards into strips. I attached strips along the outside edges of the photos and also the journaling card. The title is cut from Blackberry Bliss card once more using the retired Little Letters Thinlits Dies.
The second page is also quite simple, with the photos of the girls and the journaling panel being attached to Basic Black card before being attached to the 12″ x 12″ Whisper White page. The photo of myself is attached to the journaling panel and the greeting from the Picture Perfect Birthday stamp set is stamped in Memento Tuxedo Black ink. I have also used the Tabs for Everything stamp set to add the date on both pages.
That brings me to an end of this series of pages from our holiday to Cooktown, I hope you have enjoyed them. You will notice that my style is quite simple. After the introduction of Project Life and now Memories and More, I try and keep all my layouts so that the panels and pieces are either 6″ x 4″ or 3″ x 4″. This makes it easy to create the page and add elements. I’d love to know what your style of Memory Keeping looks like.
Bye for now,
Kris
Product Used:


Smoosh and Shimmer

This is the first card I created after a day of playing with my Shimmer Paints. I created some great samples for my technique book (make sure you keep an eye out for a day of techniques in January) and decided to create this card using the Smoosh Background technique. To do this technique, you need to take a plastic bag (a Stampin’ Up! one of course) and cut down one side and across the bottom, so that it opens like a book. With the plastic bag open, you add some Frost White Shimmer Paint and use an Aqua Painter to move it around and spread it out, but kind of in lines, not great big blobs. (Make sure that you clean your Aqua Painter straight away.) Then you add some re-inker, in my case I used Melon Mambo and Gorgeous Grape. Once you have added the re-inker, you spritz the plastic bag using a Spritzer filled with water.  Then you simply place your piece of Whisper White card onto the plastic bag, close the flap and give it a rub. You get a different result every time. You can even pop the Whisper White card back onto the plastic bag to add any of the Shimmer Paint and re-inker left where you think you need it.
I created a centre step card using Gorgeous Grape card and cut strips of my Smoosh Background panel to fit across the bottom of the card and down the two side. I stamped the stem image from the Beautiful Bouquet stamp set onto Whisper White card, using Granny Apple Green ink and attached it to the centre panel of the card. I stamped three large flowers from the Beautiful Bouquet stamp set onto Whisper White card using Melon Mambo ink and cut them out using the matching Bouquet Bunch Framelits Die. I stamped five of the medium flowers from the Beautiful Bouquet stamp set onto Whisper White card using Gorgeous Grape ink and cut them out using the matching Bouquet Bunch Framelits Die. I stamped three small flowers (I think these are actually flower centres) again from the Beautiful Bouquet stamp set onto Whisper White card using Melon Mambo ink and cut them out using the matching Bouquet Bunch Framelits Die. The flowers are attached to the top of the flower stems, some using dimensionals. I cut the bow from the Smoosh Background panel using the Bouquet Bunch Framelits Die and attached it to the flower stem. I stamped “happy birthday” from the Beautiful Bouquet stamp set onto Whisper White card using Gorgeous Grape ink. I cut out the greeting using one of the Layering Ovals Framelits Dies, attached it to a Melon Mambo scalloped oval cut using the same dies and then the card front. Lastly I added a Basic Rhinestone to the centre of each flower.
I cut a narrow strip of the Smoosh Background panel across the bottom of Whisper White card and attached to the inside of the card so that a message can be added.
This Smoosh Background creates a beautiful, shiny panel which catches the light and just looks gorgeous, although I am not sure how much of the shine you can see.
Bye for now,
Kris
Product Used:


Try Stamping on Tuesday 381
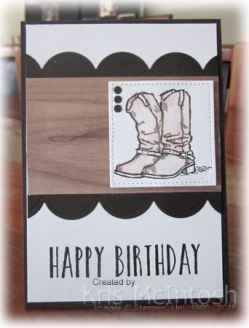
Today’s card was inspired by the sketch challenge at Try Stamping on Tuesday. I started by stamping “Happy Birthday” from the Perennial Birthday stamp set onto the bottom of Whisper White card using Early Espresso ink. I cut two scalloped pieces from Early Espresso card using the die from the Seasonal Layers Thinlits Dies. The scallop edges are attached behind the long edges of a piece of Wood Textures Designer Series Paper before being attached to the stamped Whisper White card. The whole panel is attached to scored and folded Early Espresso card. I stamped the boot image from the Country Livin’ stamp set onto Whisper White card using Early Espresso ink.  I used an Aqua Painter to move the ink around to colour the boots. I think this gives them a lovely worn look, don’t you?
  The boots are cut out using one of the squares from the Stitched Shapes Framelits Dies before being attached to the card front using dimensionals. I punched Early Espresso card using the Cookie Cutter Builder Punch to create the three small dots on the image panel. Usually I struggle to place small pieces of card onto my projects but using the Take Your Pick tool makes this so easy.
The inside of the card is very simple, with just a narrow strip of the same Wood Textures Designer Series paper attached across the bottom of Whisper White card.
Such a simple card but I love the finished result using this sketch. How about you?
Bye for now,
Kris
Product Used:


A Pearly Birthday

I have really loved playing with Shimmer Paint techniques and decided to use one of them on this birthday card for a lovely friend. Happy Birthday Shirley (sorry I was a little late). I have used the sketch challenge at Case This Sketch for the layout. To create the background you need to scrunch up some cling wrap (Saran Wrap for my friends in the USA) and dab it into Frost White Shimmer Paint and then dab it onto Whisper White card. You have to be patient and let it dry and then you gently add Sahara Sand ink using a sponge and a light circle motion. This really makes the shimmer stand out. The panel is attached to scored and folded Blackberry Bliss card. Next I stamped the “slice of wood” image from the Rooted in Nature stamp set using Rich Razzleberry ink. I stamped the greeting from the Sunshine Sayings stamp set onto Whisper White card using Blackberry Bliss ink. The greeting is attached to Blackberry Bliss card and then the card front. I stamped the leaf image from the First Frost stamp set onto Whisper White card using Shaded Spruce ink and cut it out using the matching Frosted Bouquet Framelits Dies before attaching to the card front.
  I stamped the large and small flower from the First Frost stamp set onto Whisper White card using Blackberry Bliss ink and cut them out using the matching Frosted Bouquet Framelits Dies. I used the stylus on my Take Your Pick tool to add a little dimension to the flowers. I attached the small flower to the large flower using a dimensional. The whole piece is attached over the leaf image also using a dimensional.
To decorate the inside of the card, I stamped the leaf image from the First Frost stamp set onto the lower left hand corner of Whisper White card using Shaded Spruce ink. I stamped the large flower from the same stamp set onto Whisper White card using Blackberry Bliss ink and cut it out using the matching Frosted Bouquet Framelit Die. The flower is attached over the leaf image.
I love how sparkly this card is although I am not sure that you can truly see the effect in the photos. If you haven’t tried Shimmer Paint yet, then you are truly missing out.
Bye for now,
Kris
Product Used:


Happy, Happy Birthday

Today’s card uses a fancy fold shared by Julie Burt on a Demonstrator only facebook page. Unfortunately Julie doesn’t have a blog or facebook page yet, but I will let you know when she does. I have shared a card made using this template previously but this was actually the first card I made using Julie’s amazing idea. My card is for a special friend who celebrated her birthday recently. Happy Birthday Jenny. The card is a little like a Tri-Shutter card with a twist because it has a small card that opens on the front. I used Julie’s template to cut Thick Whisper White card for the base. I added pieces of the Garden Impressions 6″ x 6″ Designer Series paper to the panels. I created the flower for the card front by stamping the large flower from the Graceful Garden stamp set twice onto Whisper White card using Memento Tuxedo Black ink. I coloured the flowers using Calypso Coral Stampin’ Blends and the leaves using Soft Sea Foam Stampin’ Blends.  I cut the small centre piece from one image and the full flower for the second image and attached the small flower to the centre of the full flower using dimensionals. I cut out the leaves and attached them behind the full flower before attaching to a Whisper White circle which I cut using the Stitched Shapes Framelits Dies. The small squares of Soft Sea Foam card are embossed using the Tin Tile Dynamic Embossing Folder. I embossed a large piece of card and trimmed one “tile” for each of the panels. The small flower is also from the Graceful Garden stamp set which I stamped onto Whisper White card using Memento Tuxedo Black ink.
  The flower is once again coloured using the Calypso Coral and Soft Sea Foam Stampin’ Blends. I cut out the flower and cut the leaves from the flower. I attached the leaves behind the flower before attaching to the Whisper White circle cut using the Stitched Shapes Framelits Dies. To decorate the last panel I cut a large circle from Whisper White card using the Stitched Shapes Framelits Dies and stamped “happy” from the Merry Christmas To All stamp set using Night of Navy ink. I stamped “happy birthday” from the Sunshine Sayings stamp set onto scrap Whisper White card using Night of Navy ink. I stamped the frame from the Merry Christmas To All stamp set around the greeting and used the die from the Merry Christmas Thinlits Dies to cut it out before attaching to the circle below the “happy”.
To decorate the inside of the small opening card, I stamped the leaf from the Graceful Garden stamp set twice onto scrap Whisper White card using Memento Tuxedo Black ink. I coloured the leaves using the Soft Sea Foam Stampin’ Blends before cutting them out. I attached one leaf to the top left hand corner and one to the bottom right hand corner.
I hope you like this card as much as I do. Thanks again Julie for the fantastic idea and once more Happy Birthday Jenny.
Bye for now,
Kris
Product Used:


Bowen to Yeppoon.
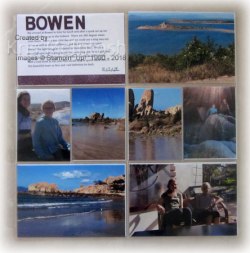
Today’s page showcases our stay in Bowen. We arrived pretty early and after setting up we went exploring the town. We first visited the lookout where you get the most magnificent views – 360 degrees. You can see all the way up and down the coast as well as over the town and the surrounding countryside. We explored the bays and foreshore of the town and spent quite a bit of time at Horseshoe Bay where the girls loved climbing the hills and exploring the headland. We enjoyed a lovely drink at the cafe before heading back to the caravan. I used a pocket page for this layout and created the journaling on the computer. I printed onto Whisper White card and added a strip of one of the Delightfully Detailed Memories and More 6″ x 4″ cards across the bottom. The date stamp is from the Tabs for Everything and the title is cut from Blackberry Bliss card using the retired Timeless Type Alphabet Thinlit Dies.
The second page depicts our arrival at Yeppoon and while setting up we were visited by the semi-resident Emu. He was quite friendly. The girls by now are quite expert at setting up and I couldn’t help but take some photos of them setting up our table to show their Mum and Dad. Again this page is a pocket page and I have used the same Delightfully Detailed Memories and More card to attach to the Whisper White card under the journaling. The word and the date stamp are from the Tabs for Everything stamp set and the title is once more cut from Blackberry Bliss card using the Timeless Type Alphabet Thinlit Dies.
Yeppoon is our last stop on this little journey, so not too many more pages to share. Hope you are still enjoying them.
Bye for now,
Kris
Product Used:


