Congrats
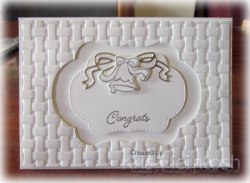
Today’s card was inspired by one I saw on Pinterest with a few modifications. I cut the medium sized label framelit die from Whisper White card using the Stitched Seasons Framelits Dies. I embossed the outside panel using the Basket Weave Dynamic Embossing Folder and attached it to scored and folded Thick Whisper White card using dimensionals. I cut the smallest label from Whisper White card using the Stitched Seasons Framelits Dies.  I stamped “Congrats” from the Blended Seasons stamp set onto the label using Versamark ink, sprinkled it with Silver Embossing Powder and heat set it. I cut the bow from Silver Foil card using the Stitched Seasons Framelits Dies and attached it to the top of the stamped label. The label is attached to the card front inside the embossed panel also using dimensionals.
  I stamped the bell image from the Blended Seasons stamp set twice onto scrap Whisper White card using Versamark ink, sprinkled it with Silver Embossing Powder and heat set it. The bells are cut out using the co-ordinating die from the Stitched Seasons Framelits Dies. One bell is attached over the bow on the front of the card using Mini Dimensionals and the second one is attached to the inside of the card.
This card is really quite pretty and pretty simple to make. It was one of the cards we made at this months card class and everyone loved it. Don’t forget that this stamp set and the co-ordinating framelits dies are only available until the end of the month on a While Stocks Last basis, so don’t delay placing your order.
Bye for now,
Kris
Product Used:


Brighter Days
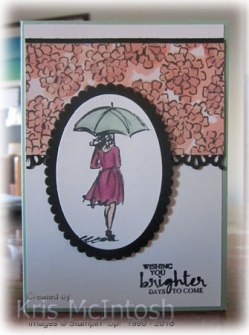
Continuing on with my cards created using a One Sheet Wonder template and assorted left-over pieces of Share What You Love Specialty Designer Series Paper, today’s card features the Beautiful You stamp set. I attached a narrow strip of Basic Black card behind one long edge of the the Share What You Love Specialty Designer Series paper. I punched a narrow strip of Basic Black card using the Decorative Ribbon Border Punch and attached it behind the other long edge of the Designer Series paper before attaching to Whisper White card. I stamped the greeting from the Beautiful You stamp set onto the lower right hand corner of the Whisper White card using Memento Tuxedo Black ink.  The whole panel is attached to scored and folded Mint Macaron card. I stamped the image from the Beautiful You stamp set onto Whisper White card and cut it out using one of the Layering Ovals Framelits Dies. I coloured the image using Rich Razzleberry, Mint Macaron and Ivory Stampin’ Blends before attaching to a Basic Black scalloped oval cut using the same Layering Dies.
  The image panel is attached to the card front using dimensionals.
To decorate the inside of the card, I punched a strip of basic Black card using the Decorative Ribbon Border Punch and attached it behind one long edge of a narrow strip of the same Share What You Love Designer Series Paper I used on the front of the card. The Designer Series Paper piece is attached to the bottom of Whisper White card.
I must admit that I love using the Stampin’ Blends and the Beautiful You stamp set has perfect images for colouring. I have several more of these cards to share with you over the coming weeks. I hope you enjoy them.
Bye for now,
Kris
Product Used:


Just Add Ink #421
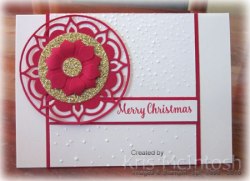
Today’s card is loosely based on the sketch challenge at Just Add Ink this week. I have a friend who owns the Eastern Medallion Thinlits Dies and I like to find ideas for her to use them. I started by embossing a piece of Whisper White card using the Softly Falling Embossing Folder. The embossed card is attached to Real Red card and then to scored and folded Thick Whisper White card. I stamped “Merry Christmas” from the Star of Light stamp set onto a narrow strip of Whisper White card using Real Red ink. The greeting is attached to a strip of Real Red card and then the card front.  I cut the large medallion from Real Red card using the Eastern Medallion Thinlits Dies and a circle die from the Layering Circles Framelits Dies. I cut a smaller circle from Gold Glimmer Paper using the same Layering Circles Framelits Dies and attached it to the centre of the medallion. I cut two of the “flower” pieces from Real Red card. If you cut the piece it is still attached around the “centre”, a quick snip and it comes free. I used my bone folder to give the petals a little dimension and attached one flower on top of the other. The flower is attached to the centre of the Gold Glimmer paper.
  I punched a 1/2″ circle of Gold Glimmer Paper and attached it to the centre of the flower. The whole medallion is attached to the left hand side of the card front.
To decorate the inside of the card, I attached a narrow strip of Real Red card to one long edge of Whisper White card which I embossed using the Softly Falling Embossing Folder.
I think these two colours together the Red and the Gold make this card really Christmassy, even though the dies used are not really for Christmas, don’t you think?
Bye for now,
Kris
Product Used:


A Little Twist
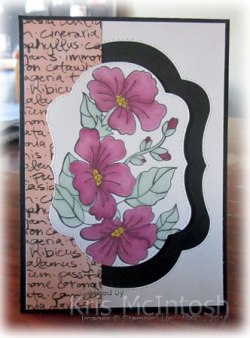
I love using One Sheet Wonder templates to create cards, however, this time instead of cutting one sheet of designer series paper, I decided to use the template (thanks Alison and Patsy) and some of the smaller pieces of the Share What You Love Designer Series Paper left over from other projects. This card uses one of those strips. I cut the label die from Whisper White card using the Stitched Seasons Framelits Dies. I attached the outside piece of the Whisper White card to scored and folded Basic Black card. I attached the Share What You Love Designer Series Paper to the left hand side of the Whisper White card. I stamped the floral image from the Blended Seasons stamp set onto Whisper White card using Memento Tuxedo Black ink. I coloured the image using Rich Razzleberry, Dark Daffodil Delight and Mint Macaron Stampin’ Blends. I cut the image using the medium label from the Stitched Seasons Framelits Dies and attached it to the centre of the card front using dimensionals.
 To decorate the inside of the card, I stamped the floral image from the Blended Seasons stamp set onto scrap Whisper White card using Memento Tuxedo Black ink, coloured it using the same Stampin’ Blends and cut out one flower and a couple of leaves. The flower and leaves are attached to the top right hand corner of Whisper White card.
Remember that the Blended Seasons stamp set and the Stitched Seasons Framelits Dies are only available for purchase until the 31st August – while stocks last. So don’t forget to place your order soon, so you won’t miss out. I will pop back with some of the other cards made using the pieces of Share What You Love Designer Series Paper using this template.
Bye for now,
Kris
Product Used:

Road Trip

My husband and I were lucky enough to take our two eldest granddaughters on a trip in our caravan to Cooktown during the last school holidays. We had an amazing time, saw lots and spent a lot of time together on our long travel days. I thought I should scrap these memories before I forgot all the details. Today’s pages show the title page and the first day of our trip.
The title page is pretty simple. I selected photos to show an overview of the trip and printed them 8 to a page. I am lucky enough to have an Epson Picturemate printer so I can easily print only the photos I want. I attached all of the photos to a piece of Basic Black card. I stamped “July 2018” onto Whisper White card using the retired Date It stamp set and Memento Tuxedo Black ink. The date is punched out using the Everyday Label Punch.  I punched Basic Black card using the same punch and attached it to the back of the stamped punch shape. The punched piece is attached to the back of the Basic Black card before attaching it to the Whisper White 12″ x 12″ page. I cut the letters for the title from Basic Black card using the retired Little Letters Thinlits Dies.
The second page depicts the first day of our trip. A really long drive from Brisbane to Emerald. We made two quick stops on the way one for morning tea at Gayndah and the second for lunch at Bileola. We arrived mid afternoon at Emerald and had a quick walk around town, the railway station being the most beautiful building we saw. The photos and journalling block are attached to a piece of Natures Poem Designer Series Paper before being attached to a Whisper White 12″ x 12″ page. I stamped the images from the Waterfront stamp set onto the lower right hand corner using Blackberry Bliss, Old Olive and Crumb Cake ink. Since most of Queensland is in drought it is hard to find too much really green grass. I cut the letters for “day” from Blackberry Bliss card using the Large Letters Thinlits Dies. The number “1” is cut from Basic Black card using the retired Large Numbers Framelits Dies. I also stamped the images from the retired Let’s Get Away stamp set onto the journaling card using Basic Black ink.
Creating these two pages brought back lots of great memories, I can’t wait to create more pages from our holiday.
Bye for now,
Kris
Product Used:


Act of Kindness

Today’s card is super simple. It’s the first thing I created using this image from the All The Good Things stamp set. I had a Whisper White die cut that I had created using the labels dies from the Stitched Seasons Framelits Dies lying on my desk and the image which I stamped in Mossy Meadow ink fitted perfectly. I cut Whisper White card using the largest of the labels dies from the Stitched Seasons Framelits Dies, making sure to centre it as best I could. I attached the outside piece of the Whisper White card to scored and folded Mossy Meadow card. I attached the stamped label inside the Whisper White frame using dimensionals. 
To decorate the inside of the card, I stamped another greeting from the All The Good Things stamp set using Mossy Meadow ink.
I know this is simple card, the kind of card you could make in a hurry in any of our wonderful Stampin’ Up! colours, but I do think that it is suprisingly beautiful, don’t you? Part of the reason that it seems to have lots of detail is because of the stitched labels from the Stitched Seasons Framelits Dies. These dies are only available until the 31st August while stocks last so you need to act as soon as possible and place your order so that you don’t miss out on these fabulous framelits dies. The All the Good Things stamp set is a Distinktive style stamp and gives so much depth just using one ink colour. I hope I have inspired you to take a look at this stamp set if you don’t already own it and perhaps get it out to play if you do.
Bye for now,
Kris
Product Used:


Fab Friday 143

The ladies at my Beachmere Class like to get a head start on their Christmas cards so we make one card each week from now until we take a break in December. Today’s card was inspired by the great sketch at Fab Friday this week. I am still waiting on my Holiday Catalogue pre-order so I have no new Christmas stamps, however, I have seen the Rooted in Nature stamp set used for Christmas and decided to give it a try. I stamped the greeting from the Hearts Come Home stamp set onto the lower right hand corner of Whisper White card using Real Red ink.  I embossed the stamped card using the Softly Falling Embossing Folder and attached it to scored and folded Real Red card. I cut a narrow strip of Real Red card, attached an even narrower strip of Gold Glimmer paper before attaching the pieces to the card front using dimensionals.
  I stamped the single “Christmas” tree image from the Rooted in Nature stamp set onto Whisper White card using Shaded Spruce ink. I cut out the image using the 2nd largest Layering Circle Framelit Die and attached it to a Shaded Spruce scallop circle cut using the same dies before attaching to the card front using dimensionals. I stamped the double “Christmas” tree image to scrap Whisper White card and cut them out using the matching Natures Roots Framelits Die. The double tree image is attached to the image circle using dimensionals.
To decorate the inside of the card I stamped the double “Christmas” tree onto the lower left hand corner of Whisper White card using Shaded Spruce ink.
I am really happy and excited to be able to use a “non-Christmas” stamp set to create such a sweet and simple card. What do you think, do you like it?
Bye for now,
Kris
Product Used:


Watercolour Stamping
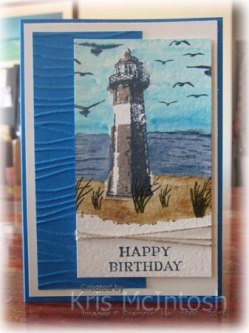
Today’s card also uses the layout on Page 151 of the Annual Catalogue but this time I am using the High Tide stamp set. I embossed Pacific Point card using the Seaside Embossing Folder and attached it to the left hand side of Very Vanilla card before attaching to scored and folded Pacific Point card. I stamped “happy birthday” from the Perennial Birthday stamp set onto the bottom of a piece of Watercolour Paper using Night of Navy ink. I stamped the sand image from the High Tide stamp set above the greeting (leaving room for my Linen Thread) using Crumb Cake ink. I re-inked the sand image using Soft Suede ink and stamped over the top of the Crumb Cake image. I used an Aqua Painter to spread the colours inside the stamped image. I stamped the first image for the lighthouse using Gray Granite ink and the second image using Night of Navy ink.  I stamped the “sea” image from the High Tide stamp set above the sand using Night of Navy ink. I used an Aqua Painter to spread the image and added some ink from the lid of the Night of Navy ink pad to create the finished look. I used an Aqua Painter and the ink in the lid of the Pacific Point stamp pad to colour above the “sea” and create some sky. I stamped the flying bird image from the High Tide stamp set around the Lighthouse using Night of Navy ink. I love the way that the images have bled a little because the paper was still slightly damp. I stamped the grass image using Mossy Meadow ink. I wrapped the gap which I left between the “happy birthday” and my lighthouse scene with some Linen Thread. The image panel is attached to the card front using dimensionals.
 Since I had so much fun creating the stamped watercolour scene for the card front, I decided to create another panel for the inside of the card. I once more stamped the sand image across the bottom of a piece of Watercolour Paper using both Crumb Cake and Soft Suede ink. I used the Aqua Painter to move the ink around inside the stamped image. I used the Aqua Painter and the ink in the lid of the Night of Navy ink pad to create some ocean and the ink in the lid of the Pacific Point ink pad to create the sky. I stamped the water birds using Night of Navy ink and the grass using Mossy Meadow ink. The panel is attached to the bottom of Very Vanilla card.
This card was so much fun to create and made me feel like a real artist – maybe those 4 years of studying Art in High School did pay off! I think I will have to play with more images using my stamps, ink pads and an Aqua Painter on Watercolour Paper.
I’d love to hear what you think.
Bye for now,
Kris
Product Used:


Brusho Blended Seasons
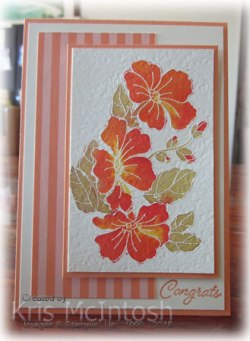
Today’s card uses the same layout as the card I shared with you on Friday and can be found on Page 151 of the Annual Catalogue. This time I decided to try a little water colouring with Brusho Crystals. I attached a piece of the 2018-2020 In-Colour Designer Series Paper to the left hand side of Very Vanilla card. I stamped the greeting from the Blended Seasons stamp set onto the lower right hand corner of the Very Vanilla card using Grapefruit Grove ink before attaching to scored and folded Grapefruit Grove card. I stamped the floral image from the Blended Seasons stamp set onto Watercolour Paper using Versamark ink, sprinkled it with White Embossing Powder and heat set it. I used my Aqua Painter to add a little water to Yellow Brusho Crystals on one of my Stampin’ Blocks. I also added water to the inside of the embossed flowers using the Aqua Painter. Then I dipped the Aqua Painter into the Brusho and then into the water on the inside of the flowers. Some of the colour spread outside of the embossing but not much. I repeated the process using Gamboge Brusho Crystals and then Brilliant Red Brusho Crystals.
  To colour the leaves I repeated the process using the Moss Green Brusho Crystals. I let the Watercolour Paper dry before attaching to Grapefruit Grove card and then the card front using dimensionals.
I kept it simple on the inside of the card by attaching a piece of Grapefruit Grove card behind one long edge of a piece of the same 2018-2020 In-Colour Designer Series Paper before attaching to the bottom of Very Vanilla card.
I haven’t played with my Brusho Crystals or watercolouring in a while and I don’t know why because it is such fun.
Bye for now,
Kris
Product Used:


Ava
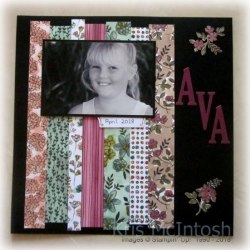
Today I am sharing the last page I made using the photos on my loungeroom wall. We had our monthly (mostly) Memory Keeping Class last Sunday and I was able to complete this page showcasing my youngest Granddaughter Ava. Once again I just had to use the beautiful Share What You Love Sprecialty Designer Series Paper. It is such beautiful paper and perfect for girly pages.  I have used quite a bit of this Designer Series Paper and had lots of leftover strips of paper, so I cut a few extra strips and varied the lengths just a little to cover most of the Basic Black 12″ x 12″ card. I hand cut some of the flowers from one of the papers and added them to the upper and lower right hand corners of the page. The letters for Ava’s name were cut from Rich Razzleberry card using the Large Letters Thinlits Dies. I used one of the labels from the Share What You Love Embellishment Kit to write the date. I attached the photo to Basic Black card, added the label to the back and attached the photo to the page using dimensionals.
 So while that’s the end of my family photos, I am hoping to share some pages created to showcase photos from a recently holiday to Cooktown with my two eldest granddaughters.
I would really love to know what you think of my pages. I know they are quite simple but I really love letting the photo do all the work.
Bye for now,
Kris
Product Used:


