Casing the Catalogue

I watched a short video recently where a demonstrator (I am sorry I don’t remember which one) said that she often cased the catalogue. I thought that was a great idea because I was struggling a little to come up with some new ideas for the All The Good Things stamp set. So if you check your catalogue on page 151 you will find my inspiration. I wrapped the left hand edge of a piece of the Natures Poem Designer Series paper with Linen Thread before attaching it to the left hand side of Cajun Craze card. The Cajun Craze/Designer Series Paper panel is attached to scored and folded Thick Whisper White card.
 I stamped the bonsai image from the All The Good Things stamp set onto Whisper White card using Cajun Craze ink and attached it to the card front using dimensionals.
To decorate the inside of the card I kept it simple and simply attached a narrow strip of the same Natures Poem Designer Series Paper to the left hand side.
So my card uses Cajun Craze instead of the green in the catalogue and I also used different designer series paper. I love the final result so I think I am going to try this with other stamp sets to see what I can create using this layout. What do you think? Do you case the catalogue? Maybe I’ve inspired you to give it a try.
Bye for now,
Kris
Product Used:


Plenty To Be Excited About
 Wow, what an amazing month this is for customers. The limited edition Blended Seasons stamp set, co-ordinating Stitched Seasons Framelits Dies and Watercolour Pencils Assortment 2 have launched and are now available for purchase. To coincide with this fantastic release, anyone who spends $90.00 during the month of August will be eligible for a $9.00 Bonus Days voucher to redeem during September. So if you purchase the Blended Seasons stamp set and the Co-ordinating Framelits Dies as a bundle you have already qualified for one Bonus Days voucher. Add the Watercolour Pencils Assortment 2, Blender Pens and Aqua Painters and an Ink Pad in your favourite colour and you have earned another Bonus Days voucher. Not only that, you have all the supplies you need to create beautiful projects using these awesome products. And, when the Holiday Catalogue launches in September, you will already have an $18.00 discount on your first order.

You need to remember that the Blended Seasons stamp set, co-ordinating framelits dies and the Watercolour Pencils Assortment 2 are only available 1-31 August while stocks last. So if you need these beautiful products, shop now.

Just to show how easy these products make it to create beautiful cards. Here is one I made using the Blended Seasons stamp set, Watercolour Pencils Assortment 2 and a Blender Pen. I added a little more product with Cherry Cobbler 1/4″ Stitched Ribbon, Gold Glimmer Paper, the Basket Weave Dynamic Embossing Folder and the 1-3/4″ and 2″ Circle Punches. The ink pads I used were Memento Tuxedo Black ink and Cherry Cobbler.
Bye for now,
Kris
Product Used:


Papercraft Crew Challenge 300

Today’s card was created using the sketch challenge at the Papercraft Crew. It is a fun sketch with lots of “white space”. I attached a narrow strip of the Under the Mistletoe Designer Series Paper to the left hand edge of Whisper White card. I stamped the greeting from the Blended Seasons stamp set onto Real Red card using Memento Tuxedo Black ink and punched the right hand edge using the Triple Banner Punch. I stamped the holly image from the Blended Seasons Stamp set onto Whisper White card using Memento Tuxedo Black ink. I coloured the image using Real Red, Old Olive and Daffodil Delight Watercolour Pencils and a blender pen. I cut out two sets of leaves and berries which I attached to the left hand edge of the greeting banner. One set of leaves and berries is attached using a mini dimensional. I also cut the leaf image using the Stitched Seasons Framelits Dies from Gold Foil.
 The Gold Foil leaves are attached to the banner before attaching the whole panel to the card front.
To decorate the inside of the card, I stamped the holly image from the Blended Seasons stamp set onto the top of Whisper White card and coloured the image using the Real Red, Old Olive and Daffodil Delight Watercolour Pencils and a Blender Pen.
Such a simple card really, thank you to the Papercraft Crew for the inspiration.
Before I go, just a quick reminder, we have two fantastic specials finishing today. The first one is the Buy 3 get one Free Designer Series Paper Sale. Don’t miss out on this one, you will be sorry. The second one is the great special for new demonstrators. Sign up for $169.00 – select $235.00 worth of product of your choice from the current catalogue and get 10 ink pads Free – that’s another $171.00 value for free. If you have ever wanted to become a demonstrator, now is the time. You will never be sorry.
Bye for now,
Kris
Product used:


Congrats

The cards I am sharing with you today was created for two team members who recruited during the month of July. The new recruits were able to purchase the initial kit by selecting $235.00 worth of product for the great price of $169.00. In addition they were also able to select a family of ink pads for free – an additional $171.00 worth of product. This is an amazing opportunity and you can still take advantage if you sign up before the 31st of July.
 The cards use the Blended Seasons stamp set which will become available for customers to purchase on the 1st August. They were both created in the same way but I did use different Stampin’ Blends for each one. I attached a piece of Soft Sea Foam card to Whisper White card and then embossed the whole piece using the Tufted Dynamic Embossing Folder. The embossed card is attached to scored and folded Thick Whisper White card. I cut out the smallest of the labels from Whisper White card using the Stitched Seasons Framelits Dies. I stamped “congrats” from the Blended Seasons stamp set onto the label and attached it to the card front using dimensionals.
  I stamped the floral image using Memento Tuxedo Black ink and coloured the image using the Flirty Flamingo and Granny Apple Green Stampin’ Blends. I cut out the image and attached it to the card front using dimensionals where necessary. I added Basic Pearls to the centres of each of the flowers.
To decorate the inside of the card, I stamped the floral image once more onto Whisper White card and coloured it using the same Stampin’Blends and also the Dark Daffodil Stampin’ Blend.  I cut out two of the flowers and attached it to the top right hand corner of the inside of the card.
The second card is created in exactly the same manner but uses Lovely Lipstick and Granny Apple Green Stampin’ Blends to colour the image. Congratulations to Jenny and Joyce for growing their teams.
Don’t forget to take advantage of the offer to purchase this limited time only stamp set during the month of August. You can purchase the stamp set, the co-ordinating dies or both as a bundle. There is also a set of Watercolour Pencils in 10 new colours available for purchase.
Bye for now,
Kris
Product Used:


Jae
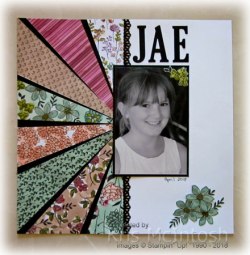
This is another of the photo’s from my lounge room wall, this time it’s a photo of my second youngest granddaughter. For this photo I still wanted to use the gorgeous Share What You Love Designer Series Paper. I cut a piece of Basic Black 12″ x 12″ card (unfortunately no longer available) down to 6″ x 12″. I cut pieces of the Share What You Love Designer Series Paper 3″ x 8-1/4″ and then I cut each piece in half on the diagonal. I attached the pieces to the Basic Black card before attaching the whole panel to Whisper White card 12″ x 12″.  I punched a length of Basic Black card using the Decorative Ribbon Border Punch and attached it over the edge of the Basic Black/Designer Series paper piece. I attached Jae’s photo to Basic Black card and then the page. I cut the letters for her name from Basic Black card using the Large Letters Framelits Dies and attached them above the photo.
  I hand wrote the date using one of the Journaling Pens. I cut the flowers from the Share What You Love Designer Series Paper and attached them to the lower right hand corner of the page, as well as a small group to the top right hand corner of the photo.
I am truly loving these pages, especially the girly ones using the Share What You Love Designer Series paper.
I’d love to hear what you think.
Bye for now,
Kris
Product Used:


More Fish

Here is another card I made using the All The Good Things stamp set. The layout is similar to the card I shared with you yesterday but I changed the orientation. I stamped the bokeh background from the Bokeh Dots stamp set onto Whisper White card using Balmy blue ink. I stamped the greeting from the All The Good Things stamp set over the top using Memento Tuxedo Black ink. I cut an oval from another piece of Whisper White card using the Layering Ovals Dies and attached the two Whisper White cards together so that the greeting showed through the oval cut out.  I attached the Whisper White panel to Balmy Blue card and then scored and folded Night of Navy card. I stamped two of the small fish from the All Good Things stamp set onto Whisper White card using Night of Navy ink and cut them out.
  The fish are attached around the oval cut out using Tombow Multi-purpose Glue on the outside of the images only.
To decorate the inside of the card I stamped one small fish onto the top left and bottom right hand corners of Whisper White card using Night of Navy ink. I also stamped the greeting from the All The Good Things stamp set onto the centre of the card using Night of Navy ink.
I think I like this version of the card better, mostly because I think it is better aligned with the greeting centred within the oval cut out. What do you think?
Bye for now,
Kris
Product Used:


All The Good Things

Today I am sharing a card with you that I made using the All The Good Things stamp set from the Annual Catalogue. This is a Distinktive stamp and gives you lots of detail and colour variation using just one ink. I stamped one of the background stamps from the Bokeh Dots stamp set onto Whisper White card using Balmy Blue ink. The Bokeh Dots stamp set is also a Distinktive stamp and you can see the variation and depth of colour that this stamp has created. I stamped the greeting from the All The Good Things stamp set over the top of the bokeh background using Memento Tuxedo Black ink.  I cut an oval from another piece of Whisper White card using the Layering Ovals Framelits Dies and placed this over the stamped Whisper White card using dimensionals before attaching the whole panel to scored and folded Balmy Blue card. I stamped the large fish image from the All The Good Things stamp set twice onto Whisper White card using Basic Gray ink and cut them out. I attached the fish around the outside of the oval using Tombow Multipurpose Glue on the outside of each image only.
 To decorate the inside of the card, I stamped the fish once more onto the right hand side of Whisper White card. The tricky thing about this large fish is that the greeting which I used on this card and the large fish is one stamp. To ink only the fish I used a sponge dauber so that I could control where I placed the ink. This was not so important for the image I cut out but for the image on the inside of the card, I didn’t want any of the greeting to show.
I hope you like my first attempt using this stamp set. I really love the Distinktive style of stamps and hope that we get more in our Holiday Catalogue.
Bye for now,
Kris
Product Used:

Magical Mermaids

I recently bought the Magical Mermaid stamp set because I think it has some amazing possibilities. Today is the first time it has been inked. I started by embossing Shaded Spruce card using the Seaside Embossing Folder. The embossed card is attached to scored and folded Thick Whisper White. I stamped the Marbled Background onto Whisper White card using Soft Sea Foam ink. I stamped the seaweed image from the Magical Mermaid stamp set over the top of the Marbled Background using Shaded Spruce ink. The greeting from the Magical Mermaid stamp set is stamped using Memento Tuxedo Black ink.  I stamped the mermaid image onto Whisper White card using Memento Tuxedo Black ink and coloured it using Stampin’ Blends – Light and Dark Rich Razzleberry, Dark Daffodil Delight, Bronze and Ivory. I cut out the mermaid and attached her over the stamping.
  The Whisper White card is attached to Soft Sea Foam card and then the card front.
To decorate the inside of the card, I stamped the small mermaid image from the Magical Mermaid stamp set using Memento Tuxedo Black ink onto the lower left hand corner of Whisper White card. I stamped the seaweed image multiple times, some without re-inking, across the bottom of the Whisper White card using Shaded Spruce ink.
I am pretty happy with the way this card turned out, but would love to know what you think.
Bye for now,
Kris
Product Used:


Blended Seasons
 My card today is created using a stamp set which is going to be released during the month of August. The promotion includes the Blended Seasons stamp set and Stitched Seasons Framelits Dies and a selection of 10 new Watercolour Pencils in some gorgeous colours which will be a great addition to the ones we already have. I am a little late sharing this with you and you may have already seen the promotion elsewhere but I didn’t want to share too early. I will probably pop in over the next week or so with some other creations using the stamp set and framelits dies.
The stamp set is truly versatile with images and sentiments to cover many occasions. Also available during the promotion period is a set of 10 Watercolour Pencils in some of the gorgeous new colours released in this year’s annual catalogue. There is a possibility (but not confirmed) that these markers may be available in a future catalogue.
 Anyway today I decided to case one of the cards in the flyer below. I embossed Whisper White card using the Softly Falling Embossing folder, before attaching a piece of Under the Mistletoe Designer Series Paper across the bottom half (This Designer Series Paper is available this month as part of the Buy 3 get one Free Designer Series paper promotion). I wrapped the top of the designer series paper with a length of Gold 3/8″ Metallic Edge Ribbon and attached the whole panel to scored and folded Real Red card. To create the focal piece I used my Stamparatus. I cut out one of the label dies from Whisper White card using the Stitched Seasons Framelits Dies. I placed the outside piece into the Stamparatus and then lined up the holly image so that it fitted into the top part of the label. I placed the label die inside the frame and stamped the holly image using Memento Tuxedo Black ink. I removed the label, rotated it 180 degrees and placed it back into the template and stamped the holly image once more.
  This gives me an image at the top and the bottom of the label piece which are both perfectly aligned and completely symmetrical. Gotta love your Stamparatus! I coloured the holly image using Stampin’ Blends – Light and Dark Old Olive, Dark Daffodil Delight and Dark Cherry Cobbler. The label is attached to the card front using dimensionals. I stamped the greeting from the Blended Seasons stamp set onto Real Red card using Memento Tuxedo Black ink, punched the ends using the Triple Banner Punch and attached it to the label between the stamped images. I cut out two sets of leaves from Old Olive card and two sets of leaves from Gold Foil using the die from the Stitched Seasons Framelits Dies. I actually cut the leaves into two pieces and attached the pieces behind the top right and lower left corners of the labels.
To decorate the inside of the card I attached a narrow strip of the same Under the Mistletoe Designer Series Paper across the bottom of Whisper White card.

Well, what do you think? Personally I am in love with the way this card turned out. I can’t wait to share another creation using the Blended Seasons stamp set and co-ordinating Stitched Seasons Framelits Dies.
Don’t forget you can only purchase the stamp set and co-ordinating dies from the 1-31st August. You can purchase them as a bundle or individually. Once they finish on the 31st August, they will no longer be available.
Bye for now,
Kris
Product Used:


Elyssa

I am slowly working my way through the photos from my loungeroom wall – I have two to go. Today’s photo showcases my granddaughter Elyssa. I think I am blessed to have such gorgeous grandchildren. I found a similar layout somewhere on the internet using different designer series paper and thought that I would adapt it to suit my photo. If you recognise this layout as your own please let me know so that I can give you credit.  I cut the Share What you Love Specialty Designer Series paper into 3″ squares and attached them to the Basic Black card. I attached my photo to Basic Black card before attaching it over the Designer Series Paper.
 I cut my title from Petal Pink card using the retired Little Letters Thinlits Dies. I cut various leaves and flowers from the Share What you Love Specialty Designer Series Paper and attached them to the top right hand corner. I also cut a smaller piece to add to the corner of the photo.
I am absolutely loving creating these pages. I get to look at the photos on the wall every day and when they are replaced I can look at the ones I have scrapped. Lucky me.
I’d love to know what you think.
Bye for now,
Kris
Product Used:


