Thank You Flowers
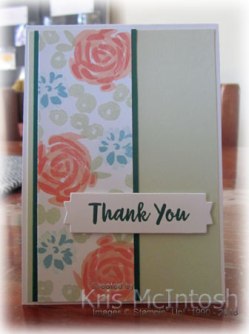
This is another card I created when I was having my first “play” with the Abstract Impressions stamp set. All three of the cards I have shared including this one use the same inks and card stock but give three different looks for the images in the stamp set. For this card, I created my own designer series paper using the stamps in the Abstract Impressions stamp set. I stamped the large flower using Petal Pink and Calypso Coral ink. The first flower is stamped using Petal Pink ink which I had stamped off first. The second image is stamped with full strength Petal Pink and the third image is stamped using Calypso Coral ink.  I also stamped the smaller flower from the stamp set using Pool Party ink for the large image and Pacific Point ink for the smaller image. I stamped a few leaves using Soft Sea Foam ink and filled the panel with the circle image using Soft Sea Foam ink.
  The panel is attached to Shaded Spruce card and then Soft Sea Foam card before being attached to scored and folded Thick Whisper White card.
I stamped “Thank You” from the Abstract Impressions stamp set using Shaded Spruce ink onto Whisper White card and cut it out using one of the labels from the Lakeside Framelits Dies. I attached the greeting to the card front using dimensionsals.
To decorate the inside of the card, I created a smaller panel with the stamped flowers which I attached to Shaded Spruce card.
Another simple card but one that I also love. The great thing is that at this time, I haven’t even started playing with the co-ordinating Springtime Impressions Thinlets Dies. I’d love to know what you think of my creations.
Bye for now,
Kris
Product Used:


Flowers and Butterflies
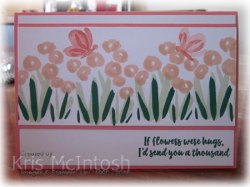
This is another card using Abstract Impressions and one that is also pretty much cased from the Annual Catalogue. This time I stamped the larger leaf image across a piece of Whisper White card using Soft Sea Foam ink. I stamped the smaller leaf image over the top using Shaded Spruce ink. I stamped the flower image using Petal Pink ink and then stamped the detailed flower image over the top using the same ink.  I stamped the solid butterfly wings using Calypso Coral ink which I had stamped off onto scrap paper first. I stamped the detailed butterfly wings as well as the butterfly body using full strength Calypso Coral ink. The panel is attached to Calypso Coral card and then Whisper White card. I stamped the greeting from the Abstract Impressions stamp set onto the lower right hand corner of the Whisper White card using Shaded Spruce ink before attaching the panel to scored and folded Calypso Coral card.
 To decorate the inside of the card, I stamped each of the images onto the lower left hand corner of Whisper White card using the same inks.
The possibilities are endless for this type of stamp set, its pretty and soft or bright and vibrant, depending on the colours you use. It makes me think of all the Impressionist Paintings I had to study in my Art classes in high school (so long ago). Hope you are getting a feel for this stamp set and maybe a desire to create with it yourself.
Bye for now,
Kris
Product Used:


Much to Love
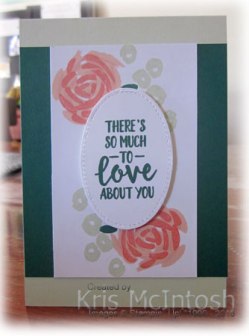
Today I pulled out another new stamp set – Abstract Impressions and decided to have a play. The first card I created is loosely based on one of the examples in the Annual Catalogue. I stamped the three step flower onto Whisper White card using Petal Pink and Calypso Coral ink. The first step is Petal Pink ink stamped off, the second step is full strength Petal Pink ink and the third step is Calypso Coral ink. Because this is an abstract stamp set, you do not have to worry about lining up the images you just basically stamp one on top of the other.  I stamped the circle image using Soft Sea Foam ink and lastly add a couple of leaves stamped in Shaded Spruce. I attached the stamped Whisper White card to Shaded Spruce card and then to scored and folded Soft Sea Foam.
  I stamped the greeting from the Abstract Impressions stamp set onto Whisper White card using Shaded Spruce ink and cut it out using one of the ovals from the Stitched Shapes Framelits Dies. The greeting is attached to the card front using dimensionals.
To decorate the inside of the card, I stamped the flower onto the lower left hand corner of Whisper White card using Petal Pink and Calypso Coral ink. I stamped the circle image using Soft Sea Foam ink and the leaves using Shaded Spruce ink.
Since I don’t have the co-ordinating Garden Impressions Designer Series Paper yet, I think this is a great compromise. Simple but sweet, don’t you think?
Bye for now,
Kris
Product Used:

Masking and Sponging

I am still loving playing around with sponging techniques and this one again uses the Lilypad Lake stamp set. I created a large mask by cutting the largest of the circles from the Layering Circles Framelits Dies from some scrap card. I used some repositional glue to attach it to Very Vanilla card. I punched a 3/4″ circle from a Post-it-Note and placed it so that the 3/4″ “hole” was sitting in the top part of the circle. I sponged Calypso Coral ink lightly inside the 3/4″ circle. I removed the mask and masked across the top of the circle. I sponged Balmy Blue ink into the lower part of the circle. I removed the mask and placed a 3/4″ circle over the area where I had sponged the Calypso Coral ink.  I covered the Balmy Blue inked area and sponged So Saffron ink across the rest of the circle. I removed the 3/4″ circle and sponged So Saffron ink lightly across the Calypso Coral circle. I removed all of the masks and stamped the greeting from the Lilypad Lake stamp set onto the lower right hand corner of the sponged card using Memento Tuxedo Black ink. The sponged card is attached to Balmy Blue card and then scored and folded Very Vanilla card.
  I stamped the crane image from the Lilypad Lake stamp set onto scrap Very Vanilla card using Basic Gray ink and cut it out using the matching Lakeside Framelits Dies. I also cut Soft Sea Foam and Pear Pizzazz card using the reed framelit from the Lakeside Framelits Dies. I attached the reeds inside the sponged circle and the crane over the top using mini dimensionals.
To decorate the inside of the card, I cut reeds from Mint Macaron, Pear Pizzazz and Soft Sea Foam card and attached them to the lower left hand corner.
Another card I am really happy with. I just love it when a card comes together just the way I had imagined, don’t you?
bye for now,
Kris
Product Used:


New Promotions
Today marks the beginning of two great promotions. The first one is all about Designer Series paper. From 1-31 July we can purchase three Designer Series Paper packs from the list below and then you can select one from the list for free. This is an amazing way to save money and stock up on some of the beautiful designer series paper from the new Annual Catalogue. I must say that I am having a hard time deciding which ones to place on my order.

The second promotion is for anyone who signs up to be a new demonstrator from 1-31 July. So if, like me, you find it hard to limit yourself to just four packs of the designer series paper, then joining Stampin’ Up! as part of my team may be the answer. For the month of July, new demonstrators can select one full colour family of Stampin’ Pads with a value of $117.00 for FREE. Yes that’s right for FREE. That is on top of the $235.00 of Stampin’ Up! product of your choice you can select from the current catalogue. That’s just over $340.00 worth of product for $169.00. So if you have been thinking of becoming a Stampin’ Up! Demonstrator now is the time. Not only do you get to buy Stampin’ Up! products at a discount but you can build friendships and become part of the Stampin’ Up! family which is just an amazing experience. I believe that Stampin’ Up! is the most supportive company you could ever wish to be associated with.

You now have a lot to think about, if you need any further information, then please do not hesitate to contact me so that I can answer any of your questions.
Bye for now,
Kris
Abigail

Today’s Memory Keeping Page holds a photo of my eldest granddaughter Abigail. I used the layout by Jacqui Crouch that I shared with you last week but created this one using the very beautiful Share What You Love Designer Series Paper. I love that I was able to use up some smaller pieces, left over from other projects to create the page. For contrast, I added a Basic Black panel across the bottom of the Designer Series Paper and I also used Basic Black behind the photo.  I created the title by cutting Blackberry Bliss, Rich Razzleberry and Petal Pink card using the Layering Alphabet Edgelit Dies to create “Abi”. I stamped the letters after I had cut them using the Lined Alphabet and Memento Tuxedo Black ink. I stamped the flowers in Mint Macaron ink and cut them out. I stamped the flowers again using Rich Razzleberry ink and stamped the flower fill image using the same ink. This time, I cut out the flowers only and attached them over the stamped Mint Macaron images.
 I didn’t need to add any journalling to the photo, just the date so I will remember when it was taken.
Although I have scrapped this photo, it is also displayed on a wall in my lounge room along with all of my other grandchildren. I love being able to see all of their beautiful faces every time I go into the room.
I’ll be back soon with another page showcasing another one of my grandchildren.
Bye for now,
Kris
Product Used:


Sailing
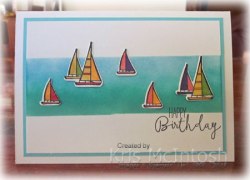
I have been having a lot of fun playing around with sponging and sponge-brayering on some cards for an upcoming technique class and was inspired to create this card.
I masked off an area on a piece of Very Vanilla card and sponged Coastal Cabana ink across the lower part of the sponging area. I added some Bermuda Bay ink across the middle of the sponging area and lastly add some Pacific Point across the top of the sponging area.  I removed the masks and stamped “happy birthday” from the Special Celebration stamp set using Memento Tuxedo Black ink. I attached the sponged panel to Coastal Cabana card and scored and folded Thick Very Vanilla card. I stamped the sailboat image from the Lilypad Lake stamp set three times onto scrap Very Vanilla card. I used Daffodil Delight, Mango Melody, Flirty Flamingo, Gorgeous Grape, Granny Apple Green and Poppy Parade Stampin’ Write Markers to colour the boats.
  I cut out the images with the matching Lakeside Framelits Dies and attached all but one of the “double boat” images to the card front.
To decorate the inside of the card, I sponged Coastal Cabana, Bermuda Bay and Pacific Point card onto the lower left hand corner. I attached the last “double boat” image over the sponged area.
I love this card. I love that it makes me feel like i need to rush off to the beach and sit and do nothing but watch the waves and whatever else passes by. I’d love to know what you think.
Bye for now,
Kris


Anniversary Celebration
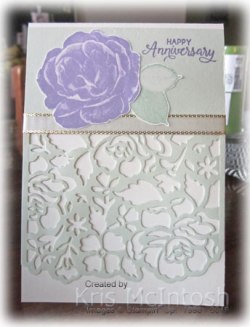
Last week my Mum and Dad celebrated their 64th Wedding Anniversary. Quite a milestone and luckily for me both still active and in good health. This is the card I made for them. I cut the bottom half of Soft Sea Foam card using the Detailed Floral Thinlits Dies and also used the matching die to cut the edge of the card. I stamped the greeting from the Beautiful Bouquet stamp set onto the top right hand corner of the card using Highland Heather ink. I wrapped the Soft Sea Foam card using the Gold 3/8″ Metallic Edge Ribbon and attached it to scored and folded Very Vanilla card.  I stamped the flower from the Healing Hugs stamp set onto Very Vanilla card using Highland Heather ink and cut it out.
 I stamped the double leaf image from the same stamp set onto Very Vanilla card using Mint Macaron ink and cut them out. I attached the leaves behind the flower before attaching the flower to the card front.
To decorate the inside of the card, I stamped the same flower onto the lower left hand corner using Highland Heather ink. I stamped the flower onto a Post-It-Note and cut it out before covering the stamped flower. I stamped two sets of the double leaf image around the flower before removing the Post-It-Note.
I really love this flower in the Healing Hugs stamp set. It is so beautiful and so easy to use.
Bye for now,
Kris
Product Used:


Love and Sympathy
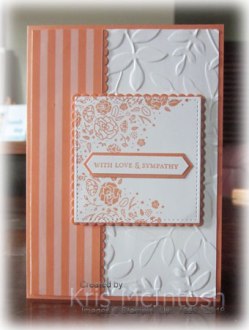
This card was inspired by one I saw on the internet and although it is nothing like the one I saw, it started me on the creative process. Does that happen to you? Its a good thing I think, to see someones work and then your brain starts ticking over and before you know it you have created something that is completely your own. I embossed Whisper White card using the Layering Leaves Dynamic Embossing Folder and attached it to scored and folded Grapefruit Grove card. I punched a long narrow strip of Grapefruit Grove card using the Decorative Ribbon Border Punch and attached it to one long edge of the 6″ x 6″ 2018-2020 In-Colour Designer Series Paper.  The Designer Series paper is attached to the left hand side of the embossed card. I stamped the image from the Wood Words stamp set onto Whisper White card using Grapefruit Grove ink before cutting it out using one of the squares from the Stitched Shapes Framelits Dies.
  The image panel is attached to a Grapefruit Grove scalloped square cut using the Layering Squares Framelits Dies and then the card front using dimensionals. I stamped the greeting from the Itty Bitty Greetings stamp set onto Whisper White card using Grapefruit Grove ink and punched it out using the Classic Label Punch. I attached the punched greeting to a long skinny scrap of Grapefruit Grove card and trimmed the ends to match. The greeting is attached to the stamped panel.
To decorate the inside of the card, I stamped the floral stamp from the Wood Word stamp set onto the top right hand and lower left hand corners of Whisper White card using Grapefruit Grove ink.
Simple, but really pretty don’t you think?
Bye for now,
Kris
Product Used:


Lacey Catalogue Case
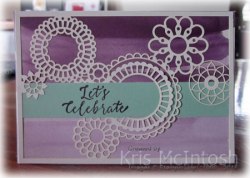
When I was creating the card for my daughter’s birthday which I shared recently, I decided to case the catalogue to create this cute note card using the Delightfully Detailed Laser-Cut Specialty Paper as well as the Delightfully Detailed Note cards and Envelopes. This is a really simple card to create, I stamped the greeting from the Detailed With Love stamp set onto Mint Macaron card using Rich Razzleberry ink. I slid the greeting panel through the Delightfully Detailed Laser-Cut Specialty Paper before attaching the panel to the Delightfully Detailed Note Card. Simple and so pretty. I didn’t decorate the inside of this card but left it plain. If you haven’t taken a look at these products in your Annual Catalogue you really should. The Designer Series Paper is absolutely gorgeous and so delicate and the Detailed with Love stamp set has some awesome greetings and decorative pieces that will be such fun to use.
Bye for now,
Kris
Product Used:


