Beach Day

Today’s page showcases a photo of my Dad, his mother and Aunty on the way to the beach. I’m pretty sure they used to go to Brighton-Le-Sands by train. I used the Sea of Textures stamp set to add some interest to the lower right hand side of a 12″ x 12″ Whisper White page. I stamped the border image across the section using Balmy Blue ink (did I tell you that I am truly loving this colour). To add a little more interest I stamped the tall seaweed image using Mint Macaron ink over the top. I stamped clusters of the large seaweed image using Fresh Fig ink and also some smaller seaweed images using Night of Navy ink. I layered four pieces of the Tranquil Textures Designer Series Paper onto Night of Navy 12″ x 12″ card and attached it to the left hand side of the stamped page. I attached my photo to Night of Navy card and then to the Designer Series Paper panel.  I printed my journalling onto Whisper White card and cut it into strips. The journaling is attached to Night of Navy card before being attached over the stamping. I stamped the letters from the Lined Alphabet onto Balmy Blue card using Night of Navy ink to create the title. I cut out the letters using the Layering Alphabet Edgelits Dies. You do have to fussy cut them just a little to completely release the letters.
I love how the photo on this page showcases how different life was when my Dad was young. A trip to the beach was a full day event and was a wonderful opportunity for whole families to come together. I hope you like my page and that it inspires you to do some more Memory Keeping with your treasured photos.
Bye for now,
Kris
Product Used:


Paper Craft Crew 295
 Today’s card was inspired by the sketch challenge at Paper Craft Crew. I used the Sea of Textures stamp set to create my card. Firstly I attached a piece of the Tranquil Textures Designer Series paper to Whisper White card before attaching the panel to scored and folded Tranquil Tide card. Next I cut crumb cake card using the Under the Sea Framelits Dies to create a net which I attached to the Designer Series Paper. I cut a circle from Whisper White card using the Stitched Shapes Framelits Dies and cut it using the die with the little fish from the Under the Sea Framelits Dies. The Whisper White circle is attached to a Tranquil Tide scalloped circle cut using the Layering Circle Framelits Dies before being attached to the card front.
  I stamped the greeting from the Itty Bitty Greetings stamp set onto a narrow strip of Whisper White card using Tranquil Tide ink. I used the Triple Banner Punch to cut both short ends and lightly sponged around the banner using Tranquil Tide ink. Using the Under The Sea Framelits Dies I cut three pieces of seaweed, one from Soft Sea Foam card, and two from Fresh Fig card and also one sand dollar from Crumb Cake Card. I attached the small Fresh Fig and the Soft Sea Foam pieces of seaweed to the Whisper White circle. The banner is attached to the card front covering part of the seaweed.
  I attached the large Fresh Fig seaweed piece and the sand dollar over the end of the banner.
To decorate the inside of the card, I stamped the long border image using Crumb Cake ink to represent sand. Next I stamped the long seaweed stamp from the Sea of Textures stamp set using Tranquil Tide ink onto the lower left hand corner of Whisper White card. I stamped another of the seaweed images using Fresh Fig ink over the top and lastly added the “starfish” which came from the centre of the sand dollar.
This is a fun card and one that would be great for the sea-lovers/fisherman in your life. I am certainly loving the possibilities that the Sea of Textures stamp set and the matching Under The Sea Framelits offer.
Bye for now,
Kris
Product Used:


Sunday Stamps Sketch
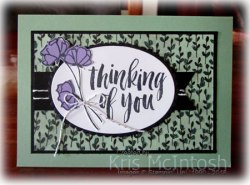
I created the card I am sharing with you today using the sketch challenge at Sunday Stamps. I love the colour combination on this card and hope that you do too. I attached a piece of the Share What You Love Specialty Designer Series Paper to Basic Black card and then to scored and folded Mint Macaron card. I punched one end of a strip of Basic Black card using the Triple Banner Punch and wrapped it with Silver Baker’s Twine before attaching it to the Designer Series Paper. I stamped the greeting from the Rooted in Nature stamp set onto Whisper White card using Memento Tuxedo Black ink. The greeting is cut out using one of the Layering Ovals Framelits Dies and is attached to a Basic Black scalloped oval which is cut using the same Dies. The oval is attached to the card front using dimensionals. I stamped the flower from the Love What You Do stamp set onto Whisper White card using Memento Tuxedo Black ink and stamped the flower fill image over the top using Highland Heather ink.
  I cut out the flower and attached it next to the greeting using Multipurpose glue and a couple of dimensionals. I tied a bow in a length of the Silver Baker’s Twine and attached it to the flower stem with a small dot of Multipurpose Glue.
To decorate the inside of the card, I stamped and cut out another flower to match the one on the front of the card. The flower is attached to the lower left hand corner of Whisper White card.
This card is so pretty. Can you see I am still loving and chopping my designer series paper?
Bye for now,
Kris
Product Used:


Sea of Textures
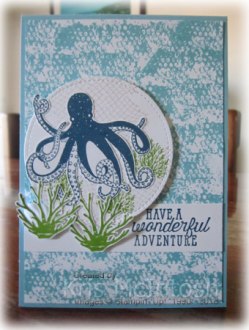
Here is another card I created for my catalogue launch, this time using the Sea of Textures stamp set. When I put my pre-order in I forgot to order the matching Under The Sea Framelits Dies so I had to do some fussy cutting for this card. I stamped the long skinny background image across the entire area of a piece of Whisper White card using Balmy Blue ink. I attached the panel to scored and folded Balmy Blue card. I stamped the greeting from the Sea of Textures stamp set onto Whisper White card using Night of Navy ink and attached the panel across the lower part of the stamped Whisper White card.  I cut a circle from Whisper White card using the Stitched Shapes Framelits Dies and stamped the “fishing net” image onto the Whisper White card using Crumb Cake ink. I also stamped several of the small “seaweed” images using Granny Apple Green ink. I attached the stamped circle to the card front using dimensionals.
  I stamped the octopus image onto Whisper White card using Night of Navy ink and the large “seaweed” image twice onto Whisper White card using Granny Apple Green ink. I cut out the images and attached the octopus to the stamped circle. I attached the “seaweed” images partially over the circle using mini dimensionals under the bases.
To decorate the inside of the card, I stamped the “fishing net” image onto the lower left hand corner of Whisper White card using Crumb Cake ink. I stamped one small and one large “seaweed” image over the top using Granny Apple Green ink.
This is such a fun set and I am so glad that I bought it. Of course I now have the The Under The Sea Framelits and do not have to fussy cut, but all the same it wasn’t hard to do. Hope you take a look at this fabulous stamp set and perhaps see some possibilities for your crafting.
Bye for now,
Kris
Product Used:

Varied Vases
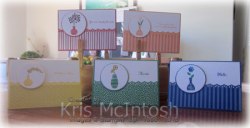
This is one of the stamp sets that I purchased on my pre-order and I love it. The stamp set has a matching punch as well. I made a set of cards for my catalogue launch using this set and the new 2018-2020 In-Colour Designer Series paper.  This 6″ x 6″ designer series paper is really lovely, you get four each of two double-sided designs in each of the five new in-colours. So pretty. I created a card in each of the colours – Lovely Lipstick, Grapefruit Grove, Pineapple Punch, Call Me Clover and Blueberry Bushel.
  I created each card by punching a strip of card using the Decorative Ribbon Border Punch and attaching behind a co-ordinating piece of the Designer Series Paper. I attached the designer series paper to Whisper White card and stamped a greeting from the Varied Vases stamp set using the co-ordinating ink.
  The Whisper White card is attached to scored and folded co-ordinating card. I stamped one of the vase images using the co-ordinating colour and a flower from the stamp set which is either stamped in Memento Tuxedo Black ink or Call Me Clover ink. The flowers are stamped in one of the new in-colours to co-ordinate with the designer series paper.
  For each of the central images I used the Vases Builder Punch to create a mask from Post-it-notes to cover the vase before stamping the stem images. The vase images where cut out using one of the circles from the Layering Circles Framelits Dies and attached to a scalloped circle cut from co-ordinating card using the same dies.
  The image panels are attached to the card front using dimensionals.
To decorate the inside of the card, I attached a narrow strip of co-ordinating card behind one long edge of a piece of the designer series paper.  The panel is attached across the bottom of Whisper White card.
I love how bright and cheerful this set of cards is, the colours are really lovely and I think it will be hard to pick a favourite. The greetings in this stamp set make it really versatile and you can layer up the vases and flowers to create so many different variations. I hope I have inspired you to take a good look at this stamp set and think about the possibilities.
Bye for now,
Kris
Product Used:


East Hills

Today I have to apologise because when I created these pages to share with you, I forgot to check the date and unfortunately the Petal Passion Designer Series paper is no longer available. However, these are created and I thought I would share anyway because you could obviously substitute the paper with something else, or maybe you still have some of this Designer Series Paper in you stash. I attached a strip of Whisper White 12″ x 12″ card to a strip of Basic Black 12″ x 12″ card (retired) before attaching three pieces of Designer Series paper across the Whisper White panel.  The whole piece is attach either at the top or at the bottom of a 12″ x 12″ Whisper White page. I attached my photos to Basic Black card before attaching to their respective pages. The title is cut from Basic Black card using the retired Little Letters Thinlits Dies. I cut banners in the ends of two pieces of designer series paper and one piece of Basic Black card and attached them to the top left hand corner of one page and underneath my journalling block on the other. I created my journalling on the computer and printed onto Whisper White card. I cut the decorative banner from Basic Black card using the Petals and More Thinlits Dies and attached it below the journalling. I also stamped the bird image from the Petal Palette stamp set onto Whisper White card using Memento Tuxedo Black ink.
  The bird is coloured using the Dark Pool Party Stampin’ Blend, cut out using the matching Petals and More Thinlits Die and attached over the decorative banner to the journalling panel. These photos are of my grandparents home which was on the banks of the Georges River. The flood photo shows the last time the house was flooded before it was raised.
I hope you are enjoying my series of Memory Keeping pages. I am probably not as fancy as some when it comes to Memory Keeping but I love showing the pictures and telling the story. What about you, what’s your Memory Keeping style.
Bye for now,
Kris
Product Used:


Happy New Catalogue

As I said yesterday, today is the day we have been waiting for, we can finally order anything we want from the new catalogue, but not until after midday. Woohoo! Today’s card is one I created for a friend who recently celebrated her birthday. This card uses some of the new colours in this year’s Annual Catalogue and a the Oh So Eclectic stamp set which I am happy to say has carried over.  I created the background by sponging the beautiful new in-colour ink, Pineapple Punch, over the left hand side of Whisper White card. I attached a length of Whisper White Polka Dot Tulle Ribbon across the sponged card. I was able to add tiny dots of Tombow Multipurpose Glue behind the dots on the Tulle Ribbon to attach it to the card. The stamped card is attached to scored and folded Rich Razzleberry card. I stamped the flowers from the Oh So Eclectic stamp set onto Whisper White card, one using Rich Razzleberry ink and one using Poppy Parade ink. The images are cut out using the matching Eclectic Layers Thinlits Dies. I also cut Rich Razzleberry and Poppy Parade card using the matching detailed dies. The detailed dies are attached over the co-ordinating stamped imaged.
  I stamped the greeting from the Picture Perfect Birthday stamp set onto Whisper White card using Rich Razzleberry ink and used one of the Layering Ovals Framelits Dies to cut it out. The greeting is attached to a Rich Razzleberry scalloped oval cut using the same dies. I also cut two sets of leaves from Vellum card stock using the leaf die from the Eclectic Layers Thinlits Dies. I attached the Vellum leaves and the Rich Razzleberry flower to the card front using Tombow Multipurpose Glue. I attached the Poppy Parade flower to the greeting oval before attaching the panel to the card front using dimensionals.
To decorate the inside of the card, I once more sponged some Pineapple Punch ink onto the lower left hand corner of Whisper White card. I attached one leaf cut from Vellum card stock and a Poppy Parade flower.
To house my gift I created a co-ordinating pizza box using Rich Razzleberry card. The front of the box is decorated in much the same manner as the card, however I have added an extra flower and used a different greeting from the Picture Perfect Birthday stamp set.
I hope you have some time today to peruse your catalogue, either in person or online and put together your Wish List. I’ve done mine and it is long!
Bye for now,
Kris
Product Used:
I don’t have an icon for the Poppy Parade Paper but you can view it here.


Last Chance
Today is the last chance you have to purchase from the retiring list before they are all gone. I know it is sad to see all the things you love retiring but don’t forget that tomorrow we get to purchase from the new and oh so beautiful 2018-2019 Annual Catalogue. I’m still trying to finalise my order for tomorrow, I want lots, but I am trying to focus on the things that I love most, so my wish list has a bit of order to it – at the top is gotta have it now, in the middle – like to have it now and at the bottom – I can wait a little while. I hope you are having fun putting together your shopping list for tomorrow. Don’t forget the store won’t be open until 12 noon to allow for the change over in items. Stampin’ Up! have assured us that you can order any of the Stampin’ Blends from the first release tomorrow with the new Stampin’ Blends to become available a little later in the month, probably around the middle. I am so excited to be able to add some more colours to my colouring stash!
Today is also the last chance to purchase the Share What You Love bundles. While all of these products except the Statement of My Heart stamp set will be available in the new catalogue, the bundles will not. If you want the Statement of My Heart stamp set, then you must order the Gotta Have it All bundle today or it will be gone forever.
If you don’t already have a Stampin’ Up! demonstrator, you live in Australia and you would like a copy of the new catalogue then please contact me so we can organise one for you. In the meantime, you will be able to download a PDF of the catalogue tomorrow, so pop in tomorrow to find the link.
In the meantime, Stampin’ Up! have this very quick video to get you excited about the great new anual catalogue.
So place your last minute orders today and get ready to shop the new catalogue tomorrow.
Bye for now,
Kris
Top Pick at Paper Craft Crew

Remember this card I shared with you last week which I entered into the Paper Craft Crew challenge. Well it made the top picks for the week for which I am eternally grateful. Thank you so much to the Paper Craft Crew for selecting my card, soooo exciting.
Just had to share.
Bye for now,
Kris
New Catalogue

Last Saturday I was joined by 20 or so of my customers and my downline to launch the new Annual Catalogue. I usually don’t hold this event until June, but my personal obligations were getting in the way of that, so I held the event early.  At least this way the ladies have nearly a week to browse the catalogue and compile their wish lists.
 I try to show off some cards using the stamp sets and dies that I have purchased on pre-order and of course the new in-colours. It was a fun afternoon and I am most grateful to these lovely ladies for the continuing success of my business.
  The ladies were able to have tea, coffee or a glass of light wine while they browsed their catalogue and ooohed and aaahed over the new products.
  I like to show my appreciation by giving them some extra goodies if I can when I hold this event. This year I gave each of them a sample of cardstock for all the revamped colour families. I think these will be a great tool for them to get an idea of how the new colours will work with the colours that they already have. I also gave them chocolate to nibble on while they browse the new catalogue.
  The colour chart and chocolate was given in little gift bags I created using the Gift Bag Punch Board, which also helped use up some of my Designer Series Paper stash.
 For my lovely downline I also created a colour swatch using the template that Stampin’ Up! provided to demonstrators with a few colour combinations for each of the colours in our new revamped colour families.
  They got an extra gift or two also in their bags as well as chocolate (you must have chocolate). Their gift bags were a little larger than the others and also used up some of my Designer Series Paper stash.
 As you know I am on a mission to use up the retired and retiring designer series paper, so I gave each of the ladies a 12″ x 12″ one sheet wonder template and a couple of pieces of 12″ x 12″ dsp to have a go at completing a set of cards.
  I hope that they enjoy playing and that they will bring their samples along to our next class.
 To help me and my customers and also to be portable I used one of the 6″ x 8″ Memories and More Albums and the co-ordinating pocket pages to keep examples of the new colour families and colour combinations.
  This album will also contain examples of the embossing folders that I have to show to my customers and also pages with pieces of the designer series paper that I have on hand. I am also going to add templates at the back for use in my Stamparatus.
 Before everyone went home I did a demonstration of some of the things that you can do with the Stamparatus. I showed them how to create a wreath and to do step stamping and also how you can create a template and then stamp hundreds of labels or greetings easily and quickly. They all loved the Stamparatus and also the lovely new Simply Shammy which makes cleaning stamps on the Stamparatus and the Stamparatus plates too.
I had a lovely time and I hope that they all did too. Sorry for the long post and so many pictures but I did want to share with you the excitement that is building towards the day when we can order from the new catalogue.
Bye for now,
Kris


