Elyssa’s Birthday card

My gorgeous granddaughter Elyssa turns 9 today. She is growing into a lovely young lady. We have a lot in common – she loves to cook and is always helping me in the kitchen when she is here. We also share our love of memory keeping and she has album full of her memories already! We had a lovely day out together to buy her birthday present, although we did have to take Pop with us which slowed us down a little. We also enjoyed lunch together to finish off our morning. Today I am sharing with you the card I made for her.
I cut a square of Whisper White card using one of the Layering Squares Framelits Dies and used Old Olive and Bermuda Bay Watercolour Pencils to add some light colour to the card. I used my Aqua Painter to move the colour and create a background.  I attached the Whisper White square to a Bermuda Bay scalloped square cut using the same dies and attached it to scored and folded Thick A4 Whisper White card. I stamped the greeting onto the card front using Memento Tuxedo Black ink. I stamped the image from the Beautiful You stamp set onto Whisper White card using Memento Tuxedo Black ink and coloured the image using Bermuda Bay and Calypso Coral Watercolour Pencils and a Blender Pen. I cut the image and attached it to the card front.
To decorate the inside I used one of the images that can be used to colour the dresses of the images in the Beautiful You stamp set to create a background for my greeting. The image is stamped onto whisper White card using Bermuda Bay ink which I have stamped once onto scrap paper first to give a lighter image. I stamped the greeting from the Beautiful You stamp set over the top using Memento Tuxedo Black ink. I attached the stamped card to Bermuda Bay card before attaching the panel to the inside of the card.
I especially love this particular image from this stamp set as it creates such a happy, carefree feeling. It also fits perfectly with Elyssa’s wish to grow up to be a dancing fairy princess. I hope she always lives her life with passion and fulfils her dreams.
I’d love to know what you think of this card.
Bye for now,
Kris

Use this Hostess Code when you place an online order during March and receive a gift from me.
Product Used:


Medallion Video
Today I thought I would share with you a video from Stampin’ Up! highlighting all the fabulous things you can do with the Make a Medallion stamp set. Yesterday I shared a card with you using this stamp set but Carrie from the training team can share so many more ideas with you. Remember Sale-A-Bration ends on the 31st of this month. So if you want any or all of these stamps you need to place your qualifying orders before the end of the month.
Carrie shares some fantastic ideas in the video, don’t you think. Bet you really need this stamp set now.
Bye for now,
Kris

Use this code when placing an online order during March and receive a gift from me.
Medallion Birthday

I think the Make a Medallion stamp set from the new release of Sale-a-bration products is fantastic. It is photopolymer which makes it is so easy to stamp the layers to create the medallion. This card also fits the sketch challenge at Freshly Made Sketches this week.
I used a piece of the Pop of Pink Specialty Designer Series Paper, one of the gold embossed designs, and added a strip of Gold Foil card behind each long edge. The panel is attached to Whisper White card and then scored and folded Night of Navy card.  I stamped the first image for my medallion using Night of Navy ink and the second image using Night of Navy ink which I stamped off once onto scrap paper first.
 I cut the image using one of the circles from the Layering Circles Framelits Dies and attached it to a Night of Navy scalloped circle cut using the same dies. I stamped the greeting from the Teeny Tiny Sentiments stamp set onto Whisper White card using Night of Navy ink. I used the Triple Banner Punch to on one end of the stamped card. I cut two narrow strips of Gold Foil card and punched one end of each strip using the Triple Banner Punch. I attached the gold foil banners behind the greeting banner and then attached the whole piece to the stamped medallion. I used dimensionals behind the medallion and the banner to attach it to the card front.
To decorate the inside of the card I attached a narrow piece of Gold Foil card behind one long edge of the same Designer Series paper before attaching it to Whisper White card.
This card is destined for a friend whose birthday I missed. I hope she likes it.
Bye for now,
Kris

Use this code when placing an order during March and receive a gift from me.
Product Used:


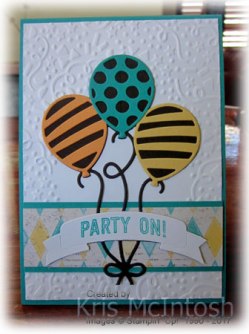
Balloon Adventures
I saw a sketch somewhere in my recent browsing of the internet which inspired me to start this card. Somewhere along the way, it took on a life of it’s own and now looks nothing like the sketch I started with!
I embossed Whisper White card using the Confetti Embossing Folder and attached to scored and folded Bermuda Bay card. I attached a strip of the Cupcakes and Carousels Designer Series Paper to Bermuda Bay card and then to the card front. I used the Balloon Pop-Up Thinlit Die to cut out the balloons from Early Espresso card and trimmed the frame away.  I cut the banner from Whisper White card and trimmed away the excess. I stamped “party on” from the Balloon Adventures stamp set onto the banner and attached it over the Early Espresso piece.
  Using the Balloon Pop-Up Thinlit Dies I cut balloons from Peekaboo Peach, So Saffron and Bermuda Bay card and attached them over the Early Espresso balloon cut out. The panel is then attached to the card front.
To decorate the inside of the card, I stamped the balloon string image onto the left hand side of Whisper White card using Early Espresso ink. I stamped the solid balloon image using So Saffron ink and stamped the polka dot balloon image over the top using Early Espresso ink. I also added the bow to the top of the balloon string using Early Espresso ink. All of these images are from the Balloon Adventures stamp set.
Well, what do you think? Considering this is nothing like what I imagined the card would look like, I love it. What about you?
Bye for now,
Kris
Use this code when placing an online order during March and receive a gift from me.
Product Used:


Butterfly Basics birthday
 I made this card using a recent sketch from Stampin’ Gals Gone Wild. I stamped the hexagon image from the Butterfly Basics stamp set onto the Whisper White card using Saraha Sand ink. I stamped the leaf image twice over the top using Wild Wasabi ink. I attached the stamped card to Wild Wasabi card and then to scored and folded Thick Whisper White A4 card. I stamped the flower image onto Whisper White card using Memento Tuxedo ink and coloured it using Wisteria Wonder and Wild Wasabi ink and a Blender Pen.
 I cut the image out and attached it over the other stamped images. I stamped the greeting from the Butterfly Basics stamp set onto Whisper white card using Wisteria Wonder ink and cut it out using an oval from the Stitched Shapes Framelits Dies. I attached the greeting to an scalloped oval cut from Wisteria Wonder card using the Layering Ovals Framelits Dies.
  The greeting is attached to the card front using dimensionals.
To decorate the inside of the card, I stamped the leaf image using Wild Wasabi ink. I stamped the image a couple of times and then once without re-inking.
One of the things I am trying to keep up with this year is to send cards to my customers. This card went out to one of them and although it was a little late, she said she loved it.
Bye for now,
Kris
February’s Code is closed, look out for the March code.
Product Used:


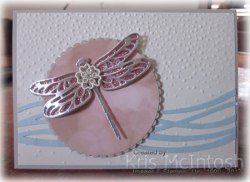
Stampin’ Gals Gone Wild Challenge 90
I am a little late getting this card made for last weekend’s sketch challenge over at Stampin’ Gals Gone Wild. I love Connie’s weekend challenge and love to play along if I can.
This week I chose to emboss Very Vanilla card using the Softly Falling Embossing Folder. I cut the swirly border from Soft Sky card using the Swirly Scribble Thinlit Dies and attached it across the bottom of the embossed card. The panel is attached to scored and folded Sahara Sand card. I cut a circle from the Falling in Love Designer Series Paper using the Layering Circles Framelits Dies and attached it a scalloped circle cut from Sahara Sand card using the same dies. The designer series paper panel is attached to the card front using dimensionals. I cut the solid dragonfly from the new Sweet Sugarplum Glimmer Paper available free during Sale-A-Bration.
  I cut the detailed dragonfly from Silver Foil card and attached it over the Glimmer Paper dragonfly using Glue Dots. I used my bone folder to add some dimension and shape to the wings and attached the dragonfly to the designer series paper using Glue Dots. For the final touch I added one of the Falling in Love Embellishments to the dragonfly, again using Glue Dots.
To decorate the inside of my card I cut the swirly border from Soft Sky card using the Swirly Scribble Thinlit Dies and attached it to the bottom of Very Vanilla card.
A simple enough card, but pretty, don’t you think?
Bye for now,
Kris
The hostess code for February is now closed, watch out for the March code.
Product Used:


February Memory Keeping

Last night I held my monthly Memory Keeping Class. I call it a class but really it is a come and do what you like kind of night. Some of the ladies and children make the page I create, some make cards using the elements and pieces from the layout. Whatever they do we have a lot of fun, creating, talking, laughing and sharing. This month’s page features my grandchildren on the first day of school this year. Since their school colours are Navy and Yellow, I though that the Floral Boutique Designer Series Paper would work perfectly on the page.
I stamped the top left and the bottom right hand corners of my page using Night of Navy ink and the large splatter image from the Gorgeous Grunge stamp set. I cut three pieces of the Floral Boutique Designer Series Paper 3″ x 4″. I also cut three pieces of Night of Navy card 3″ x 4″. I embossed each of the pieces of Night of Navy card using either the Cable Knit, Hexagon or Fluttering Embossing Folders.  I attached the Designer Series Paper pieces and the Night of Navy card pieces to the stamped Whisper White card in a grid fashion. I attached my 6″ x 4″ photo to Whisper White card and then Night of Navy card. The photo is attached over the grid using dimensionals.
I cut Night of Navy card using the Bloomin’ Hearts Thinlit Die and attached it to the lower left hand corner. I stamped two large and three small flowers from the Bloomin’ Love stamp set onto Whisper White card using Night of Navy ink and cut them out using the matching Bloomin’ Hearts Thinlits Dies. The flowers are attached to the die cut heart using Glue Dots and a Basic Rhinestone is added to the centre of each flower.
A simple page but I love it. By sticking to Project Life size pieces, it’s easy to create a co-ordinated page in almost no time at all.
Since I had a few more photos to show off, I added a second, co-ordinating pocket page. I used the 4″ x 6″ pockets on this page to add my photos and the central 4″ x 4″ panel to add my journalling (handwritten in my awful handwriting but apparently it is the done thing to preserve your handwriting for the future generations!). The rest of the pockets are 2″ x 2″. To fill these I cut four pieces of the Floral Boutique Designer Series paper, two pieces of Night of Navy card and two pieces of Whisper White card. I embossed the Night of Navy card using the Cable Knit and Hexagon Embossing Folders. The Whisper White card is stamped using the heart and the star image from the Perpetual Birthday Calendar stamp set and Night of Navy ink. I did stamp two images in Night of Navy ink onto the journaling square – “picture perfect” from the now retired Project Life Remember This stamp set and the “date” from the Project Life Date It stamp set.
I love how easy it is to co-ordinate my pages using Stampin’ Up! products. What about you? Do you love Project Life?
Bye for now,
Kris
February Code is now closed, stay tuned for the March code.
Product Used:


A card for Baby
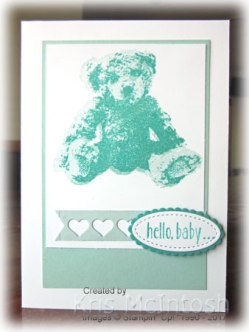
My niece recently delivered her third gorgeous boy. I thought I would share with you the card I made for her. I used the lovely Baby Bear stamp set. This is a three step stamp and I stamped it onto Whisper White card using Soft Sky, Pool Party and Bermuda Bay ink. I attached the stamped panel to Pool Party card and then to scored and folded Thick Whisper White A4 card. I used the heart die from the Mini Treat Bag Thinlits Dies to create a banner of hearts from Soft Sky card. I attached the banner to the card front below the stamped bear.  The greeting from the same stamp set is stamped onto Whisper White card using Bermuda Bay ink. I cut the greeting using an oval from the Stitched Shapes Framelits Dies and attached it to a scalloped oval cut from Bermuda Bay card using the Layering Ovals Framelits Dies.
  The greeting panel is attached to the card front using dimensionals.
To decorate the inside, I punched the top of Whisper White card using the Confetti Hearts Border Punch. I stamped the greeting from the Baby Bear stamp set below the hearts using Bermuda Bay ink and attached the panel to Soft Sky card.
I love this Baby Bear, he is so cute. It can be a little tricky to line up the images when you stamp but if you take your time, it’s ok, especially because it is a photopolymer stamp and you can see through it for placement.
I hope my niece likes it.
Bye for now,
Kris
Product Used:


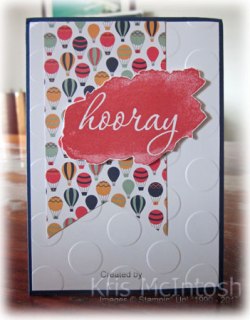
Reverse Words
Isn’t it exciting when Stampin’ Up! offers us something for nothing. Sale-a-bration is the best time of the year. All those free goodies we can get just by buying things we need! I thought I would show you something quick and easy I made using the Reverse Words stamp set. I really loved the layout at Global Design Project last week but didn’t get around to making a card, so I used the sketch to create my card today.
I embossed Whisper White card using the Large Polka Dot Embossing Folder and attached it to scored and folded Night of Navy card.  I cut a “v” in the end of a piece of the Carried Away Designer Series paper which is also in the Sale-A-Bration catalogue, and attached it to the card front. I stamped “hooray” from the Reverse Words stamp set onto Whisper White card using Watermelon Wonder ink and cut it out. I attached the greeting to the card front using dimensionals.
  Isn’t the watercolour effect that this stamp gives just sensational. So on trend and so easy to achieve because Stampin’ Up! has done all the hard work for us.
To decorate the inside of the card I attached a narrow strip of Night of Navy card behind one long edge of a piece of the Carried Away Designer Series paper. The piece is attached to the bottom of Whisper White card.
Such a simple card to make but I think it packs a lot of
wow for so little effort. You could literally make this card in minutes. A quick idea to have when you need a card in a hurry. I’d love to hear what you think.
Bye for now,
Kris

Use this Hostess Code when you place an online order during February and receive a gift from me.
Product Used:


A Special Reason to Glitter

By now you have probably already seen the three new products which have been added to the items you can select for free during Sale-A-Bration. Gorgeous aren’t they? I love how the Glimmer Paper Assortment Pack comes in 6″ x6″ sheets with three colours in the pack – Bermuda Bay, Mint Macaron and Sweet Sugarplum.
Here is my first creation using the Glimmer Paper. I attached a narrow strip of the Bermuda Bay Glimmer Paper across the bottom of Whisper White card and attached it to scored and folded Bermuda Bay card. To create the focal image panel, I cut the large and the small flowers from Whisper White card using the Stylish Stems Framelits Dies. I stamped the greeting from the Wetlands stamp set onto the lower right hand corner of the Whisper White care using Bermuda Bay ink. I cut the Berumuda Bay Glimmer Paper using the outline die for the large and small flowers from the Stylish Stems Framelits Dies and attached them behind the flower cut outs in the Whisper White card.
  I attached the whole floral panel to the card front using dimensionals.
To decorate the inside of the card, I cut the small flower from the lower left hand corner of Whisper White card using the Stylish Stems Framelits Dies. I cut the outline for the small flower from Bermuda Bay Glimmer Paper and attached it behind the flower cut out.
Isn’t this paper just a gorgeous WOW? I love how simple it was to create a really special card. So don’t forget to place your qualifying order to get your hands on this fabulous Glimmer Paper Pack.
Bye for now,
Kris

Use this Hostess Code when place your online orders during February and receive a gift from me.
Product Used:


