A Blue Carousel
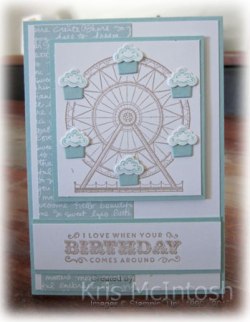
Here is another card using the Carousel Birthday stamp set. This one is also created for my Beachmere Classes as I had a request for a boy birthday card.
I attached a strip of Pool Party Designer Series Paper from the Subtles Designer Series Paper Stack to the left hand side of Whisper White card. I attached the panel to scored and folded Pool Party card. I stamped the carousel image from the Carousel Birthday stamp set onto Whisper White card using Crumb Cake ink. I attached the image panel to the card front using dimensionals.  An interesting thing about this particular image is that the “cup cakes” can be cut out using the Up and Away Thinlits Dies. So I stamped the image once more onto Whisper White card using Pool Party ink. I used the matching Up and Away Thinlit Die to cut out the icing.
  I cut the cupcake bases from Pool Party card and then attached the pieces over the Crumb Cake image using Glue Dots. I think it is such a cute image, don’t you?
I stamped the greeting from the Carousel Birthday stamp set onto Whisper White card, attached it to Pool Party card and then across the bottom of the card front.
To decorate the inside of the card I stamped the tent image from the Carousel Birthday stamp set onto the lower left hand corner of Whisper White card using Pool Party ink.
So what do you think? Are you liking this stamp set? I think it is going to be a fun set that will get a lot of use.
Bye for now,
Kris

Use this code when you place an online order during February and receive a gift from me.
Product Used:


Butterflies and Roses updated

Way, Way back in May 2013 I created this card using products which were current at the time. Surprisingly this has been one of my most pinned cards and is a featured card at the All Free Papercrafts. I have just been notified that this card is part of a free e-book which has recently been updated. So, it set me to thinking, what if I re-created this card using current Stampin’ Up! products.
This time I embossed Whisper White card using the Softly Falling Embossing Folder. I attached a piece of Blooms and Bliss Designer Series paper across the bottom of the embossed card and wrapped the join using the Sweet Sugarplum 3/8″ Ruched Ribbon.  I stamped the large and the small butterfly from the Papillon Potpourri stamp set onto Whisper White card using Sweet Sugarplum ink. I punched the butterflies using the matching Elegant Butterfly and Bitty Butterfly Punches. I used my bone folder to add some shape to the wings and attached the small butterflies to the centre of the large butterflies using Mini Glue Dots.
  The butterflies are attached to Whisper White card again using Mini Glue Dots. I added three Basic Pearls to the centre of each of the butterflies. The Whisper White card is attached to Mint Macaron card and then the card front using dimensionals. The greeting from the Teeny Tiny Sentiments stamp set is stamped onto Whisper White card using Sweet Sugarplum ink. I trimmed one end of the stamped card using the Triple Banner Punch, attached it to Mint Macaron card, also trimmed using the same punch, and then the card front.
To decorate the inside I stamped the large butterflies along the left hand edge of Whisper White card using Sweet Sugarplum ink.
I didn’t change a thing on the card, just updated it with current product and I love this new version just as much. What about you, which one do you prefer?
Bye for now,
Kris
Use this Hostess code to place an order online during February and receive a gift from me.
Product Used:


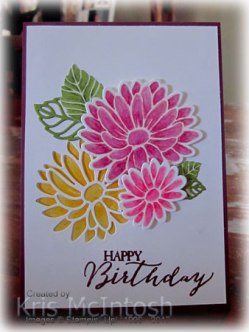
Watercolour Birthday

I have been loving my Watercolour Pencils so much that I have been drawn to my stamp sets that contain images that I can colour. The beautiful flower in You’ve Got This is just one that has gained my attention.
I embossed Whisper White card using the Softly Falling Embossing Folder and attached it to Rich Razzleberry card and then scored and folded Thick A4 Whisper White card. I stamped happy birthday from the Best Birds stamp set onto Whisper White card using Rich Razzleberry ink and cut it out using one of the ovals from Stitched Shapes Framelits Dies. I attached the greeting to a Rich Razzleberry scalloped oval cut using the Layering Ovals Framelits Dies and then the card front. I stamped the flower from You’ve Got This onto Whisper White card using Memento Tuxedo Black ink and coloured the image using a Rich Razzleberry, Old Olive and Daffodil Delight Watercolour Pencils and a Blender Pen.
 When I had finished colouring the flower I fussy cut the image and attached it to the card front using dimensionals, so that it sits partially over the greeting.
I embossed Whisper White card using the Softly Falling Embossing Folder and attached a narrow strip of Rich Razzleberry card behind one long edge. The embossed card is attached to Whisper White card and Rich Razzleberry card before the panel is attached to the inside of the card.
Well what do you think? I love it. I love the colours and I love the simplicity. This card has been sent to a special friend – I hope she likes it as much as I do.
Bye for now,
Kris

Use this code during February to place an online order and receive a gift from me.
Product Used:


February Classes
 I have updated my Classes and Workshop page with upcoming classes. The cards we make this month will all use product from the Sale-a-bration catalogue. We will make five cards and a card pouch to keep them in. I will supply everything to complete the projects. So all you need to do is bring yourself, the cost of the class ($30.00) and your smile.
It was hard to limit myself to just five cards as the stamps and accessories we can earn for free are all awesome and more will be released on the 21st of this month. The products are available until the end of March or until sold out, so you need to make sure that you place your orders to earn free product sooner rather than later.
Please let me know as soon as you can if you want to attend as space is limited.
Bye for now
Kris
Carousel Challenge
The sketch challenge at Stampin’ Gals Gone Wild this weekend is a fun one. Since the Carousel Birthday stamp set is the one that I have been working on I decided to use it to create my card.
I attached a piece of the Cupcakes and Carousels Designer Series Paper Stack to Very Vanilla card and then to scored and folded Early Expresso card. I stamped the image from the Carousel Birthday stamp set onto Very Vanilla card using Bermuda Bay ink. I cut the image using a circle from the Stitched Shapes Framelits Dies and attached it to an Early Espresso scalloped circle cut using the Layering Circles Framelits Dies. I attached the image panel to the card front using dimensionals.  I stamped “happy birthday” from the Party with Cake stamp set onto a narrow strip of Very Vanilla card using Early Expresso ink. I cut one end using the Triple Banner Punch and attached it to Early Expresso card which also had one end cut using the Triple Banner Punch.
  I attached the banner to the card front using dimensionals under the left hand side so that the banner could sit across the image panel.
To decorate the inside of the card I stamped the carousel horse image from the Carousel Birthday stamp set onto the bottom of Very Vanilla card using Bermuda Bay ink.
Wow, I am loving this. I got to create a great card using a great sketch and the bonus is it really only took minutes. The colour scheme comes from the Designer Series Paper and because they have been professionally co-ordinated, I think my card looks fabulous! Best of all I got to break out this gorgeous Designer Series Paper and create a fun card.
I’d love to hear what you think.
Bye for now,
Kris
Use this hostess code when you place an online order during the month of February and receive a gift from me.
Product Used:


Pink Carousel
 I’ve bought so many things from the current Occasions Catalogue because they were so gorgeous and I had to have them, but, I haven’t used all of them yet. I am trying to work my way through the stamp sets and product suites so that I can actually put ink to paper and see what I can create. Are you like that? Then I challenge you to get out one stamp set or product suite and create at least three cards. I’d love to see them when you are finished.
Anyway I started out fairly simple with the Carousel Birthday stamp set. I embossed Whisper White card using the Confetti Embossing Folder and attached it to scored and folded Melon Mambo card. I stamped the carousel horse onto Whisper White card using Melon Mambo ink and cut it out using the largest oval from the Stitched Shapes Framelits Dies.  I attached the image to a scalloped oval cut from Melon Mambo card using the Layering Ovals Framelits Dies. I cannot believe how much I love the Stitched Shapes Framelites Dies and the co-ordinating Layering Ovals, circles and Squares Framelits Dies. I don’t think I could create a card without them.
Ok, so what did I do next. Oh yes, I attached the image panel to the card front using dimensionals. I stamped the banner image from the Balloon Adventures stamp set onto Whisper White card using Melon Mambo ink. I stamped “happy birthday” from the same set inside the banner image. I hand cut the banner and attached it to the card front using dimensionals under the ends so that it could sit over the bottom of the image panel.
To decorate the inside I attached a narrow strip of Melon Mambo card behind one long edge of Whisper White card which I embossed using the Confetti Embossing Folder. The panel is attached to Whisper White card.
I’m going to let you in on a little secret. Why do I decorate the inside of my cards? Well, sometimes I don’t want to write a long message on my cards, so by decorating the inside, I cut down on the space and I don’t feel overwhelmed about what I have to write. How about you, do you feel like this too?
This card is going to be one that we make at my Beachmere class next week as I had a request for a birthday card for a little girl. Hopefully this will fit the bill.
Bye for now,
Kris
Use this Hostess Code when placing an online order during February and receive a gift from me.
Product Used:


Freshly Made Sketch 273

The sketch this week at Freshly Made Sketches is super simple and I decided that I would keep to that idea – super simple.
I attached three strips of the Urban Underground Specialty Designer Series paper to Very Vanilla paper. It’s called Specialty Designer Series Paper because it has two sheets in the pack that are silver embossed, single sided patterns. I’m not sure if you will be able to see the shine in the photos but the top paper and the bottom paper are the specialty papers. I stamped the greeting from the Urban District stamp set below the designer series paper using Memento Tuxedo Black ink.  I attached the Very Vanilla card to Delightful Dijon card and then scored and folded Basic Black card. The inside of the card is decorated with a strip of the hexagon specialty paper attached to the bottom of Very Vanilla card.
 As I said, super simple but I think this makes a really great male card. Since male cards are not one of my strengths I am very happy with this one. I’d love to know what you think.
Bye for now,
Kris
Use this code when you place an online order during February and receive a gift from me.
Product Used:


For My Sister
My celebrated her birthday recently and I haven’t shared her card with you. I made this card whilst I was playing, I mean working, with the Special Reason stamp set.
I cut the large flower from the left hand side of Whisper White card using the Stylish Stems Framelits Dies. I stamped the greeting from the Butterfly Basics stamp set onto the lower right hand corner of the Whisper White card. I stamped the large flower onto Whisper White card using So Saffron ink and then used the Daffodil Delight Watercolour Pencil and Blender Pen to add more colour following Alisa Tilsner’s technique. I attached the coloured image behind the image cut in the Whisper White card before attaching the whole panel to scored and folded Rich Razzleberry card. I stamped the large flower onto scrap Whisper White paper using Blushing Bride ink and added more colour using the Rich Razzleberry Watercolour Pencil and a Blender Pen.  The image was cut out using the Stylish Stems Framelits Dies and attached to the card front using dimensionals. I stamped the small flower onto scrap Whisper White card using Pink Pirouette ink and added more colour using the Melon Mambo Watercolour Pencil and a Blender Pen. This flower is also attached to the card front using dimensionals. I stamped a large leaf and a small leaf onto scrap Whisper White card using Pear Pizzazz ink and added more colour using the Old Olive Watercolour Pencil and a Blender Pen. The leaves were cut using the matching Stylish Stems Framelits Dies and attached to the card front along with one large and one small detailed leaf cut from Pear Pizzazz card.
To decorate the inside of the card I stamped the small flower onto a Post-It-Note and cut it out. I attached the Post-It Note image to the lower left hand corner of Whisper White card. I stamped the small leaf over the edge of the Post-It Note using Pear Pizzazz ink. I stamped twice on each side without re-inking. I removed the Post-It Note and attached a small flower stamped in Pink Pirouette and coloured using the Melon Mambo Watercolour Pencil and a Blender Pen.
I am so loving this watercolour technique that Alisa Tilsner shared on her face book page. Check it out by clicking on the video link on the left hand side of her page and selecting Episode 11.
I hope my sister liked the card, I was little late getting it away to her.
Bye for now,
Kris
Use this code when placing an online order during February and receive a gift from me.
Product Used:


A touch of Blue

I have been creating cards for my April Class which will be based around the Urban District Product Suite, so you have been seeing the cards I am designing with that class in mind. Some of these cards will make it into the class and some won’t. However, it is fun seeing what I can come design using the stamps and co-ordinating products.
For this card I embossed Very Vanilla card once more using the Hexagon Embossing Folder and attached it to scored and folded Basic Black card. I attached a piece of Urban Underground Specialty Designer Series Paper to Basic Black card and then to the card front. I embossed a smaller piece of Very Vanilla card once more using the Hexagon Embossing Folder, attached it to Basic Black card and then the card front, using dimensionals under the lower portion.  I stamped the hammer image from the Nailed It stamp set onto Very Vanilla card using Memento Tuxedo Black ink and cut it out using the matching Build It Framelits Die. I used my Basic Gray and Pacific Point Watercolour Pencils and a Blender Pen to colour the image. Before attaching it to the card front I stamped the cute little smiley face onto the hammer because I wanted the card to have a fun feel to it. I stamped “nailed it” from the Nailed It stamp set onto Very Vanilla card using Memento Tuxedo Black in and cut it out using the smallest oval die from the Stitched Shapes Framelits Dies.
  I stamped the nail image from the same stamp set onto the right hand side of the greeting using Memento Tuxedo Black ink. I attached the greeting to a Basic Black scalloped oval cut using the Layering Ovals Framelits Dies and then the card front with a dimensional underneath the lower right hand side.
To decorate the inside I stamped “congratuations” from the Flourishing Phrases stamp set onto Very Vanilla card using Memento Tuxedo Black ink. I attached a narrow strip of Basic Black card behind one long edge of a strip of the same designer series paper I used on the card front. I attached the designer series paper to the stamped Very Vanilla card and then attached the panel to the inside of the card.
I think the pop of blue colour on this card really sets it off, what about you?
Bye for now,
Kris
The hostess code for January has closed, stay tuned for the February Code.
Product Used:


Just Playing
 Here I am with another card using the Urban District Product Suite and co-ordinating products. I saw a sketch challenge online somewhere and although the challenge had finished, I used the idea to create this card. Can you see a pattern here, unless I have something visual to work with, it can be very hard to create a card.
I embossed Very Vanilla card using the Hexagon Embossing Folder. If you don’t have this folder, you need it. It is gorgeous and the pattern is so deep. I used the “ruler” from the Build It Framelits Dies to add texture to both edges of a strip of Delightful Dijon card.  I attached the card to the card front and wrapped the centre of the card using the Smokey Slate 1/8″ Stitched Ribbon. I attached the embossed card to scored and folded Basic Black card.
  I used the hexagon framelit die to cut two pieces of the Urban Underground Specialty Designer Series Paper. The hexagons are attached to the card front using dimensionals. I stamped the image from the Urban District stamp set onto Very Vanilla card using Memento Tuxedo Black ink and once more used the framelit to cut out the image. I attached the greeting panel to the card front, also using dimensionals.
I simply decorated the inside of the card by embossing a strip of Very Vanilla card using the Hexagon Embossing Folder. I attached a narrow strip of Delightful Dijon card behind one long edge of the embossed card and attached it to Very Vanilla card.
So I really think this one is nicer than the one I showed you a couple of days ago. What about you, which one do you like the best?
Bye for now,
Kris
The January Hostess Code has closed, stay tuned for the February Code.
Product Used:


