Stampin’ Gals Gone Wild Challenge 27.1.17
I love the sketch this weekend at Stampin’ Gals Gone Wild. I have been wanting to use the dies the Window Box Thinlits Dies but not to create the box, to create cards and this sketch gave me a chance to try.
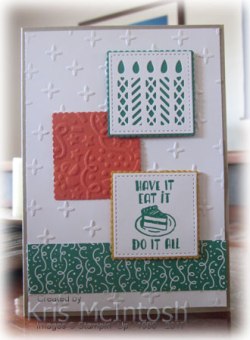
I embossed Whisper White card using the Sparkle Embossing Folder and attached it to scored and folded Crumb Cake card. I attached a narrow strip of the Animal Party Designer Series Paper across the bottom of the embossed card. I cut a scalloped square from Tangerine Tango card using the Layering Squares Framelits Dies and embossed it using the Confetti Embossing Folder.  This folder has a blank oval in the centre, so I placed the scalloped square into the top left hand corner and only a small section remained un-embossed on the bottom right hand corner. I attached the Tangerine Tango scalloped square onto the card front on the left hand side. I cut the Window Box Die that shows the candles from Whisper White card, and then used a square from the Stitched Shapes Framelits Dies to completely cut it out. I attached the candle piece to a scalloped square cut from Emerald Envy card using the Layering Square Framelits Dies and then the card front using dimensionals.
 I stamped the greeting from the Designer Tee stamp set which is on the last page of the Sale-A-Bration catalogue, using Emerald Envy ink. (You can earn this set free with a qualifying order.) I cut the greeting using a square Stitched Shapes Framelits Die, attached it to a Crushed Curry scalloped square (cut with the Layering Square Framelits Dies) and then the card front using dimensionals. You will notice that this panel, covers the section of the Tangerine Tango card which was not embossed. Yay!
To decorate the inside of the card, I embossed a narrow strip of Tangerine Tango card using the Confetti Embossing Folder which I attached across the bottom of Whisper White card. I wanted to leave a little white showing below the embossed card to kind of match the designer series paper on the front.
Another fun sketch challenge and hopefully another card you all like. Let me know!
Bye for now,
Kris
Hostess code for January is closed. Stay tuned for the February code.
Product Used:


Nailed It

Well maybe! Here is a card I created using the Urban Garden product suite and co-ordinating products. If you check out the Occasions Catalogue on page 46 and 47 you will see this all the beautiful products that make up the Urban Garden product suite. But, if you turn the page to 48, you will see the Nailed It product bundle which co-ordinates so well. I think we are lucky, this is one of the nicest “male” suites we have carried for a while.
I used my trusty sketch book to come up with the layout. The colour scheme is always easy because I just use the colours from one of the Designer Series Papers, in this case the Urban Underground Specialty Designer Series Paper.
I attached Very Vanilla card to scored and folded Basic Black card. For the next layer I embossed a piece of Very Vanilla card using the Hexagon Embossing Folder and attached it to Basic Black card and then the card front. I ran a strip of each of the designs in the Urban Underground Designer Washi Tape across a piece of Very Vanilla card, attached it to Basic Black card and then the card front, making sure to cover the bottom of the embossed Very Vanilla card. I cut the hammer and the screw driver images from Smokey Slate card using the Build It Framelits Dies. I stamped the Hardwood Background onto Crumb Cake card using Soft Suede and cut the two images once more, this time cutting the “handle” section and attaching over the Smokey Slate images.  The images are attached to the embossed section of the card. I cut the banner using the framelit in the Build It Framelits Dies from Basic Black card and once more from Very Vanilla card. I stamped the greeting from the Nailed It stamp set onto the Very Vanilla frame, attached it to the black frame and then to the card front using dimensionals. You have to be careful with this die because this die actually cuts two pieces, the piece the size of the Very Vanilla card and a piece the size of the Basic Black frame that you can see. You can remove the outer edge quite easily, so if you want to mount them together you just need to be gentle so they don’t come apart.
To decorate the inside of the card I added two rows Urban Underground Designer Washi Tape across the bottom of Very Vanilla card.
Once more a simple card, but one that shows of the products in this suite very well, I think, what about you, what do you think?
Bye for now,
Kris

Use this Hostess Code when placing an order during January and receive a gift from me.
Products Used:


Card for Jack

I thought I would share with you the card I made for my niece to celebrate the birth of her son Jack. I started by stamping the “onsie” image from the Every Occasion stamp set nine times onto Whisper White card using Soft Sky ink. I used the smallest square from the Stitched Shapes Framelits Dies to cut them out. I attached the squares to Marina Mist card and then scored and folded Sahara Sand card. I cut a piece of Marina Mist card to create the banner for the card front.  I cut the hearts from Soft Sky card using the Love Notes Framelits Dies. The large heart is cut from Marina Mist card using the Love Notes Framelits Dies. I stamped “hello baby” from the Teeny Tiny Sentiments stampset onto Whisper White card using Marina Mist ink and trimmed both ends into a “v”. I added a medium Basic Pearl to the string of hearts on the banner.
 To decorate the inside of the card, I simply stamped the string of hearts from the Sealed With Love stamp set onto the top of Whisper White card using Marina Mist ink.
This card is actually cased from one I saw which was a Valentines card. Unfortunately I cannot find the original card to give credit, but thanks whoever you are for designing such a cute layout. I love the way it turned out as a baby card, what do you think?
Bye for now,
Kris
Use this code when placing an online order during January and receive a gift from me.
Product Used:


Welcome Baby

First of all let me say “Happy Australia Day”. I hope you have a wonderful day spending time doing something you enjoy with the special people in your life.
I became a great aunt once more recently when my niece delivered a healthy baby boy whose name is Jack. I wanted to create a gift which would record the event and be displayed.
I started by creating a long narrow panel down the right hand side of an A4 piece of Soft Sky card with his name. I cut the letters from Soft Sky card using the Large Letters Framelits Dies and attached them to a piece of Whisper White card which I attached to Sahara Sand card.  I created the top panel on the right hand side using MDS and a card from the Baby Boy Project Life Card Collection to hold his name, date of birth, weight, etc. The panel is also attached to Sahara Sand card. The middle panel holds a gorgeous photo of baby Jack. and the bottom panel is just purely for decoration. I cut the large heart from Soft Sky card using the Bloomin’ Hearts Thinlits Dies and attached to the left hand side of the Whisper White panel. I stamped the greeting which comes from the Layering Love stamp set onto the right hand side of the Whisper White panel using Sahara Sand ink. The stamped panel is once more attached to Sahara Sand card.
All in all quite a simple but I think cute and effective way to show off the birth of this gorgeous little man.
What do you think?
Bye for now,
Kris
Product Used:


Another Special Reason
 This is another card I created using the Special Reason Bundle. I started by embossing Peeaboo Peach card using the Petal Burst Embossing Folder. I attached it to Whisper White card and wrapped the join using the Gold 3/8″ Metallic Ribbon from the Sale-A-Bration catalogue. I stamped “Happy Birthday” from the Vertical Garden stamp set onto the top right hand side of the Whisper White card. I cut the leaf and stem from Whisper White card using the Stylish Stems Framelits Dies and attached it to Mint Macaron card. See how the die cuts the negative from the Whisper White card.
  Fantastic isn’t it. I stamped the small flower onto Whisper White card using Peekaboo Peach ink and cut it out using the matching Stylish Stems Framelits Die. I attached the flower to the top of the flower stem and then attached the panel to the card front using dimensionals.
To decorate the inside I embossed Peekaboo Peach card using the Petal Burst Embossing Folder and attached it to Whisper White card. I wrapped the top edge of the embossed card using the Gold 3/8″ Metallic Ribbon.
I love this card, it is so pretty and the touch of gold in the ribbon really sets it off, don’t you think?
Bye for now,
Kris
Use this Hostess Code when you place an order during January and receive a gift from me.
Product Used:


A Late Birthday
 I was chatting with a friend recently and found out that she had celebrated a birthday earlier in the month. My goal this year is to make sure that I send everyone I know a birthday card. Co-incidentally I was on Demonstrator Facebook Page when a lovely lady by the name of Lorraine Dowling shared a set of cards she had made using the Avant Garden stamp set. The design took my eye straight away and I just had to use it to create my card. Unfortunately Lorraine doesn’t have a blog I can direct you to, but be sure to keep an eye out for when she does because she is super talented.
I stamped the flowers from the Avant Garden stamp set onto Whisper White card using Sweet Sugarplum ink. I stamped the image twice without re-inking to give some depth of colour to the card. I stamped the leaves using Cucumber Crush ink, again stamping twice without re-inking. The dotted background image was stamped using Mint Macaron ink. I stamped the greeting from the Avant Garden stamp set using Sweet Sugarplum ink as well. The flower centres are stamped using Early Espresso ink.  The stamped panel is attached to Sweet Sugarplum card and then scored and folded Thick Whisper White card. To add a little extra dimension around the flowers, I stamped the background stamp using Mint Macaron ink which I stamped off first, so that I could stamp over the flowers without blurring the images.
To decorate the inside of the card I simply stamped the flowers, leaves and background as I had done on the front of the card. The stamped panel is once more attached to Sweet Sugarplum card. I may or may not have gone a little overboard on the inside, but, I am so happy with this card. It is really lovely, especially in person. So thank you once more to Lorraine.
I’d love to hear what you think, so please leave me a comment.
Bye for now,
Kris
Use this Hostess Code when you place an order during January and receive a gift from me.
Product Used:


Memory Keeping
 This is the page I have created to share at my Memory Keeping class this Friday night.
I started by stamping the Watercolour Wash Background stamp on the top left hand and bottom right hand corners using Daffodil Delight ink. I created the balloon panel using the Balloon Pop-Up Thinlits Dies. The main purpose of the die is to cut it from the centre of the panel you are going to put inside your card. It has a fold line down the middle and one on each side so that it will pop up on the inside of your card. I found that the die is exactly 6″ long and by using a narrow piece of cutting plate on top of the die, I could cut out the piece without the outside score lines. (I am lucky enough to have a handy son-in-law who refinishes the edges on my cutting plates when they break, creating many sized pieces which I can use in my crafting.)  I cut my panel from Whisper White card which I trimmed by 1/8″ from each side so that I could place it onto my 4″ x 6″ Early Expresso panel. I stamped “happy birthday” onto the banner section using a greeting from the Balloon Adventures stamp set and Early Expresso ink. The decorative balloon pieces were cut from Daffodil Delight, Rich Razzleberry and Tangerine Tango card using the dies in the Balloon Pop-Up Thinlits Dies. This panel makes up the top right hand side of the layout. I added two photos of my gorgeous, youngest granddaughter celebrating her birthday last year. The panel in the bottom left hand corner is created by stamping the “look who’s turning” from the Number of Years stamp set onto Whisper White card using Early Expresso ink. I added the number “6” which is from the same stamp set once again using Early Expresso ink. Across the bottom of the panel I stamped the “date” image from the Project Life Date It stamp set using Early Expresso ink. The stamped panel is attached to a piece of Early Expresso card 4″ square. I cut the letters to create her name from Early Expresso ink using the Large Letters Framelits Dies.
I am always trying to create pages to demonstrate how easy it is to stick to standard Project Life size cards. Any of these pieces could be change out using cards from the Project Life Card Collections. I love how easy it makes memory keeping, I don’t have to think for hours and hours about where to place my photos or embellishments. Of course, I do scour Pinterest for Scrapbook Layouts which suit my purposes.
If you would like to attend this class, please contact me to reserve your place as space is limited.
Bye for now,
Kris
Use this Hostess Code when placing orders during the month of January and receive a gift from me.
Product Used:


A Stamping Challenge
The sketch challenge for this weekend at Stampin’ Gals Gone Wild (facebook page) is so good, I just had to play along. As my stamp set of the moment is Special Reason and the Special Reason bundle, I had to use it for the sketch.
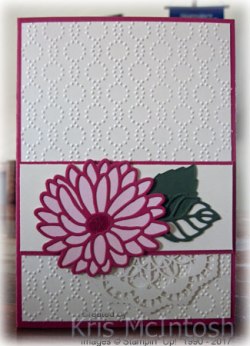
I embossed Very Vanilla card using the Elegant Dots Embossing Folder and attached it to scored and folded Rose Red card. I attached half a Lace Doily from the Occasions Catalogue to the card front, using the Very Vanilla side. I attached Very Vanilla card to Rose Red card. The panel is attached to the card front, covering the top edge of the Lace Doily. I cut the flower from Rose Red card using the Stylish Stems Framelits Dies.  You have to cut the flower twice, first you cut out the detail of the flower and then you cut the surrounds of the flower – cool isn’t it. I also cut a solid flower from Pink Pirouette card. The detailed Rose Red flower is attached over the Pink Pirouette flower.
  I also attached the flower centre from the Rose Red flower and coloured is using the Clear Wink of Stella. I cut the solid leaf and detailed leave from Always Artichoke card. The flower and the leaves are attached across the card front.
To decorate the inside of the card, I attached a narrow strip of Rose Red card behind one long edge of Very Vanilla card embossed using the Elegant Dots Embossing Folder. The embossed panel is attached to the bottom of Very Vanilla card. I cut the small flower using the Sylish Stemps Framelits Dies, again one solid flower from Pink Pirouette and one detailed flower from Rose Red. The small leaves are also cut using the same dies from Always Artichoke. I attached the flowers and the leaves over the top left hand edge of the embossed card. I once more added the Rose Red flower centre which I coloured using the Clear Wink of Stella.
I am so loving this Special Reason Bundle. Although I didn’t use any of the stamps today, I could have stamped the flower in Pink Pirouette onto the Pink Pirouette card, to create a little more definition.
Since I have been creating with a particular stamp set or bundle, it kind of gets me excited and as I create one card, I think of ways that I could have used the products, to create a different look.
I’d love to know what you think of my card today.
Bye for now,
Kris
Use this Hostess Code when you place an order during January and earn a gift from me.
Product Used:


A Special Reason
Have you seen all the gorgous creations being shared all over the net using the Special Reason stamp set. Let me say this wasn’t on my wish list and I didn’t purchase it until last week when I just had to give in and try and create something gorgeous. I was directed to a facebook Video by Alisa Tilsner (after you click the link you will need to select the video which is episode 11) which showed a technique using Watercolour Pencils on top of a stamped image and decided to give it a try. I followed the video and created my flowers and leaves using the same colours that Alisa did but used one of those sketches in that book I have sitting on my desk to create my card.
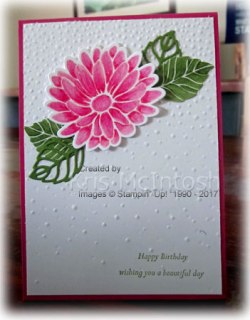
I stamped “happy birthday” and “wishing you a beautiful day” from the Special Reason stamp set onto the lower right hand corner of Whisper White card.  I embossed the stamped card using the Softly Falling Embossing Folder and attached it to scored and folded Melon Mambo card. I stamped the flower from the Special Reason stamp set onto Whisper White card using Pink Pirouette ink and coloured it using the Melon Mambo Watercolour Pencil and a Blender Pen. I cut the flower out using the matching Stylish Stems Framelits Dies and attached it to the top left hand corner of the embossed card using a Glue Dot in the centre.
  I stamped the leaves using Pear Pizzazz ink onto Whisper White card and coloured them using the Old Olive Watercolour Pencil and a Blender Pen. I cut the leaves out using the matching Stylish Stems Framelits Die. I also cut the open leaves from Old Olive card using the same dies. The leaves were attached together and then to the card front underneath the flower using Tombow Multipurpose Glue.
To decorate the inside I created a small flower using the Pink Pirouette ink and Melon Mambo Watercolour Pencil technique and attached it to the lower left hand corner of Whisper White card.
I realised after I had put the card together that I think the flower on the front is upside down. What do you think, is it the right or wrong way up? Oh well, its too late now to change it.
Bye for now,
Kris
Use this Hostess Code when placing an order during January and I will send you a gift.
Product Used:


Another Dragonfly card
 I have had my folder with all the card sketches I saved (pre-pinterest) out next to my desk this past week or so and have been finding sketches I think will work with the particular stamp set I am wanting to use. This creation is based on one of those sketches.
I embossed Very Vanilla card using the Falling Petals Embossing Folder and attached it to scored and folded Sahara Sand card. I attached two pieces of the Falling in Love Designer Series Paper (actually small pieces left over from other projects). I stamped “happy birthday wishes” from the Avant Garden stamp set (Free with a qualifying order during sale-a-bration) onto Very Vanilla card using Sahara Sand ink. I cut the greeting using a circle die from the Layering Circles Framelits Dies and attached it to a Soft Sky scalloped circle but using the same Dies.
  The greeting panel is attached to the card front using dimensionals. I stamped the dragonfly onto Very Vanilla card using Soft Sky ink and cut it out using the matching Detailed Dragonfly Thinlit Die. I cut the detailed dragonfly from Sahara Sand card using a die in the same set. I attached the dragonflies together before attaching to the Very Vanilla circle. Lastly I added one of the Falling in Love Embellishments using a Glue Dot.
For the inside of the card, I simply added a strip of the Falling in Love Designer Series Paper to the bottom of Very Vanilla card.
Well what do you think of this card? Are you loving the dragonflies, I know I am.
Bye for now,
Kris
Use this Hostess Code when you place an order during January and you will receive a gift from me.
Product Used:


