MDS Monday 67
This week the challenge at MDS Monday is all about Project Life. Since Stampin’ Up! have already released the Everyday Adventure Digital Project Life Cards – Digital Download, I decided to use use of the 3″ x 4″ cards to create my page.

I added Designer Series Paper from the Convention 2014 Photobook Template Digital Download to my 12″ x 12″ page as my background. I added a Square Punch, resized it and filled it with Whisper White card on top of the Designer Series Paper. I add one of the Simply Life Photo Templates – Digital Download to my page which gave me the space to add my photos and the Everyday Adventure Digital Project Life 3″ x 4″ card. I added photos from my recent trip to the South Pacific Stampin’ Up! Convention in Melbourne and added journalling to the Project Life card.
These photos show out gorgeous apartment and the views from our windows. Gwen and I had a wonderful time as you already know and I was glad to be able to make this page to document such a happy time.
bye for now,
Kris
Product Used


It’s Time to Say Goodbye
Today marks the release of the retired stamp set and accessories lists. Can you believe that it is almost a year since we got our hands on the current catalogue. I can still remember my excitement. So many new goodies! Now it is time to say goodbye to some that have become our favourites. Some may still be on your Wish List. If that is the case you need to get in early to ensure that you secure what you need. I believe that some stamp sets and accessories sold out within 24 hours when the lists were released in the United States and Canada. I would hate for you to miss out on something you really want.

All the product on these lists will be sold on a “While Stocks Last” basis, so you really do need to act fast. You can order your favourite products while stocks last at my online store. If you don’t already have an account it is easy to set up and the product will be delivered directly to your door. If you have any questions or need some help, do not hesistate to contact me.
Bye for now,
Kris
You won’t believe this
Starting yesterday for four weeks (until 30th June) you can become part of the Stampin’ Up! family for the low price of $85.00 ($90.00 worth of free product).

Having just been to our South Pacific Convention I can testify first hand as to what a great company this is to be part of. I have made so many friends both in person and online that I know has only been possible because of Stampin’ Up. There are many reasons to join Stampin’ Up! – making new friends, sharing ideas, great product and I get a discount. I also get to order new product before it becomes available to customers (Project Life pre-order begins tomorrow). So if you think that you might like to be part of this great family, contact me and I can get you started and answer any questions you might have.
Bye for now,
Kris
Notecard & Presentation Box
This is another of the Make and Takes we did at Convention. This cute little box is actually one of the Gift Card Enclosures which will be available in the new catalogue. We added a couple of extra score lines to create a box.

All of the stamped embellishments come from the Amazing Birthday stamp set (another new one in the new catalogue). You can see some new Designer Series Paper and some of the new in-colours as well. My favourite is the beautiful star which is cut using a new set of framelit dies.
 We also stamped three notecards and added some bling. The cute little star is part of the same punch pack as the flower on the make and take card I showed you previously.
 I must admit to never having bought any note cards but they are now really high on my wish list.
Bye for now,
Kris
Convention Make and Take
I’m home from the Stampin’ Up! South Pacific Convention and what an amazing time I have had. We were spoiled from the moment we arrived until the end of the day on Saturday. I received lots of free goodies, lots of great information and was thoroughly entertained along the way. This is my second Convention and the programme this time was completely different to my first Convention and I absolutely loved it. I didn’t take the time to complete my make and takes whilst I was at Convention last time, but this year the format made it part of the programme and so I completed all my projects whilst there.

This first project uses a stamp set which will be new to the catalogue released on the 1st July and is called Kinda Eclectic. We also used some of the new in-colours as well. I just love the cute little yellow flowers which are punched using a new punch set. I think this stamp set may become my new favourite – well so far anyway. We made two versions of the card, one of which is slightly stepped up. I love them both! This is the “basic” version.

And here is the stepped up version.

I realised after I posted the first picture that I had lost a Rhinestone from the centre of one of the little flowers, so added it before I took this close up. I love the way the linen thread is added to this card.
I can’t add links to the product used, because you it isn’t available until July 1st but I would love to know what you think.
Bye for now,
Kris
Chocolate Box
 It’s the last day of Convention. I can’t believe how fast the time has gone. I wonder what we will learn and see today. Anyway, I made this box to give to my friend Gwen at Convention. I used Early Expresso Core’dinations card to create the box. Once I had scored it and cut the flaps and the lid, I used the Stamping Sanding Block along all the scored lines and also across the box panels to give it some dimension. I cut the leaves from Old Olive card using the Little Leaves Sizzlet and attached them to front panel. I cut two flowers from Real Red Core’dinations card using the Spiral Flower Originals Die.
  I sanded the edges of the flower, spritzed them with Isopril and scrunched them up. I let them dry which only takes a minute and rolled the flower together. I unrolled them a little and pushed down on the top to give them a more flattened and irregular look. I used crystal effects to hold the flower together and once that was dry attached them to the front of the box using Glue Dots. I filled the box with some Cadbury’s favourites.
Stay tuned for more updates from Convention.
Bye for now,
Kris
Product Used:


3D Convention Swap
I love the Chocolate Holder which I shared with you earlier this year and decided to create some of these as one of my Convention swaps. I created them in three different colour combinations and I love all of them.

The first one is Real Red card with the background image from Gorgeous Grunge stamped all over in Real Red. I stamped the flower from the Petite Flower stamp set onto Whisper White card using Real Red in and punched them out using the Petite Petal Punch. The leaves are punched from Old Olive card using the Bird Builder Punch. I added Basic Rhinestones to the centre. The ribbon is Whisper White 1/2″ Tafetta Ribbon. For the second chocolate holder I used Whisper White and again stamped the background from Gorgeous Grunge using Real Red ink. The flowers are punched from Real Red card and the leaves from Old Olive card. I have added a Basic Rhinestone to the centre of the flowers. This one is held closed by Real Red 1/4″ Stitched Grosgrain Ribbon. The last one is Marina Mist card with the same background image stamped in Marina Mist ink. The flowers are stamped onto Whisper White card using Marina Mist ink and punched out. The leaves are punched from Whisper White card. I added a Basic Pearl to the centre of the flowers. This one is again held closed with the Whisper White 1/2″ Tafetta Ribbon I forgot to photograph the inside before I packaged them but each one is stamped with the background image and then one flower and set of leaves is attached to the front of the chocolate slide.
If you want to create your own Chocolate Holders, you can download the PDF from my Free Tutorials Page.
Bye for now,
Kris
Product Used:


Convention Swap
You all know how excited I am about Stampin’ Up! partnering with Becky Higgins for Project Life. Well….I decided that I would make a 6″ x 4″ project life card for one of my swaps.

I used My Digital Studio to create my card using the Creative Elements Stamp Brush Set Digital Download. I coloured the background flourish old olive and added a flower in Cherry Cobbler. The “create” comes from the Creative Elements Stamp Brush Set. Inspire comes from the Get it Done Kit Digital Download and share comes from the Days to Remember CD which is retired. I coloured the words Night of Navy. I copied the flowers and pasted them to another page. Once I had them created, I printed them out onto Whisper White card at home and by copying them I could be sure that when I cut them out they would layer perfectly onto the card. I rounded the corners using the Envelope Punch Board to give them the Project Life “look”. I think they will be a nice addition to a Project Life style page about convention or maybe a small bag book.
I really love that I can create hybrid style projects using My Digital Studio. It makes it very easy to mass produce for swaps like this. If you haven’t tried My Digital Studio then why not download the free trial version to see why I love it so much.
I hope that whoever gets them loves them as much as I do.
Bye for now,
Kris
Product Used:


Convention Bag Tags
In case you don’t know, myself and my friend Gwen are off to Convention today! It is so exciting. We have been planning for ever so long and now today is the day! We are leaving in a couple of hours.
One of the very nice things about going to Convention is all the goodies we receive. Stampin’ Up! is a very generous company. This year there are about 700 demonstrators and guests attending and we all get the same bag as a gift when we register. As you can imagine it can be a little hard to keep track of your bag, so I made a tag for myself and Gwen to attach to ours. The tag was inspired by one I had seen on Pinterest by Deborah Smart, I changed it up a little (but not much) to add our initials.
 The base of the tag is Real Red Core’dinations card cut using the large Apothecary Framelit Die. Once cut it was embossed using the Fancy Fan Embossing Folder and sanded a little to bring out the design. I stamped the image from the Chalk Talk stamp set onto Whisper White card using Real Red ink and cut it out using the co-ordinating Chalk Talk Framelit. I punched a 1-3/4″ Circle from Red Glimmer Paper and attached it to the centre of the stamped tag. I cut the letter “K” and “G” from Silver Glimmer Paper using the Typeset Alphabet Bigz Die. The letters are attached to the centre of the Red Glimmer Paper circle. I punched Old Olive card using the Bird Builder Punch to create a couple of sets of leaves and attached them to the tag. I cut the flowers from Real Red Core’dination card using the Spiral Flower Original Die. I sprayed them with Vanilla Shimmer Smooch Spritz and filled the centre of the flowers with Silver Sparkle Dazzling Details before attaching them to the tag. I used my Crop-A-Dile to add a large Pewter eyelet (retired) to the top of the tag and attached a bag ring.
 I attached my tag to a bag I made to take to Convention using some Stampin’ Up! supplies. The frills on this bag are created using the 7/8″ Cotton Ribbon and the straps are made using the Natural 5/8″ Chevron Ribbon.
 I think these are going to look really cute hanging from our Convention Bags and hopefully will make it a little easier for us to keep track of them.
Bye for now,
Kris
Product Used:


Use Designer Series Paper
Are you like me a Designer Paper hoarder. I buy it because I love it and then I don’t use it. I know, sad really. However, I get to this time of year and realise that my beloved Designer Series Paper will soon be retiring and I need to use it! So at the moment I am on the look out for card sketches that give me the opportunity to use up some of my stash.
I have had this sketch pinned for a while and thought it was perfect.
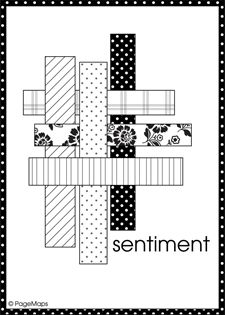
I cut varying sizes of strips of Gingham Garden Designer Series Paper and attached them to Very Vanilla card. It was a little tricky but I used glue dots to attach the left hand edge of the horizontal pieces, with some double sided tape on the other end. That way I could slide the vertical strips over the horizontal ones and then attach the other end to the card front. Once I had the Designer Series paper attached I stamped the greeting from the Petite Pairs stamp set onto the lower right hand corner using Melon Mambo ink.

Inside the card I attached a piece of Melon Mambo card with one long edge punched using the Scallop Trim Border Punch behind another piece of Gingham Garden Designer Series Paper.
 This card is so pretty and is one that my ladies at Beachmere will be making tomorrow.
Bye for now,
Kris
Product Used:


