A second card for SC 80/13
 This is actually the first card I made using Vicky’s great sketch for the current Sunny Challenge. However, I decided to post the card using the Dress Framelits instead.
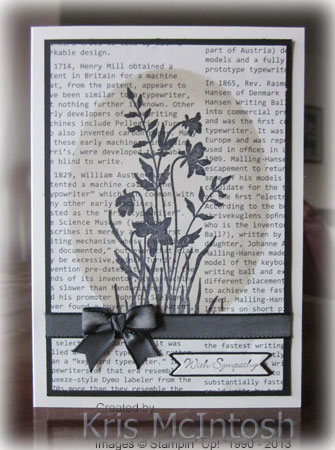
I embossed Cherry Cobbler card using the Fancy Fan Embossing Folder. I actually placed the card inside the folder so that the fans run across the card and this left the lower section un-embossed. I added a piece of the beautiful Delicate Details Lace Tape across the card to cover the end of the embossing. The embossed card was then attached to scored and folded Crumb Cake card. I inked the flower from the Serene Silhouettes stamp set using Cherry Cobbler and Old Olive Stampin’ Write Markers. You will notice that one of the flowers is a little lighter – this is because I actually stamped the image onto scrap paper and then only re-inked the other two flowers and the stems before stamping onto Whisper White card.  The image panel is attached to Crumb Cake card and then to the card front using dimensionals.
I thought this was a little plain at first but it is really growing on me. What do you think?
You still have plenty of time to play along, the challenge won’t close until late on Friday so get crafting and then pop over to Sunny Challenges and Creations and add your card, scrap page or 3d item to Mr. Linky.
Bye for now, Kris.
Best Of Stamp Sets
As part of the Stampin’ Up! 25-year anniversary celebration, they are bringing back some of their favourite stamp images from the last quarter century and combining them into five sets, which will release-one set per month-until October. Even better, along with some great classic images, each “Best of” set will also include a never-before-seen image! Each of these sets will be available for purchase until April 2014. What a fantastic idea.

This beautiful Best Of Flowers stamp set is available from today until April 2014 at a fabulous price of $25.95. The next set will be released on the 1st July, so keep a look out. You will be able to find all the Best Of stamp sets at my online store, just click on the Special Offers button and then the Best of 25 years or just contact me to place an order.
Bye for now, Kris.
Retired Lists
As a demonstrator the release of the Retired List is always a kind of love/hate moment. I hate seeing some of my favourite things being retired BUT this is the day that I also get to pre-order from the New Catalogue. So on the one hand I am very sad to see the 2011-2103 in colours retire, but I have already ordered the new in-colours and I know they are going to be just as fabulous.
 You can view all the retiring products at my online store or click on the link on the right hand side of this page.
Remember that if you really want something on the retiring list, then you need to order it straight away, because once they sell out, they will no longer be available. If you don’t like the idea of ordering online, then just contact me to order your supplies.
The Just Believe stamp set is one of those sets that I really am going to miss. This is a card that I found on Pinterest by Cindee Wilkinson and one that we made at a recent class. It truly is a fabulous set, so don’t wait if you really want it. The card also features the Newsprint Designer Series Paper (retiring) and Basic Black 3/8″ Taffeta Ribbon (also retiring).
Happy Shopping and bye for now, Kris.
A present from Shirley
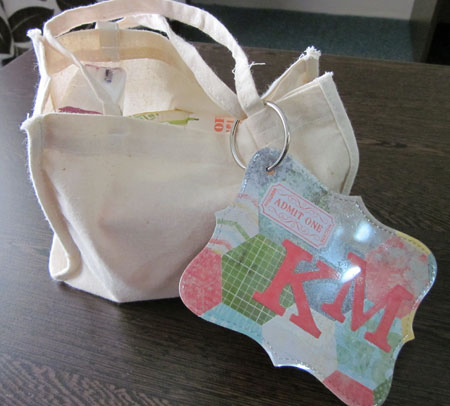 My lovely downline Shirley gave me this awesome present at Convention. A beautiful Tag to add to my Convention Bag (think I have already shared my Convention bag and tag) was attached to a gorgeous little calico bag. You may wonder why I needed to be reminded which was my bag (no it’s not because I am getting old and senile) – with 700 demonstrators all carrying the same bag you definitely need something to let you know which one is yours. Inside was a gorgeous box which Shirley decorated and filled with chocolate (of course). She also included tissues, Tic Tacs and some gum all the necessaries for enjoying a fabulous Convention. I took these photos while I was at Convention and this is the first chance I have had to share them. Thanks Shirley for being such a great friend.
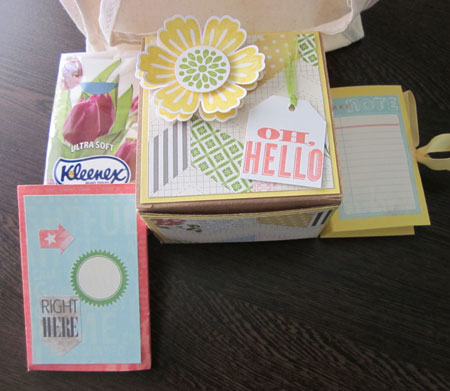
Next Convention is going to be in Melbourne and I truly hope that I can go and be part of this fabulous event once again. It is a wonderful experience, not only enjoying all the things that are on offer in the way of classes and techniques, new products to play with etc. but to meet and spend time with people who I only know online.
 If you think you would love to be part of this fantastic company so that you too can attend Convention 2014 in Melbourne, then contact me and we can discuss how to become a Stampin’ Up! Demonstrator and discover just how wonderful that can be.
Bye for now, Kris.
Sunny Challenge 80/13
 Sunny Challenges and Creations has a great challenge for you this week. Vicky has provided us with a sketch to use any way we want, so why not join us for this challenge. Remember that our challenges run for two weeks now so there is plenty of time to play along.
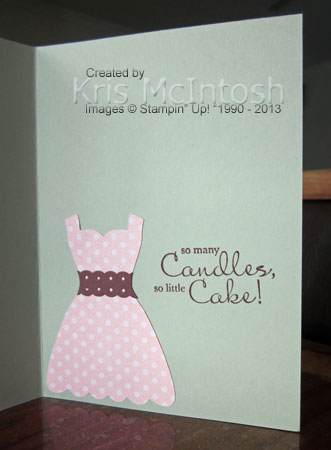
I began my card by embossing Bravo Burgundy card using the Chevron Embossing Folder and attached it to scored and folded Sahara Sand card. I stamped “celebrate” from the Fabulous Phrases stamp set using Bravo Burgundy ink onto Sahara Sand card. I punched strips of Pretty in Pink card using the Dotted Scallop Border Punch, added them behind the greeting panel and then attached the whole piece to the card front. I cut Whisper White card using the large framelit from the Apothecary Framelits and embossed it using the Perfect Polka Dots Embossing Folder. 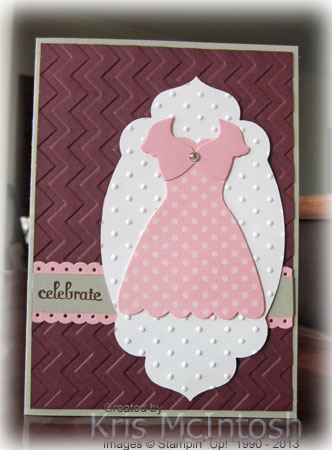 I attached this panel to the card front using dimensionals. I cut the sleeveless dress from Pretty in Pink Polka Dot Designer Series paper from the Brights Designer Series Paper Stack using the Dress Up Framelits. I also cut one dress with sleeves from Pretty in Pink card. The Pretty in Pink dress is punched with the Full Heart Punch to create a cute little “shrug”. I attached the “shrug” to the dress, added a Basic Rhinestone for bling and attached it to the embossed Whisper White framelit.
Inside the card I added a sleeveless dress cut from the Pretty in Pink Polka Dot Designer Series Paper. I punched a strip of Bravo Burgundy card using the Dotted Scallop Border Punch and added it to the waist of the dress. I stamped the greeting from the Bring on the Cake stamp set using Bravo Burgundy ink.
 Well, what do you think? Did I create something you would like to receive? For more inspiration pop on over to Sunny Challenges and Creations and see what the design team has created. Once you have made your card, scrap page or 3d item, add it to Mr. Linky. We look forward to seeing all your gorgeous creations this week.
Bye for now, Kris.
U Stamp With Dawn
It’s my second day at the Stampin’ Up! South Pacific Convention and I am really enjoying myself. Lots of classes today, learning about MDS, how to use Social Media for my business and how to grow and nurture my downline. During our General Session this morning we were treated to a fun stamping presentation by Shelli Gardner. Juliana also present a real Wow presentation using the fantastic This and That Products, especially the Washi Tape. I don’t have any photos to share at the moment but hopefully my photos will be ok and I can share some of the fun with you. In the meantime, here is a card I made before I left for Convention. I recently participated in the U Stamp With Dawn and Friends Bigshot Round Up which had a fantastic selection of gorgeous projects. The card I am sharing was part of a project created by Kirsten Brown. You might notice that I seem to be drawn to projects using the gorgeous Tea for Two Designer Series Paper at the moment and that was the first thing I loved about this card. Kirsten has combined several papers to create a simply beautiful card. I continued the theme on the inside adding the banners and the flower. (Apologies for the sunlight across the photo.)

I really love the way this card has come together, don’t you? If you would like to re-create this project then email me or pop on over to my online store to order before the catalogue ends on the 30th June and this gorgeous Designer Series Paper disappears.
Bye for now, Kris.
Stampin’ Up! Convention 2013
I am really excited to share that today I attended the first day of my first Stampin’ Up! Convention. Wow, how exciting. It’s almost too much information to take in all at once. Shelli Gardner, Co-Founder of Stampin’ Up! was the first speaker this morning and was truly a fantastic speaker. She shared stories about the early years or Stampin’ Up! till now – 25 years what an achievement!
One of the fun parts of attending Convention is swapping cards with the other demonstrators. I thought I would share with you the card front that I made to swap.
 I sponged Real Red ink onto the edge of a Paper Doily, cut it in half and attached each half to Whisper White card embossed using the Perfect Polka Dots Embossing Folder. I punched both long edges of a strip of Basic Black card using the Scallop Trim Border Punch, wrapped it with Whisper White 5/8″ Organza Ribbon and attached it to the card front, covering the cut edges of the doily halves. I stamped the stem image from the Field Flower stamp set onto Whisper White card using Old Olive ink, attached the image panel to Basic Black card and then to the card front using dimensionals. I stamped the flowers onto scrap Whisper White card using Real Red ink and cut them out. The flowers were attached to the card front over the ends of the stem using Snail.
I did complete one card by attaching the card front to the scored and folded Basic Black card. I decorated the inside of the card by stamping the stem onto Whisper White card using Old Olive ink. I stamped the flowers onto scrap Whisper White card and cut the flowers out. I stamped the greeting from the Field Flowers stamp set using Stazon Jet Black ink. The Whisper White card was attached to the inside of the card.
I really love the look of this card, especially the colour combination. I really love cards made using Black, White and Red.
To celebrate attending my first convention, I have a PDF tutorial for you to download so that you can reproduce the card.
Bye for now, Kris.
Using some inspiration
 You know that I love Craft Project Central and I have lots of tutorials from them on file but I don’t think I have shared many of my re-creations with you. This gorgeous card is the one that accompanies the Altered Birdhouse from the February 2013 edition of Craft Project Central and is created by the very talented Monika Davis. I love the texture on this card using elements from lots of different places. The punched Silver Glimmer Paper adds just the right amount of bling and I loved creating the cute little flag. Best of all I got to use some of the Tea for Two Designer Series Paper.
I’d love to hear what you think.
Bye for now, Kris.
Dress Up Class
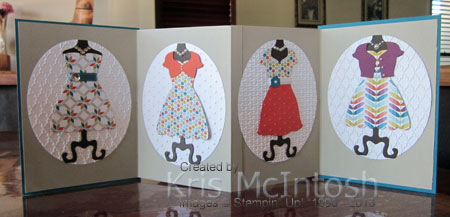 I just love the Dress Up Framelits in the current Seasonal Catalogue. Remember how much fun it was playing with paper dolls when you were a little girl. These framelits give you the chance to play paper dolls again, only in a much more grown up way!
I have just updated my Classes and Workshops page with my latest class using the Dress Up Framelits. During the class we are going to create a little book of ideas so that you can get the most from the framelits.  There are many, many different ideas around for creating dresses, coats, pants, jackets etc. using card stock and designer paper (my thanks to Patty Bennett for most of my inspiration). Our little booklet will use the now retired Sale-A-Bration Designer Paper Sycamore Street and matching ribbon and buttons. To save time, I am going to create the booklets so all you need to do is add your beautiful creations.
So why not come play dress up with me! Please reserve your place early as space is limited. I am really looking forward to this class, it will be lots of fun.
Bye for now, Kris.
I Dig You Birthday
 I made another card for the current challenge at Sunny Challenges and Creations this time using the cute stamp set I Dig You. The challenge uses a sketch and you had to create a card suitable for a child. There is still another week to play along, hope you can join us.
I embossed Whisper White card using the Houndstooth Embossing Folder and attached it to scored and folded Basic Black card. I attached Pacific Point striped designer series paper from the Brights Designer Series Paper Stack to Basic Black card and attached it to the left hand side of the card front. I attached Real Red striped designer series paper from the same Paper Stack to Basic Black card and attached it to the card front.  I stamped the truck in Real Red onto Whisper White card and then again in Pacific Point onto scrap Whisper White card. I cut the back out of the Pacific Point truck and attached it over the real red one. I punched two 1″ circles from Basic Black card, added Whisper White 1/2″ Circles to the centre, pierced a hole and added a Basic Black Brad from the Neutrals Brads Collection. I attached these over the red wheels using Glue Dots. I coloured the present image using Real Red, Old Olive and Pumpkin Pie Stampin’ Write Markers, cut it out and attached it over the back of the truck. The image panel is attached to Basic Black card and then to the card front using dimensionals.
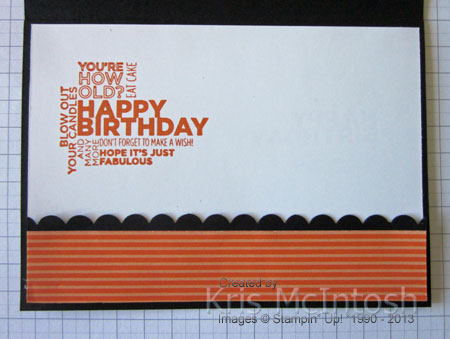 I punched one long edge of a strip of Basic Black card using the Scallop Border Punch and attached it behind Pumpkin Pie striped designer series paper from the Brights Designer Series Paper Stack. This is attached to the lower edge of Whisper White card. I stamped the happy birthday greeting from the Delightful Dozen stamp set using Pumpkin Pie ink and then attached the piece inside the card.
I think this is a really bright happy card and I know my grandsons would love it. What do you think? If you would like to make this card then you can purchase all the supplies at my online store.
Bye for now, Kris.


