Butterflies and Roses
I’d like to share with you a card that the ladies at Beachmere made last week. I am pretty sure that the design was insired by a card I saw on Pinterest (which I can’t find now) so if it looks like something you made, please let me know so I can give you credit.
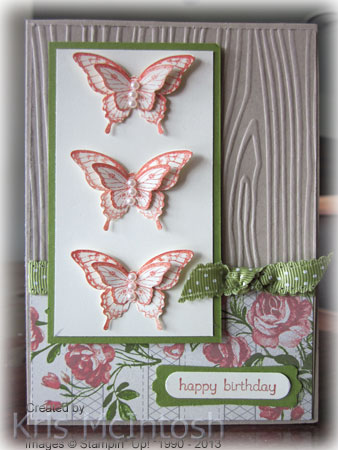 I embossed a piece of Crumb Cake card using the Woodgrain Embossing Folder and attached a piece of the beautiful Tea for Two Designer Series Paper to the lower edge. Old Olive 1/2″ Dotted Scalloped Ribbon covers the join and then the whole piece was attached to scored and folded Crumb Cake card. I stamped the butterflies, three large and three small from the Papillon Potpourri stamp set onto Very Vanilla card using Calypso Coral ink. The large butterflies are punched using the Elegant Butterfly Punch and the small butterflies are punched using the Bitty Butterfly punch. The butterflies are attached to each other using Glue Dots in the centre of the body and small pieces of dimensional under the wings and then to the Very Vanilla card, again using Glue Dots and 1/2 a dimensional under each wings.
 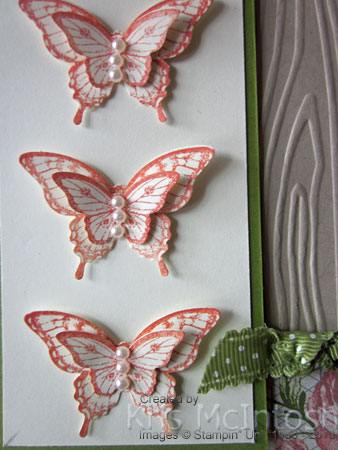 Three of the “string of pearls” on the Basic Pearls sheet are added to the centre of the small butterfly. I like to add the dimensionals under the wings so that the butterflies will keep some dimension even after they are sent through the post. The image panel is attached to the card front using dimensionals and another piece of Old Olive 1/2″ Dotted Scallop Ribbon is tied to the attached ribbon to the right of the image panel. I stamped happy birthday from the Easy Events stampset using Calypso Coral ink on Very Vanilla card and punched it using the Word Window punch. The greeting is attached to an Old Olive Modern Label and then the card front. I stamped three of the large butterflies onto the left hand side of Very Vanilla card using Calypso Coral ink and attached it to the inside of the card.
 All in all a very pretty card and one that works well with the lovely Tea for Two Designer Series Paper. The ladies at Beachmere really liked this card and if you do too then download my free PDF.
All the supplies needed to complete this card can be purchased at my online store on my website. Just click on the Shop Now button under my name.
Bye for now, Kris.
Sunny Challenge 79/13
It was my turn this week to set the challenge for Sunny Challenges and Creations. I have supplied a sketch and I want you to create a card suitable for a child.
 I embossed Whisper White card using the Square Lattice Embossing Folder and attached it to scored and folded Basic Black card. I embossed Midnight Muse card using the Chevron Embossing Folder, attached it to Basic Black card and then to the left hand side of the card front. I attached a strip of Parkers’ Patterns Designer Series Paper to Basic Black card and then to the card front. I created my little penguin by using the Owl Builder Punch. I added arms made from the Word Window Punch and trimmed off the ears to get the basic shape. I added some googly eyes (retired) and a hat punched from the Parker’s Patterns Designer Series paper using the Petite Pennants Builder Punch. The Pom Pom is punched from Cherry Cobbler card using the circle punch in the Itty Bitty Punch Pack.
 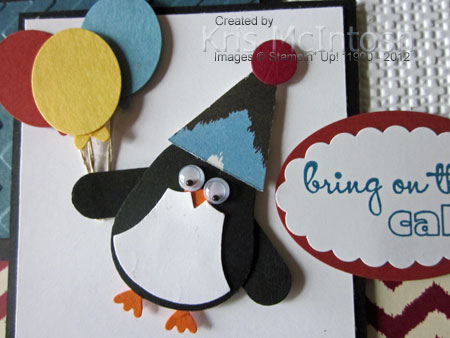 I created the balloons by punching Marina Mist, Cajun Craze and Daffodil Delight card using both the Small Oval Punch and the heart from the Owl Builder Punch. The penguin and the balloons are attached to Whisper White card using glue dots and dimensionals with a little Linen Thread to make the balloon “strings”. The image panel is attached to Basic Black card and then the card front using dimensionals. I stamped “bring on the cake” from the Bring on the Cake stamp set using Midnight Muse ink onto Whisper White card and punched it out using the Scallop Oval Punch. I attached it to a Cajun Craze Wide Oval and then the card front using a dimensional.
I think this is a fun card, that most children would love. What do you think?
If you would like some more inspiration then pop over the Sunny Challenges and see what the design team has created. Once you have made your card, 3d item or scrap page then add it to Mr. Linky. Can’t wait to see your creations.
Bye for now, Kris.
A 60th Birthday Card
We have the pleasure of celebrating three birthday in our family on the 10th May. My mother-in-law, my sister-in-law and my grandson Noah all share this same birthday. Today I want to share with you the card I made for my sister-in-law.
 I Whisper White using the Perfect Polka Dots Embossing Folder and attached one of the Paper Doilies to the right hand side, trimming the edge. I attached a piece of striped Twitterpated Designer Series Paper over the doily and then wrapped the piece with Island Indigo 3/8″ Ruffed Ribbon. I cut the red Twitterpated Designer Series Paper into a flag and attached it over the ribbon using dimensionals. I cut the numbers from Silver Glimmer Paper using the Timeless Type Alphabet (retired) and used a sponge dauber to add some Island Indigo ink to them. I punched Silver Glimmer Paper using the Small Oval Punch and also the cut three hearts using the Owl Builder punch. I coloured one heart and one oval using Island Indigo ink and two hearts and two ovals using Ridinghood Red ink. I attached the hearts to the ovals using Glue Dots and used another glue dot to attach the Silver Thread.
  The “balloons” are attached to the card front using more Glue Dots and the strings are attached under the ribbon using another Glue Dot. I attached this whole piece to scored and folded Island Indigo card. I tied a bow in a piece of the Island Indigo 3/8″ Ruffled Ribbon and attached it to the card front using a Glue Dot.
To decorate the inside of the card I punched one long edge of a piece of the Red Twitterpated Designer Series Paper using the Scallop Border Punch, attached it behind a piece of the striped designer series paper and wrapped it with the Island Indigo 3/8″ Ruffled Ribbon. The whole piece is attached to the lower edge of a piece of Whisper White card. I stamped the greeting from the Bring on the Cake stamp set using Island Indigo ink and then attached it inside the card.
 I love how subtle the colour is when you add ink to the Silver Glimmer Paper. It looks so pretty. I hope my sister-in-law likes the card.
You can purchase supplies to recreate this card from my online store.
Bye for now, Kris.
Another Sympathy Card
After having made a couple of sympathy cards this week as a design team member for Sunny Challenges and Creations, we got some sad news on the weekend about my husbands Godmother. She passed away after a couple of strokes aged 90 – a lovely lady who will be greatly missed. So I used one of my left over kits to create another sympathy card.

This time I used one of the images from the Thoughts and Prayers stamp set which I stamped using Certainly Celery ink. I used the greeting from the Petite Pairs stamp set but this time I attached it to the bottom of the image panel. The front of the card is embossed once again using the Perfect Polka Dots Embossing Folder.
I stamped the same image on the inside of the card along with the second part of the greeting using Certainly Celery ink.
The Sunny Challenge is still current until Friday night so there is still time for you to play along. Although I hope you don’t actually have a need for your card.
Bye for now, Kris.
Reworked Sympathy Card
Firstly, a little reminder that there is still time to play along with the current challenge at Sunny Challenges and Creations. All you need to do is make a Sympathy card. Not the funnest (is that a word) card to make but still necessary on occasions, unfortunately. I decided to rework my Design Team card. I used exactly the same layout but changed it up a bit.

I still embossed the front of the card using the Perfect Polka Dots Embossing Folder. This folder has to be one of my favourites. It is so easy to add extra embossing to a larger piece of card because the design can be rotated and still match up. Love it! Instead of embossing the image from the Lovely As A Tree stamp set I simply stamped it in Certainly Celery ink. I wrapped the image panel with a piece of Certainly Celery 1/2″ Taffeta Ribbon and tied a knot before attaching it to the Certainly Celery mat. The image panel is attached to the card front using dimensionals. I stamped the same greeting from the Petite Pairs stamp set using Certainly Celery ink and attached it to the top right hand corner instead of the lower left one.
I stamped part of the same tree image on the inside of the card using Certainly Celery ink and added the second part of the sympathy greeting “to heal your heart” in the same ink.
Well what do you think? I think I like this one even better than the first one. Sometimes it takes a little tweaking to be absolutely happy with your creations.
Remember you can purchase any of these great products from Stampin’ Up! through my online store.
Bye for now, Kris.
Same Supplies – Different Looks
Last week in my class at Beachmere the ladies made a card which was a CASE from Mary Davidson. It is such a cute card using the Dinoroar stamp set. For my version we used Tempting Turquoise and Whisper White card stock. I also used a strip of the Tempting Turquoise striped designer series paper from the Brights Designer Series Paper Stack. The Whisper White card is embossed on the top two-thirds only using the Square Lattice Embossing Folder. I stamped the images and greetings using Stazon Jet Black ink. The “grass” is stamped in Old Olive ink. The images on the front of the card are cut out and one is popped up on dimensionals.
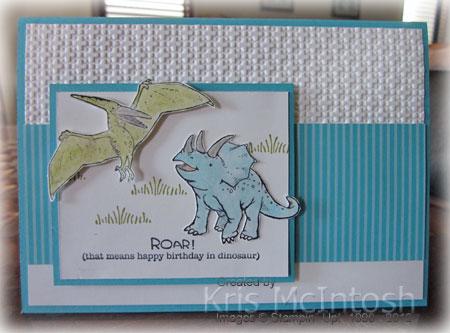
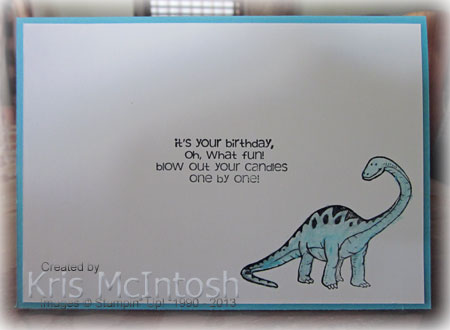
We also decorated the inside of the card and added a verse. All the images were coloured using Tempting Turquoise, Old Olive, Basic Gray and Melon Mambo Watercolour Crayons and a Blender Pen. The greeting is from the Bring on the Cake stamp set.
I had quite a few kits left over so I decided to play with them and see what other cards I could create. For my first card I decided to use the Clockworks stamp set to create a background for the racing car from the Need to Speed stamp set. The racing car is actually stamped onto Whisper White card using Tempting Turquoise ink and cut out. The greeting is from the Petite Pairs stamp set. I embossed the front panel completely using the Square Lattice Embossing Folder.

For my next card I used the My Friend stamp set and the Papillon Potpourri stamp set. I also stamped the greeting from Bring on the Cake along the bottom of the card. The butterflies were stamped onto Whisper White card and punched using the Bitty Butterfly and the Elegant Butterfly Punches. This time I embossed the top two-thirds of the Whisper White card using the Perfect Polka Dots Embossing Folder.
I decorated the inside using the same image as I used on the front.
For the third card I used Betsy’s Blossoms stamp set. The background is again Sahara Sand, the bird and leaves were stamped onto Whisper White card and hand cut. The Whisper White card is embossed using the Petals-a-Plenty embossing folder.
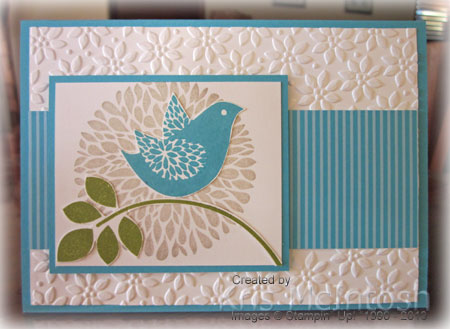
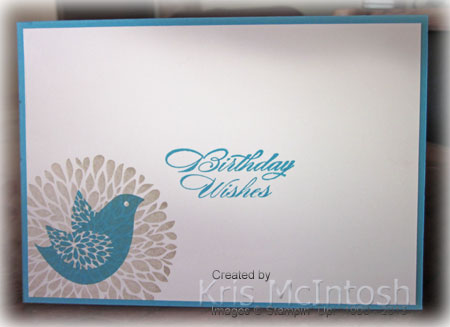
I decorated the inside by stamping the bird on top of the background. The greeting is from the Bring on the Cake stamp set.
So there you have it, four very different cards all using the same card stock and designer paper. I’d love to hear what you think about my different variations.
If you would like to recreate these cards you can purchase all the supplies you need at my online store.
Bye for now, Kris.
Oh Whale Box and Cards
The bonus project for the April edition of Craft Project Central is designed by Sharon Burkett. Take a visit to Sharon’s blog to see more of her lovely work and don’t forget to let her know how much you love it.

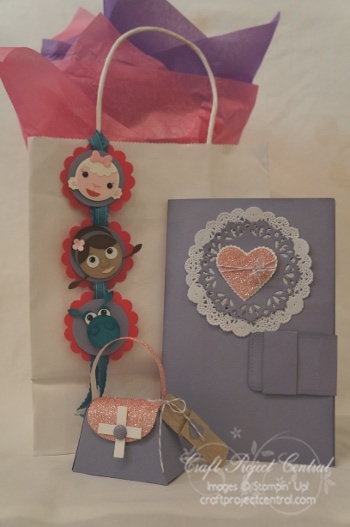
Doc McStuffin’s Gift Ensemble
The newest project for the April edition of Craft Project Central was created by Niki Toll. Niki is a fabulous crafter so if you haven’t already visited her please check out her lovely work and don’t forget to leave her a comment.
Sunny Challenge 77/13
Here we are again at the beginning of another Sunny Challenge, this time it has been set by Gwen and she wants us to make a Sympathy card. Like most of you I think these are probably the hardest cards to make, so having a few on hand can make it just that little bit easier when we do need one.
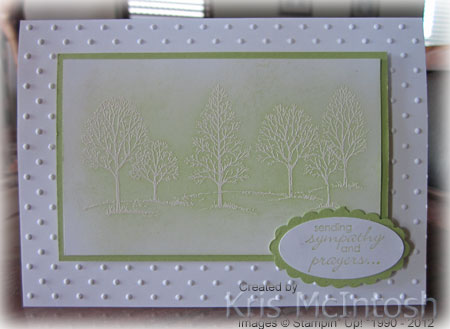 I decided to keep my card very simple. I stamped the image from the Lovely as a Tree stamp set onto Whisper White card using Versamark ink and embossed it using White Embossing Powder. I sponged over the whole piece of card using Certainly Celery ink, before attaching it to a layer of Certainly Celery card. The image panel is attached using dimensionals to Whisper White card which I embossed using the Perfect Polka Dots Embossing Folder. I stamped the greeting from the Petite Pairs stamp set using Certainly Celery ink onto Whisper White card and punched it using the Large Oval Punch.
  The greeting is attached to a Certainly Celery Scalloped Oval before attaching it to the card front.
Now for some more inspiration please head over to Sunny Challenges and Creations and see what the Design Team has created. Once you have made your card, 3d item or scrap page, just add it to Mr Linky. As always I look forward to seeing your gorgeous creations.
Bye for now, Kris.
Sudsol Sketch Challenge 185
I finally had time to play along with one of the challenges posted by Sudsol, a Stampin’ Up! Demonstrator site of which I am a member.
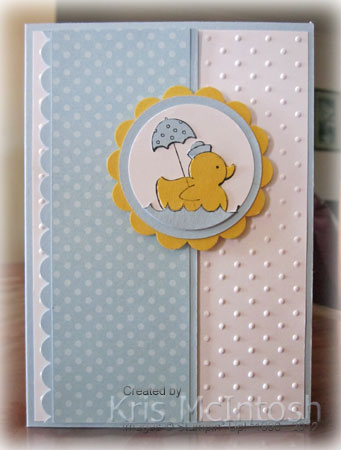 I embossed a piece of Whisper White card with the Perfect Polka Dots Embossing Folder and attached it to scored and folded Bashful Blue card. I punched one long edge of a piece of Bashful Blue card, attached a layer of Bashful Blue Polka Dot Designer Series Paper from the Subtles Designer Series Paper Stack and then attached it to the card front. I stamped the image from the Easy Events stamp set onto Whisper White card using Jet Black Stazon ink. I also stamped the image onto Bashful Blue and Daffodil Delight card and cut out the various pieces of the design, attaching them to the Whisper White image. The paper pieced image was punched using the 1-3/4″ Circle Punch. I attached the image to a 2″ circle of Bashful Blue card cut using the Circles 2# Die and then to a Daffodil Delight 2-3/8″ Scallop Circle. The image panel is attached to the card front using dimensionals.
To decorate the inside of the card I stamped the image onto the bottom left hand corner of Whisper White card and coloured the image using Daffodil Delight and Bashful Blue Stampin’ Write Markers. I attached a narrow strip of Bashful Blue card which has one long edge punched using the Scallop Border Punch to the bottom of the Whisper White card covering the lower part of the stamped image. I stamped “welcome baby” from the Petite Pairs stamp set in the centre of the Whisper White card using Stazon Jet Black ink.
I think this is a cute card to welcome a new baby, but it would also be a great birthday card for a 1 year old. I’d really love to hear what you think.
Bye for now, Kris.


