Tea for Two Desk Set.
Here is another gorgeous project from Craft Project Central. I have to admit I love this designer series paper it is really pretty. This fantastic desk set was designed by Regina Andari. Please visit her blog and let her know how much you love her work.

There are some things that every desk needs, and they definitely should look good! This desk set includes a postage stamp dispenser, tissue box, and a frame that can be used for a photo, favourite quote, or a calendar! Use your favourite designer series paper collection to create the items in this desk set. These three items are so easy to make that you will probably look forward to making a set for each season! Great for a class or club project as well.
In order to get the instructions so you can make this lovely desk set, all you need to do is visit Craft Project Central and subscribe to the April edition. It is only $10.00 for 10 projects – fantastic value.
Bye for now, Kris.
It’s all blue Birthday
I decided to flip the sketch for the current challenge at Sunny Challenges to create another card.
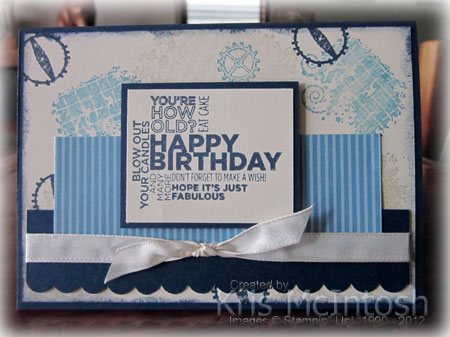 I stamped three of the images from the Clockworks stamp set using Sahara Sand, Marina Mist and Night of Navy onto Very Vanilla card. I sponged the edges using Night of Navy ink and than attached it to scored and folded Night of Navy card. I punched one long edge in a piece of Night of Navy card using the Scallop Border Punch, wrapped it with Whisper White Taffeta ribbon and tied a knot before attaching it to the lower portion of the card front. I added piece of striped Marina Mist Designer Series Paper from the Subtles Designer Series Paper Stack, sliding it under the ribbon before attaching it.
 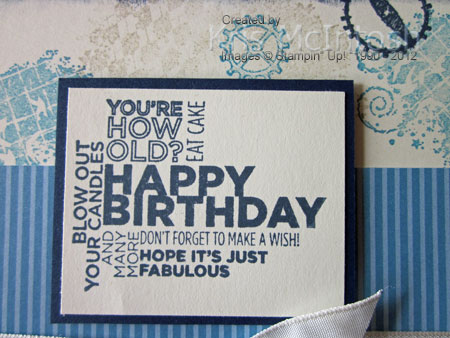 I stamped the image from the Delightful Dozen stamp set onto Very Vanilla card, attached it to Night of Navy card and then the card front using dimensionals.
It is fun to get back to using your stamps to create a background, I for one have become lazy about this because we have so many embossing folders that make the job simple.
You still have plenty of time to play along, I’d love to see a few more of you enter the challenge this week. If you would like a little more inspiration go check out the design team entries and the ones already added to Mr. Linky.
Bye for now, Kris.
Shadowbox and Greeting Card
This is the latest project for the April edition of Craft Project Central. The fantastic shadowbox was created by Monika Davis. Take a visit to Monika’s blog and see what else she has been up to and don’t forget to let her know how much you love her work.

This pretty shadowbox made of card stock boxes is a fun way to make customized home decor and is also fun to make as a special gift for someone who loves crafting and can appreciate the thought and time that went into making this beauty! It’s also a great way of showcasing some pretty crafting products. In addition, this project makes for a fun Stamp Camp project or as an advanced class project.
If you would like the instructions to complete this project then just pop on over to Craft Project Central and subscribe to the April edition. Remember at only $10.00 for 10 projects it is amazing value.
Bye for now, Kris.
Framed Hoot and Hooterbell
I am a little bit in love with the idea of creating framed art to give as gifts to my family and friends, so I decided that I would make one for Ava for her birthday. I scanned the internet to find photos of the famous (well in my grandchildren’s eyes) Hoot and Hooterbell so that I would have some inspiration for creating. This is how my creation turned out.

I used the 3″ Circle Originals Die for the head and the 2-1/2″ Circle Punch for the body. The feet/legs are made from trimming two opposite petals on the Blossom Punch. The eyes are 1-1/4″ Circles with white 1″ circles in the middle. The eyebrows are the wings from the Bird Builder Punch. The centre of the eyes is punched with the circle in the Itty Bitty Shapes Punch Pack. The mouth is the Full Heart Punch trimmed down with the 1-3/4″ Circle Punch. The nose is the smallest heart from the Hearts Collection Framelits as are the wings. All the little butterflies are cut using the Beautiful Wings Embosslit. The letters are cut using the Typeset Alphabet Bigz die. I used the Small Heart punch to create the bow for Hooterbell and also her pocket. I hand cut the pocket on Hoot. Colours used to create Hoot and Hooterbell are Pretty in Pink, Real Red, Pumpkin Pie, Regal Rose, Basic Black, Marina Mist and Bashful Blue.
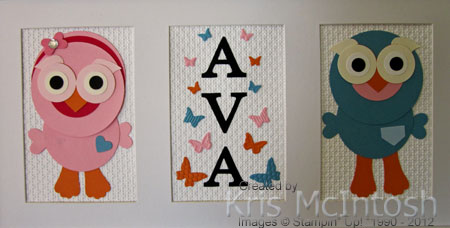
Fortunately this time, Ava agreed that these birdies were indeed Hoot and Hooterbell.
Bye for now, Kris.
Scallop Square Spotlight
This is the first project for the April edition of Craft Project Central and how gorgeous it is.

Maybe the Scallop Square Bigz die has been around for a while, but there are so many new, cool and fresh things you can create with it! This tutorial will show you how easy the Scallop Square makes it to create a Lidded Window Sheet Box, an Open-Top Handle Tote, a Slide-Out Pocket Card and a 4-Way Treat Holder. Any of these would make a great favors for all your parties and the invitation! This gorgeous project has been created by Julie Beltramo. Please take a visit to her blog and check out all her fantastic work and don’t forget to leave a comment.
Now if you would love to create this fantastic project then just subscribe to the April edition of Craft Project Central. You will get access to not only this project but another 9, each one with photo step by step instructions – all for $10.00
Bye for now, Kris.
Happy Birthday Ava
My youngest granddaughter celebrated her 3rd birthday yesterday. She had to share the excitement of her party with the Easter Bunny but I think that only added to the fun. All my grandchildren love Hoot and Hooterbell from the ABC TV Children;s show Giggle & Hoot but Ava particularly so. I found a card which was created by Stasia here and recreated the owl on my card. Thanks Stasia for the inspiration.
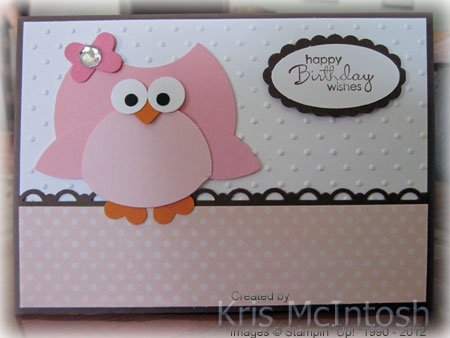 I started by embossing Whisper White card using the Perfect Polka Dots Embossing Folder before attaching it to scored and folded Chocolate Chip card. I punched one long edge of a narrow strip of Chocolate Chip card using the Scallop Trim Border Punch, attached it to the back of Pink Pirouette Polka Dot Designer Series Paper from the Subtles Designer Series Paper Stack and then to the card front. I punched a 2-1/2″ Circle from Pretty in Pink card and punched out a small section using the 1-3/8″ Circle Punch. I punched a 1-3/4″ Circle from Pink Pirouette card. I punched two petals from Pretty in Pink card using the Blossom Petals Builder Punch and attached them behind the Pink Pirouette Circle. The circle and petals were then attached to the lower part of the 2-1/2″ circle. I trimmed the Pink Pirouette circle to match the bottom of the Pretty in Pink one. I punched the nose from Pumpkin Pie card using the Small Heart Punch. The feet are made using the same Small Heart punch and Pumpkin Pie card. The eyes were created from Whisper White card using the largest circle on the Owl Builder Punch. The centres of the eyes are punched from Basic Black card using the Cupcake Builder Punch. I made the little bow in her hair using the Small Heart Punch and Regal Rose card. I added a Large Rhinestone Basic Jewel to cover the join in the hearts. I stamped “happy Birthday wishes” from the Petite Pairs Stamp set using Chocolate Chip ink onto Whisper White card and punched it using the Large Oval Punch. I attached the greeting to a Chocolate Chip Scallop Oval and then the card front using dimensionals.
Ava loved it and knew straight away it was a birdie but she took some convincing it was Hooterbell. I’d love to hear what you think.
Bye for now, Kris.
SC 76/12
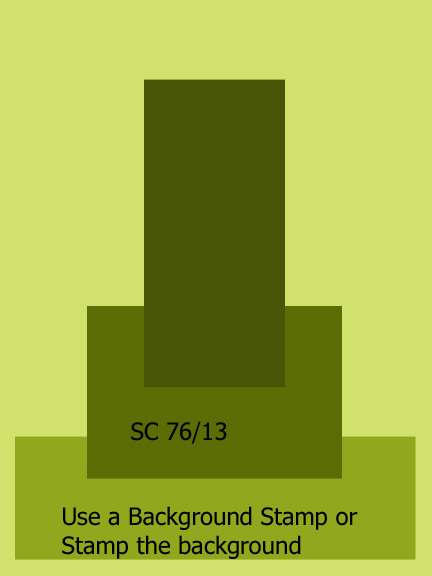 This week’s Sunny Challenge has been set by me. I created a simple sketch and you just need to either use a background stamp or stamp the background. I created my challenge some time ago and obviously forgot to check the dates because I have used the now retired SAB stamp set Feeling Sentimental. I’ll have to see if I can make another card using current Stampin’ Up! product!
I decided to stamp my background and I used the En Francaise Background Stamp onto Very Vanilla card using Crumb Cake ink. I also sponged the edges of the card using Crumb Cake ink. I attached the stamped card to scored and folded Basic Black card. I embossed Cherry Cobbler card using the Chevron Embossing Folder, attached it to Basic Black card and then to the lower edge of the card front. I attached Marina Mist striped Designer Series Paper from the Subtles Designer Series Paper Stack, attached it to Basic Black card and then to the card front using dimensionals under the top half only. I stamped the telephone box image from the Feeling Sentimental stampset onto Very Vanilla card using Cherry Cobbler ink and sponged the edges of the card using Crumb Cake ink. I attached the image panel to Basic Black card and then to the card front with dimensionals under the top half of the image only. I stamped the greeting “Celebrate” onto Very Vanilla card using Cherry Cobbler ink and punched it using the Large Oval Punch. The image is attached to a Basic Black Scallop Oval and then the to card front using dimensionals. I really love the way this card looks. Feeling Sentimental is a really lovely stamp set, perfect for vintage style cards, I hope you got yours free during Sale-A-Bration.
I’m sure that Gwen and Vicky have created something gorgeous using “current” Stampin’ Up! product. So pop over to Sunny Challenges and check out the inspiration and then once you have created your card, 3d item or scrap page add it to Mr. Linky. Remember our challenges run for two weeks now so you have plenty of time. As always I am really looking forward to seeing your creations.
Bye for now, Kris.
En Francaise Background Stamp (wood mount only) Item. 112358 ($30.95)
Feeling Sentimental – Free during Sale-A-Bration now retired
Basic Black A4 card stock – Item 121688 ($11.95)
Very Vanilla A4 card stock – Item 106550 ($14.95)
Cherry Cobbler A4 card stock – Item 121681 ($11.95)
Subtles Designer Series Paper Stack – Item 117152 ($37.95)
Cherry Cobbler ink – Item 126966 ($9.95)
Crumb Cake ink – Item 126975 ($9.95)
Large Oval Punch – Item 119855 ($27.95)
Scallop Oval Punch – Item 119856 ($29.95)
Chevron Embosing Folder – Item 127749 ($13.95)
Dimensionals – Item 104330 ($6.95)
Snail – Item 104332 ($11.95) – refill Item 104331 ($7.95)
I am really excited
to share with you some fantastic news. As of today Stampin’ Up! has introduced online ordering. So you can purchase any of your favourite Stampin’ Up! products online, directly from me. Just click on the link to take you to my Web Page and once there hit the Shop Now Button just under my name and contact details. (You can also shop by going to Products, then Shop Now.) Once you reach the online store you will be asked to create an account, just a couple of steps and don’t forget to make a note of your account details. Any qualifying orders you place online can earn you Stampin’ Rewards, online Hostess Benefits.
In conjunction with online ordering we now have the fantastic My Digital Studio available online to purchase and download. WooHoo. So, if you do decide to place an online order you can do so via my Stampin’ Up Web page. Just take a little look at this video to see what amazing things you can create in My Digital Studio.
I am really excited to be able to offer you my online store and also this fantastic new product.
Bye for now, Kris.
Take Two for SC 75/13
The current Sunny Challenges and Creations challenge is only half way through so there is still plenty of time for you to join us. I thought I would share another “Get Well” card with you for a little more inspiration.
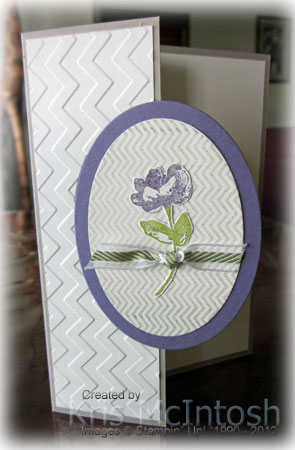 I started with a standard sized Crumb Cake card and cut the front panel down to 5cm (about 2″). I embossed a piece of Very Vanilla card using the Chevron Embossing Folder and added it to the front panel. I stamped the background image from the Oh Hello stamp set onto Very Vanilla card using Crumb Cake ink and cut it out using the matching Ovals Collection Framelit. I cut one size larger oval from Perfect Plum card and attached the stamped oval to the centre. I added adhesive on the left hand side of the back of the image panel and attached it over the embossed Very Vanilla card. I inked the flower image from the Oh Hello stamp set using Perfect Plum and Old Olive Stampin’ Write Markers, stamped onto Very Vanilla card and cut it out. I attached the flower image to the centre of the oval. I tied a knot in a piece of Old Olive Striped Organdy Ribbon and attached it over the flower stem using a Glue Dot.
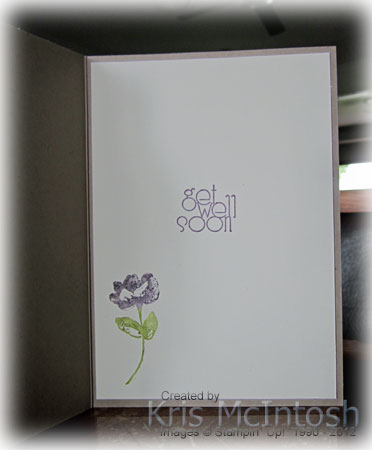
For the inside of the card, I inked the flower image using the same Stampin’ Write Markers and stamped onto the lower left hand side of Very Vanilla card. I stamped “Get Well Soon” from the Delightful Dozen stamp set using Perfect Plum ink and making sure that you can’t see it when the card is closed.
We’ve had quite a few entries this week but we would love you to add your creation, so come on, I’m sure we all need to have one or more of these cards in our stash.
Bye for now, Kris.
Sean’s Birthday Card
My son-in-law celebrated his birthday on Monday and this is the card I made for him.
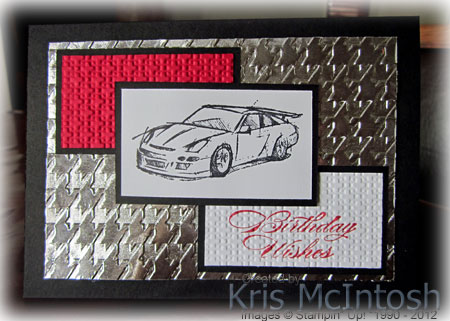 I attached a piece of aluminium foil (can you tell I love this technique) to Whisper White card using an Anywhere Glue Stick, trimmed the edges so it was nice and neat and then embossed it using the Houndstooth Embossing Folder. I attached the embossed card to scored and folded Basic Black card. I embossed a piece of Real Red card using the Square Lattice Embossing Folder, attached it to Basic Black card and attached it to the card front. I stamped “birthday wishes” from the Bring on the Cake stamp set onto Whisper White card using Real Red ink.
 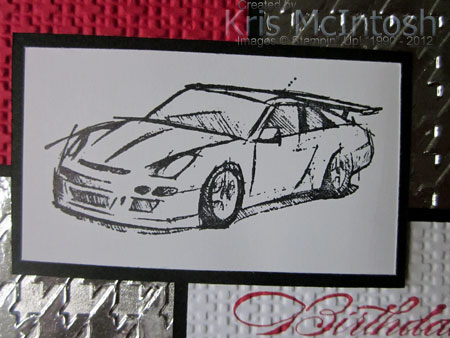 I embossed the greeting piece using the Square Lattice Embossing Folder, attached it to Basic Black card and then to the card front. I stamped the “racing car” image from the Need For Speed stamp set onto Whisper White card using Stazon Jet Black ink. I attached the image panel to Basic Black card and then to the card front using dimensionals.
I just love how easy this card was to make and how impressive it looks. The background shines and shimmers and really looks like metal. Try it yourself and see what results you can come up with.
Bye for now, Kris.


