Sunny Challenge 74/13
 Here we go again with another great challenge. This week Vicky has presented us with a great sketch and the theme is Easter. I know that you all need Easter cards for your family and friends, or maybe you need to create a scrap page to show off the photos you took of the children/grandchildren hunting for eggs last year. Maybe you need to create something for the children to put their collected eggs in. Well this challenge is your opportunity to share with us all.
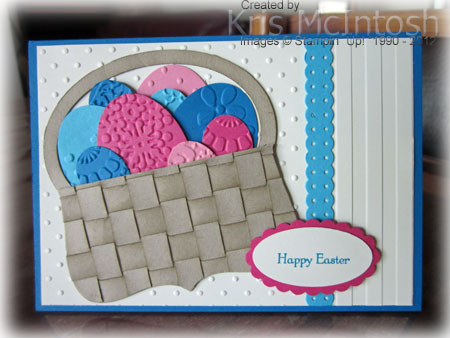
I started my card by embossing a piece of Very Vanilla card with two embossing folders, Perfect Polka Dots on the left two thirds of the card and Stripes on the right narrow panel. I masked the join in the two embosing folders by adding a strip of Tempting Turquoise card which is punched using the Dotted Scallop Border Punch. I attached the Very Vanilla card to scored and folded Pacific Point card. I created my basket by cutting 1cm wide strips of Crumb Cake card and sponging the edges with Crumb Cake ink. Then I weaved them together and laid them on top of a piece of Crumb Cake card which I cut using the Top Note Die. 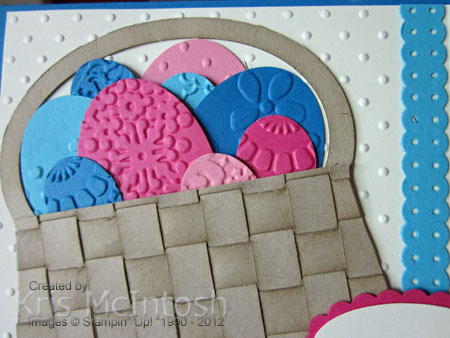 Once I glued down the woven card, I trimmed the Top Note to the size I wanted to fit on my card front. I created the handles by cutting Crumb Cake card using two of the Oval Framelits to create a narrow piece and then sponging the edges using Crumb Cake ink. Then I punched Raspberry Ripple, Pacific Point, Tempting Turquoise and Regal Rose card using the Extra Large Oval Punch and the Small Oval Punch. I embossed the ovals using various Embossing Folders and then layered them behind the top of the Top Note basket. I stamped “happy easter” from the Teeny Tiny Sentiments stamp set onto Very Vanilla card using Pacific Point ink and punched the greeting using the Large Oval Punch. I attached the greeting to a Raspberry Ripple Scallop Oval and then to the card front using dimensionals only under the right hand side.
I am really happy with the way this card turned out. It is a little time consuming but sometimes it’s nice to just play around and see what effect you can get with a little effort.
Now for some more inspiration pop on over to Sunny Challenges and Creations and see what the Design Team and Guest Designers have created for you. Once you have made your card, 3d item or scrap page, then add it to Mr. Linky. As always we look forward to seeing your entries.
Bye for now, Kris.
Dapper Dad
I was inspired by a suite of cards I saw on Pinterest to create this one using the Dapper Dad stamp set.
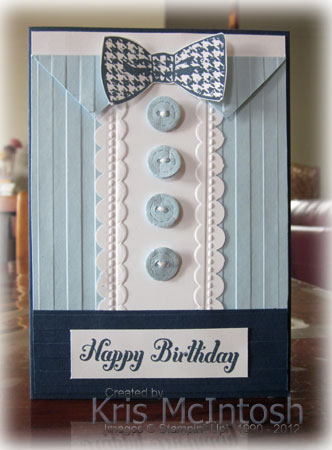 I started by cutting the collar shape onto a 10cm x 14.3cm piece of Bashful Blue card. Once I had done my cutting, I embossed the card using the Stripes Embossing Folder. Next I took a strip of Whisper White card and punched both long edges with the Scallop Border Punch. I also embossed using one of the Needlepoint Border Embossing Folders. I attached this strip to the embossed Bashful Blue card and added a dimension under each “collar” piece to hold it in place. This piece was then attached to Whisper White card and then to scored and folded Night of Navy card. I embossed a piece of Night of Navy card with the Stripes Embossing Folder, so that the stripes run across the card when attached over the bottom of the Bashful Blue card. I stamped the tie from the Dapper Dad stamp set onto Whisper White card using Night of Navy ink and cut it out. I attached it to the card front using a Glue Dot in the middle and a dimensional under each side. I cut four buttons using the Buttons #5 Sizzlit from Bashful Blue card. I pushed out the buttonholes and attached three 1/2″ Circles of the same colour to the back of each button to give it some dimension. I pushed the buttonholes through the stacked card and then added a little Whisper White Bakers Twine which I held in place using a Glue Dot. I attached the buttons to the card front using Glue Dots. Lastly I stamped “happy birthday” from the Bring on the Cake Stamp set onto Whisper White card and attached it to the card front.
I really love the way this has turned out. It’s a fun concept to play with. Let me know what you think.
Bye for now, Kris.
Card Gift Box Set
Another amazing project from Craft Project Central. This time the designer is the very talented Heidi King. To see more of her lovely work please visit her blog and let her know how much you love it.

More By The Tide
This card gave me an opportunity not only to play with the stamp set By The Tide but also to do some heat embossing and masking.
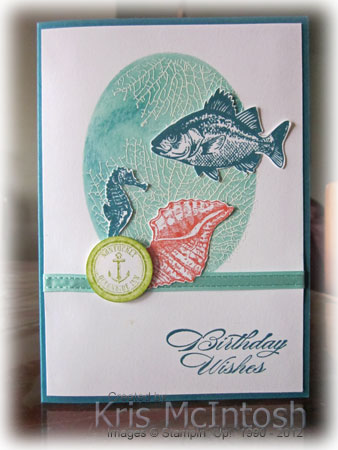 I created a mask in some copy paper using one of the Oval Framelits and stamped the seaweed image onto Whisper White card inside the frame using Versamark ink. I heat embossed using White Embossing powder and then inked inside the oval using Pool Party ink with a little Island Indigo ink around the edges to create a little depth in the “water”. I stamped “happy birthday” from the Bring on the Cake stampset onto the bottom right hand corner using Island Indigo Ink. I wrapped the Whisper White card with a piece of Sycamore Street Pool Party Ribbon and attached it to scored and folded Island Indigo card. I stamped the fish and the seahorse onto Whisper White card using Island Indigo ink and cut them out. I stamped the shell onto Whisper White card using Calypso Coral ink and cut it out.
 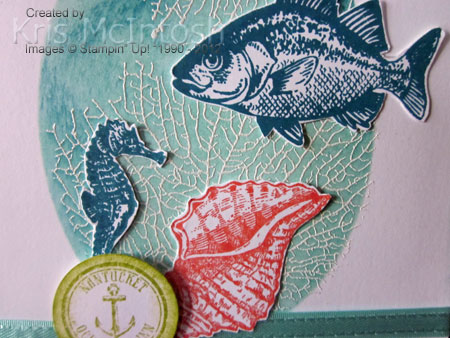 The three images were then attached to the card front. I stamped the “Nantucket” image onto Whisper White card using Lucky Limeade ink and punched it using the 1″ Circle Punch and then sponged the edges using Lucky Limeade ink. This image is attached to the card front using a dimensional.
This card was actually inspired by one that Connie Babbert shared on her blog. Thanks Connie. Of course I added some extra bits and pieces to make it my own.
What do you think?
Bye for now, Kris.
Winner – Free Subscription
The lucky winner of one month’s free subscription to Craft Project Central is
Jasmin
I loved receiving all your lovely comments on my project and look forward to having you visit me in the future. I wish I could give you all a free subscription.
Bye for now, Kris.
Altered Bird House and Card
I am truly amazed by the projects for the February edition of Craft Project Central. This one by Monika Davis is no exception. You can see more of Monika’s fabulous work by visiting her blog, and don’t forget to leave a comment and let her know how much you love it.
 This beautiful altered birdhouse would be a lovely décor item in any house. Use it to decorate your desk, use it as a special pencil holder, or just give it away as a piece of art. Great for a stamp camp, or as a class project.
If you would like to create these two beautiful pieces, then sign up for the February edition of Craft Project Central. I know that you will not be disappointed.
Bye for now, Kris.
My first Pop’n Cut
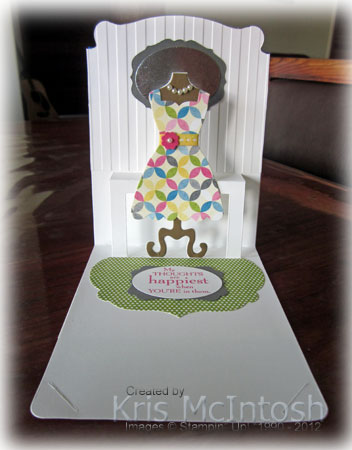 I have had a fun time playing with the new Card Base Pop’n Cuts and the Dress Form Pop’n Cuts which fits inside. They are really easy to use as long as you place the insert in the right way. The matching All Dressed Up stamp set and Dress Up Framelits make co-ordination easy. However, you can get caught up in all the little extra pieces when you are designing the inside of your card.
I used Whisper White card to cut the dress form piece for the inside of my card and then started playing with the pieces to finish it off. I cut the dress form using the framelit from Soft Suede card and cut my dress from the Sunshine and Sprinkles Designer Series Paper. I wrapped it with a little Daffodil Delight 1/4″ Stitched Grosgrain Ribbon, punched Melon Mambo using one of the Itty Bitty Shapes Punch Pack, attached it over the ribbon and added a medium Basic Pearl to the centre. 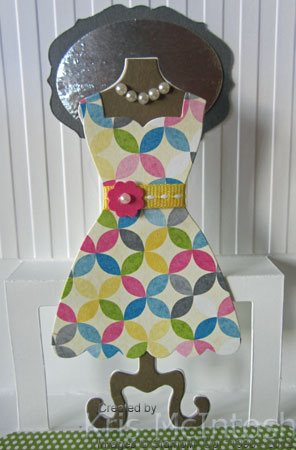 I decorated the neck with some Basic Pearls as well. I cut a piece of Whisper White, ran it through the Pop’n Cuts Base and embossed it using the Stripes Embossing Folder before attaching it behind the dress form. I wanted to make a mirror so I attached some Aluminum foil (the type you use in the kitchen) to a scrap of Whisper White card using an Anywhere Glue Stick and punched it using the Extra Large Oval Punch. I attached the “mirror” to Basic Gray card cut using one of the Lots of Tags Sizzlits and then to the embossed card. I cut another piece of Sunshine and Sprinkles Designer Series Paper using one of the Labels Framelits, cutting to give me a straight edge to line up below the dress form. I think it looks like a floor rug. I stamped the greeting from the Field Flowers stampset using Melon Mambo ink onto Whisper White card and punched it using the Extra Large Oval Punch, attached it to a Basic Gray Decorative Label and then to the centre of the “floor rug”. I am really happy with the way this has all come together.
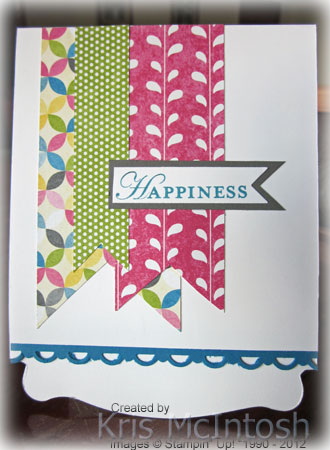 To finish the outside of the card, I cut a strip of Whisper White card 4-1/4″ wide across the 8-1/4″ width. I punched one edge of a piece of Pacific Point card using the Scallop Trim Border Punch and attached it to one of the 4-1/4″ ends of the Whisper White card. I scored the card and attached the Dress Form insert. I cut strips of Sunshine and Sprinkles Designer Series paper, cut “fishtails” in one end of each piece and attached them to the card front. I stamped “happiness” from the Loving Thoughts stamp set onto Whisper White card, cut it using the largest Bitty Banner Framelit and trimmed one edge flat. I attached this to Basic Gray card, cut the fishtail to match, and then added it to the card front.
One of the things that I love about these cards, is that it comes with a pre-cut slot so you can “lock” the card closed. This is especially important because the inside can be a little bulky when you put all the layers together.
I had a lot of fun playing with these pieces and know that you will too. It is a little expensive to get all the pieces, but although these particular Pop’n Cuts are exclusive to Stampin’ Up!, the other Pop’n Cuts dies that Sizzix sells will work with the Stampin’ Up! ones. Also you only need one Pop’n Cuts Base to use all the different inserts. I really hope that we get more of these fun dies when our new catalogue is released later this year.
Karen Burniston a designer for Sizzix, is the lovely lady who designed these Stampin’ Up! exclusive dies. Her video gives an overview of how to use the dies correctly.
I’d really love to know what you think of this card.
Bye for now, Kris.
Sale-a-Brate Challenge
There is still plenty of time to enter the current challenge at Sunny Challenges and Creations. The sketch is really simple and lends itself to all sorts of interpretations, just take a look at what the design team has created for your inspiration. I decided to create another card for this challenge, using the Bloomin’ Marvelous stamp set this time.
 I embossed Whisper White card using the Vine Street Embossing Folder (Sale-a-bration freebie) and attached it to scored and folded Summer Starfruit card. I attached a piece of the Sycamore Street Designer Series Paper (another freebie) to Summer Starfruit card which has one long edge punched using the Scallop Trim Border Punch. I wrapped this piece with Sycamore Street Tangerine Tango Ribbon and tied a knot before attaching it to the card front. I stamped the butterfly image three times onto Whisper White card using Tangerine Tango ink and used the Bitty Butterfly Punch to cut them out. I love that this new punch from the Seasonal Catalogue matches this image perfectly. I stamped “oh happy day” using Tangerine Tango ink onto Whisper White card and arranged the butterflies around the greeting. I attached the image panel to Island Indigo card and then to the card front using dimensionals.
  I tied a piece of the Sycamore Street Island Indigo Ribbon (freebie) through a Sycamore Street Pool Party button (freebie) and attached it to the image panel using a Glue dot.
I think there is a fantastic range of freebies to choose from in the Sale-A-Bration catalogue. The majority of them are limited time, one-of-a-kind products which means if you want them, you need to get them before the end of March when they will no longer be available.
So now that I have inspired you to enter the challenge, create your card, 3d item or scrap page, then pop on other to Sunny Challenges and add it to Mr. Linky.
Bye for now, Kris.
Dresser Drawer Card Set
This wonderful project has been designed by Christy Fulk exclusively for the February edition of Craft Project Central. Isn’t it just gorgeous? To see more of Christy’s fantastic work take a visit to her blog Create with Christy and don’t forget to leave a comment, letting her know just how much you love her projects.
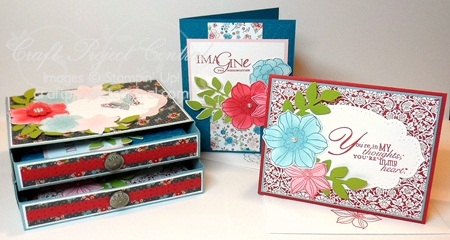 This dresser drawer box would look so nice on any desk, and inside are two card sets! Once the cards are gone, the dresser can be used to store pens, notepads, postage stamps, paper clips, and any other little things you want to store inside. This would be a wonderful gift to make for any friend or family member. It’s also a great project for a class.
If you would like to create this fabulous project then just pop on over to Craft Project Central and sign up for the February edition. Remember it’s only $10.00 for 10 projects.
Bye for now, Kris.
On the Tide Birthday
 The challenge this week at Late Night Stampers is to create a birthday card. I thought this would be a good opportunity to play with a stamp set I just purchased from the Seasonal Catalogue called On the Tide.
I stamped the word image from the On the Tide stamp set onto Very Vanilla card using Sahara Sand ink and sponged the edges using the same ink. Then I over stamped the background using the seaweed image and Pacific Point ink. This piece was then attached to scored and folded Cajun Craze card. I stamped the greeting from the Bring on the Cake stampset onto Very Vanilla card using Cajun Craze ink, attached it to Pacific Point card which has both long edges punched with the Scallop Border Punch and then attached it to the card front. I stamped the shell and lobster images onto Very Vanilla card using Cajun Craze ink and cut them out before attaching them to the card front.
This stamp set has some great images and I am sure it will be one that gets plenty of use.
Bye for now, Kris.


