Dry Erase Gift Set
Isn’t this gift set just adorable and so practical. This is the latest project in the February edition of Craft Project Central which is designed by the very talented Julie Beltramo (just take a visit to her blog to see more of her fabulous work).

Make this Dry Erase Board with the coordinating pen and cup for a sweet project for a friend, or maybe even make one for yourself! It’s a simple project, with some great ‘up-cycling’ ideas using your Stampin’ Up! supplies. And just think of how many ways you can change up the board to fit your needs – a grocery list, kids’ chores… the possibilities are endless!
So to get your copy of this fabulous tutorial, just pop on over to Craft Project Central and sign up for the February edition. Fantastic value at only $10.00 for 10 step by step, photo tutorials.
Bye for now, Kris.
It’s my turn
My project is up at Craft Project Central today. I am really happy with this little project which features the Dressed up framelits.

I created this project with my eldest granddaughter in mind. She loves receiving coordinated gifts but she also loves to give them. The set includes a gift bag, chocolate slider, covered notepad and matching card. What little girl doesn’t love chocolate and writing notes to her friends, so why not make one for your favorite little girl.
To celebrate my project being published, I have another one month free subscription to Craft Project Central. All you have to do is leave a comment on this post to be in the running. Make sure that your email address is available for me to contact you. I am sure you will want to enter because the projects at this site really are fantastic.
Bye for now, Kris.
SC 73/13
 We have a great challenge for you at Sunny Challenges and Creations this week, a simple sketch and all you have to do is add something from the Sale-A-Bration catalogue. So let your imagination run wild and create a card, 3d item or scrap page. I can’t wait to see what you create because there are so many gorgeous things in the Sale-A-Bration catalogue.
I embossed Whisper White card using the Vine Street Embossing Folder which you can get Free with a qualifying order from the Sale-A-Bration catalogue, and attached the embossed card to scored and folded Rich Razzleberry card. I attached a piece of the Sycamore Designer Series Paper (also Free with a qualifying order) to Rich Razzleberry card and then to the left hand side of the card front. I stamped the leaf image from the Madison Avenue stamp set (another freebie) using Summer Starfruit ink twice. 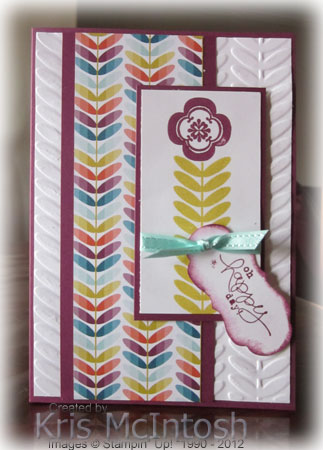 I stamped the open flower image using Rich Razzleberry ink above the leaves. I also stamped the small floral image inside the large one again using Rich Razzleberry ink. I wrapped the image with the Pool Party ribbon (also available free with a qualifying order) and tied a knot. The image panel is attached to Rich Razzleberry card and then the card front using dimensionals. I cut Whisper White card using one of the Lots of Tags dies and stamped the greeting from the Bloomin’ Marvelous stamp set (yet another freebie) using Rich Razzleberry ink. I sponged the edges of the tag using Rich Razzleberry ink and attached it to the image panel underneath the ribbon using Glue Dots.
I really love the selection we have in this year’s Sale-A-Bration catalogue, don’t you?
 For some more inspiration visit Sunny Challenges and Creations to see what the Design Team and Guest Designers have created. Once you have created your card, 3d or scrap page add it to Mr. Linky. So now it’s over to you.
Before I close, I want to say that it is really exciting to see the number of entries we have had for the last two challenges. It seems you all like the extra time we are giving you to enter. Maybe this week we’ll get even more.
Bye for now, Kris.
Stamp Set Challenge
 One of the challenges at Sudsol this week was to use the Secret Garden stamp set from the current Seasonal Catalogue. This is one of the stamp sets that has matching framelits to cut the images. I used a sketch I have used many times to create my card.
I embossed the lower two-thirds of Very Vanilla card using the Lacy Brocade Embossing Folder. I wrapped the embossed card with Summer Starfruit 3/8″ Stitched Satin Ribbon and attached it to scored and folded Cherry Cobbler card. I stamped the greeting from the Petite Pairs stamp set onto the top right hand corner using Cherry Cobbler ink. I stamped the leaf image from the Secret Garden stamp set onto Very Vanilla card using Gumball Green ink and cut them using the matching framelit. I stamped two of the flower images onto Very Vanilla card using Cherry Cobbler ink and cut them out using the matching framelit. I attached the leaves and then one of the flowers to the card front using Glue Dots.  I cut the second flower and attached only the centre part to the full flower using a dimensional. I tied a small piece of Summer Starfruit 3/8″ Stitched Satin Ribbon around the ribbon already attached to the card front. Lastly I added one of the Large Pearl Basic Jewels to the centre of the flower.
I love the layout of this card, it is simple one that really puts the focus on the flower and leaves. What do you think?
Bye for now, Kris.
Mixed Media Canvas Gift
Everywhere you look there is another piece of mixed media art on display. I love the look but wouldn’t have had a clue where to start. Lucky for me (and you) Regina Andari has done all the hard work and created this great tutorial for Craft Project Central.
The project includes a 5” x 7” canvas board, a decorative gift box, and a coordinating card. You’ll enjoy creating this ensemble so much that you might have trouble parting with it, so go ahead and plan to make two!
To get the instructions for this great project, just pop on over to Craft Project Central and subscribe to the February edition. This one project alone would make the $10.00 for 10 tutorials worthwhile.
Bye for now, Kris.
Swallowtail Box & Cards
What a gorgeous boxed set of cards Sharon Burkert has created using the Swallowtail stamp from the Seasonal Catalogue. This is the latest project from the February edition of Craft Project Central. The Swallowtail stamp is a big, beautiful and detailed image and the set is full of shimmer and shine. This would make a wonderful gift and also a fun class for stampers of all skill levels.
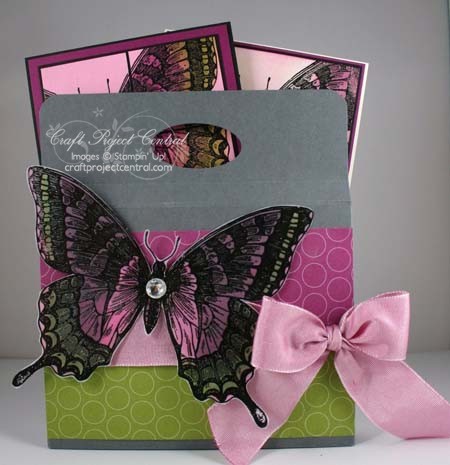
If you would like the instructions for this project, then pop on over to Craft Project Central and sign up for the February edition. You will get the instructions for this and 9 other projects for the ridiculously low price of $10.00.
Bye for now, Kris.
A gift for Elly
 My granddaughter is having a birthday soon and I saw these gorgeous heart shaped door hangers at Stamp Academy. You will remember I told you that I have partnered with this site so that you can have access to online classes at your leisure. This cute little door hanger is one of the projects that you can try before you buy. If you click on the link in my sidebar and then on the Free Videos link you can see there are lots of projects for you to look at before you decide to subscribe.
Anyway I thought this would be a great little extra something for Elyssa’s birthday. 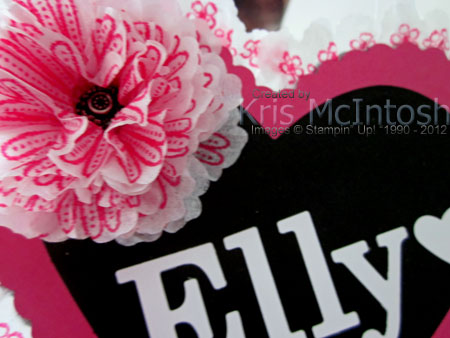 The tutorial uses Waffle Paper and Blackboard Paper which I think are now unavailable (at least in Australia), however I substituted the Creped Filter Paper from the Seasonal Catalogue and just went with Basic Black card stock and added white letters to simulate the look of the blackboard.
I think it is very cute and can thoroughly recommend a look at this site. Once you have decided to sign up, you will have access to you projects 24/7. Take a little tour and see what you think. I’m sure you will be impressed.
Bye for now, Kris.
Week Two Sunny Challenge 72
We are really excited by the number of entries we have for our current challenge. It’s only been running for one week and already we have 15 entries! Woohoo! Thanks to those of you who have already entered and to those of you who haven’t, I hope you can find the time over the next week.

Our theme is “love” and I thought I would share a double page scrapbook layout that I have created for an upcoming class. I love the combination of Black/White/Red and thought it would be a good one for this theme. I think the pages lend themselves to wedding/engagement/anniversary type photos or maybe Valentine’s day. I used the Secret Garden stamp set and matching framelits to create the floral embellishments as well as the largest heart in the Heart Collection Framelits. The Scallop Trim Border punch creates a little bit of a “lace” effect and I used the Tasteful Trim Die to cut the Real Red scallop border. I haven’t added a title but there is plenty of room to do so.
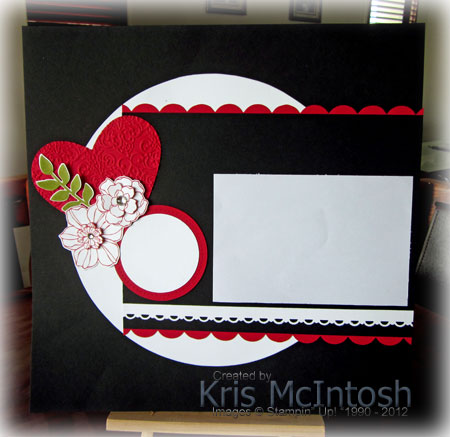
I am looking forward to starting the scrapbook classes as a way of helping me to get some more scrapbooking done. I still have loads of photos which I want to scrap. I am trying to keep the pages fairly simple and generic in that they could be used for a number of different occasions. Also I will try to keep them to a standard photo size of 4 x 6″. Just check out my Classes and Workshops page to get more details about my upcoming classes.

So now, for once, you have seen something from me other than a card for inspiration for our current challenge. So don’t forget to visit Sunny Challenges once you have created your card, 3d item or scrapbook page add it to Mr. Linky. We would love to see even more entries for this challenge.
Bye for now, Kris.
Creating Pretty Cards Sketch No. 20
Craft Project Central hosts a sketch challenge each month. The sketch’s are created by Kris and not only does she provide the sketch but a tutorial about how she created her inspiration card. You don’t have to be a member to play along and you have the chance to win a one month FREE subscription.
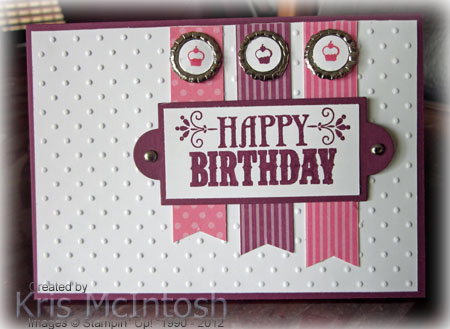 I started my card by embossing Whisper White card using the Polka Dots Embossing Folder and attached it to a Rich Razzleberry card base. I used the Brights Designer Series Paper Stack to create my banners which are cut to varying lengths before attaching to the card front. I stamped “happy birthday” from the You’re Amazing stamp set onto Whisper White card using Rich Razzleberry ink. The greeting was cut using Apothecary Accents Framelits and trimmed so that it would fit onto the same Framelit cut from Rich Razzleberry card. I pierced a hole in each end of the Rich Razzleberry Framelit, inserted Silver Brads and attached it to the card front, over the banners, using dimensionals.
 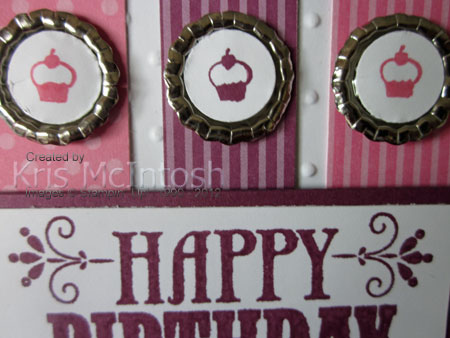 I stamped the “cupcake” image from the Itty Bitty Bits stamp set onto Whisper White card, twice using Regal Rose ink and once using Rich Razzleberry ink. I punched the images using the 1/2″ Circle and attached them to the centres of small Soda Pop Tops. I ran the Soda Pop Tops through my Big Shot to flatten them and then attached them to the card front using dimensionals. These little Soda Pop Tops are so cute. To give you an idea of the size, my banners are 2cm wide.
I think this is such a cute card and would suit almost any age group. What do you think?
I hope I have inspired you to join the challenge and perhaps win a Free subscription to this fantastic site.
Bye for now, Kris
A Secret Garden Birthday
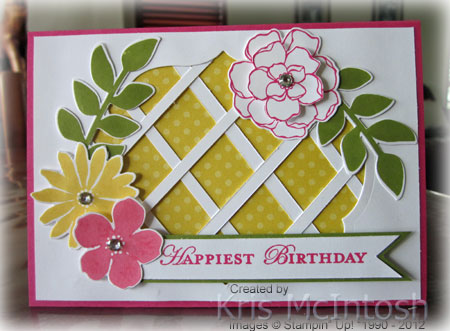 Today I decided to play around and create a lattice card. I have only made of these before and I really think they are cute. For this one I cut my window in Whisper White card using one of the Label Collection Framelits. I attached narrow strips of Whisper White card behind the opening to give the lattice effect and then attached a piece of Polka Dot Designer Series Paper from the Brights Designer Series Paper Stack. The whole piece is attached to scored and folded Melon Mambo card. I stamped the leaves from the Secret Garden stamp set using Old Olive ink onto Whisper White card and cut them out using the matching Framelit.
  I stamped the flower images onto Whisper White card using Melon Mambo ink and Daffodil Delight ink and cut them out using the matching Secret Garden Framelit. I cut two of the outline flower and cut one down and attached it to the centre of the larger one using a dimensional. The leaves and flowers are attached to the card front around the lattice frame with the solid Melon Mambo flower attached using a dimensional. The greeting from the Apothecary Art stamp set is stamped onto a strip of Whisper White card using Melon Mambo ink. I cut a fish tail in one end and then attached it Old Olive card, cutting a matching fish tail. The greeting is attached to the card front with one end underneath the solid Melon Mambo flower using dimensionals. Lastly, I added a large Basic Rhinestone to the centre of each flower.
I love how bright and cheery this card is and I absolutely love that I don’t have to cut each of the flower out by hand. The Secret Garden Framelits match each of the images in the Secret Garden stamp set. Fantastic! You can find this fantatic suite of products in the new Seasonal Catalogue released on the 1st February.
I’d love to hear what you think.
Bye for now, Kris.


