A Secret Garden Birthday
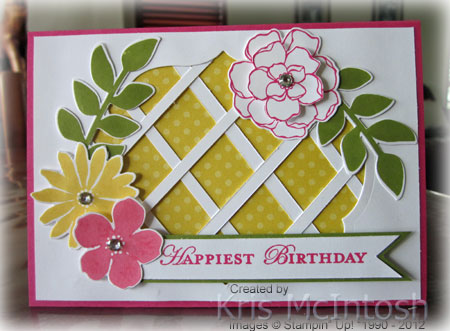 Today I decided to play around and create a lattice card. I have only made of these before and I really think they are cute. For this one I cut my window in Whisper White card using one of the Label Collection Framelits. I attached narrow strips of Whisper White card behind the opening to give the lattice effect and then attached a piece of Polka Dot Designer Series Paper from the Brights Designer Series Paper Stack. The whole piece is attached to scored and folded Melon Mambo card. I stamped the leaves from the Secret Garden stamp set using Old Olive ink onto Whisper White card and cut them out using the matching Framelit.
  I stamped the flower images onto Whisper White card using Melon Mambo ink and Daffodil Delight ink and cut them out using the matching Secret Garden Framelit. I cut two of the outline flower and cut one down and attached it to the centre of the larger one using a dimensional. The leaves and flowers are attached to the card front around the lattice frame with the solid Melon Mambo flower attached using a dimensional. The greeting from the Apothecary Art stamp set is stamped onto a strip of Whisper White card using Melon Mambo ink. I cut a fish tail in one end and then attached it Old Olive card, cutting a matching fish tail. The greeting is attached to the card front with one end underneath the solid Melon Mambo flower using dimensionals. Lastly, I added a large Basic Rhinestone to the centre of each flower.
I love how bright and cheery this card is and I absolutely love that I don’t have to cut each of the flower out by hand. The Secret Garden Framelits match each of the images in the Secret Garden stamp set. Fantastic! You can find this fantatic suite of products in the new Seasonal Catalogue released on the 1st February.
I’d love to hear what you think.
Bye for now, Kris.
Fabric Covered Mini Book and Card
This gorgeous little Mini Scrap Album and matching card is the latest project from Craft Project Central. The very talented Monika Davis is the designer and a visit to her blog is always inspiring.
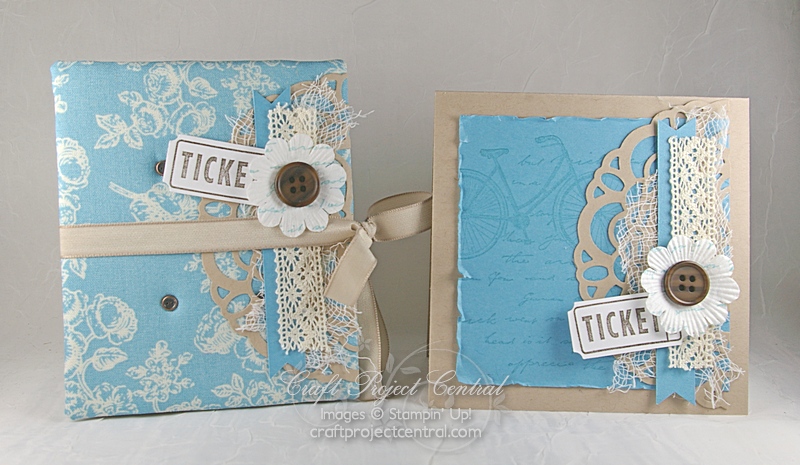
This fabric covered mini accordion album is perfect for scrapbooking or keeping keepsake photos. Its’ hidden pockets can hold even more treasures. It’s a perfect gift for anyone and it comes with a matching greeting card. Great for small parties or a class project.
You can get the tutorial for this great project by subscribing to the February edition of Craft Project Central.
Bye for now, Kris.
Sweet Rose Gift Set
How adorable is this project from the February Edition of Craft Project Central. The wonderfully talented Amanda Corbett has created this gorgeous rose with a beautiful presentation box and card. Take a visit to Amanda’s blog to see more of her wonderful work.
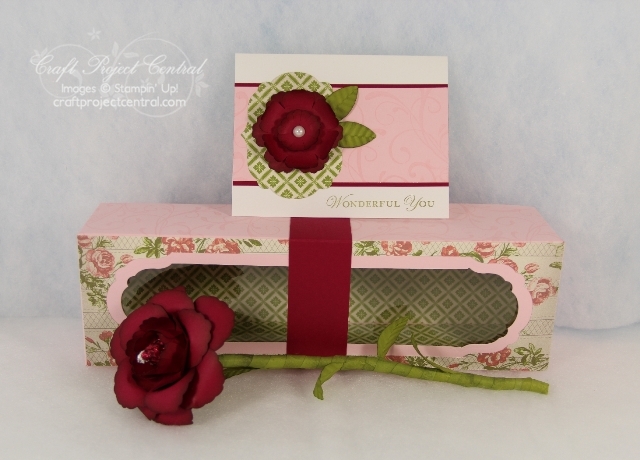
This life-like rose has a sweet candy center and is ready for giving as a gift in the beautiful display box with a matching card. Show someone how truly special they are by giving this beautiful gift set! So pop over to Craft Project Central and sign up for the February edition – remember it is only $10.00 for 10 step by step photo tutorials.
Bye for now, Kris.
Craft Project Central January and February Editions.
I am late sharing the bonus project tutorial for the January Edition and I want to share also the first project for the February Edition of Craft Project Central.
This is the bonus tutorial for the January edition of Craft Project Central. This gorgeous Leprechaun Ensemble was created by Heidi King. To receive access to the bonus project, just post the Craft Project Central blinkie on your blog, or subscribe to two or months in a row, or refer you friends and when they subscribe, let Craft Project Central know. That means that you can get 11 tutorials for $10.00 per month!
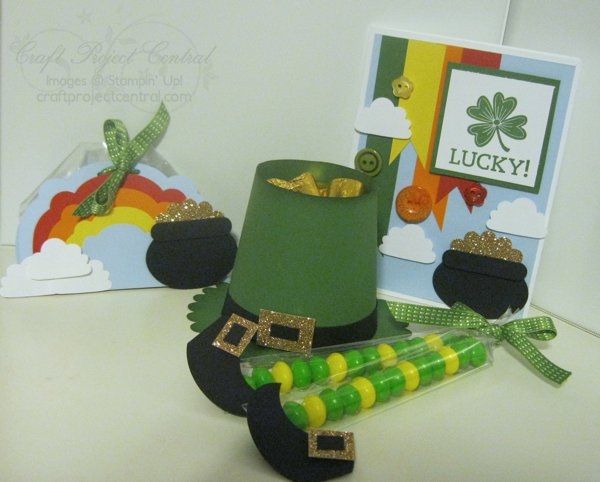
Everyone, young and old will love these adorable treats made just for the lucky holiday St. Patrick’s Day. I just love those Leprechaun Feet treat holders and what about that gorgeous hat. My grandchildren would love that filled with chocolate coins.
Now on to the first project for the February edition of Craft Project Central. This gorgeous Tea For Two Topiary Gift Set was designed by Julie Beltramo. This little trio of gifts would make any girlfriend smile! Topiaries are such a great home décor item, and this has to be the most budget-friendly handmade topiary tutorial you’ll find! You don’t have to buy a costly styrofoam ball! The coordinating stand-up card is another budget-friendly idea that will replace a costly picture frame. And, of course, everyone appreciates a little sweet treat in a gift!

So now your have two more good reasons to subscribe to Craft Project Central. Once you subscribe to an edition you have access to them on the website for a full twelve months. So from 1.1.13 to 31.12.13 you get access to the January Edition. Sooooo, what are you waiting for?
Bye for now, Kris.
SC 72/13
The Sunny Challenge and Creations challenge this time is again an easy one. The challenge has been set by Gwen and all we have to do is make a card, 3d item or scrap page with a general “love” theme and don’t forget the challenge runs for two weeks. So you can make it for a wedding, anniversary or valentines, whatever you want, I went with a Wedding theme.
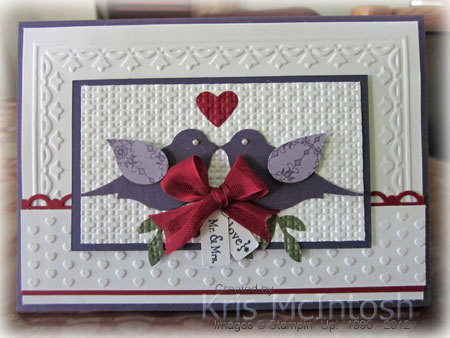
I embossed the top two-thirds of Whisper White card using the Framed Tulips Embossing Folder and attached it to scored and folded Perfect Plum card. I embossed a strip of Whisper White card using the Adorning Accents Embossing Folder and attached it to Cherry Cobbler card which has one long edge punched using the Scallop Trim Border Punch. This piece is attached to the lower edge of the card front. I punched 3 sets of leaves from Always Artichoke card using the Bird Builder Punch and attached them to Whisper White card. I punched Cherry Cobbler card using the Small Heart Punch and attached it to the same piece of Whisper White card. 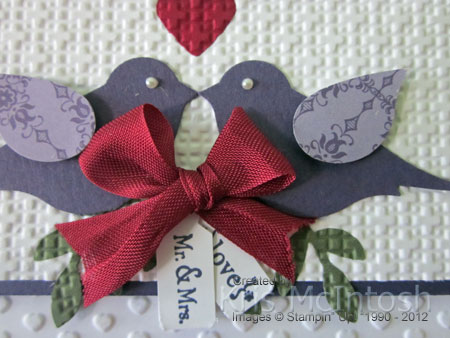 I embossed the Whisper White card using the Square Lattice Embossing Folder to embed the punched pieces. I attached the embossed card to Perfect Plum card and then to the card front using dimensionals. I punched the birds from Perfect Plum card using the Bird Builder Punch and the wings from Perfect Plum Designer Series Paper from the Subtles Designer Series Paper Stack. I attached the birds over the punched leaves and the wings over the birds using dimensionals. I stamped “love” and “Mr & Mrs” from the Tiny Tags stamp set using Perfect Plum ink and punched them with the Jewellery Tag punch. I attached the tags to each other and then to the card front using Mini Glue Dots. I tied a bow in Cherry Cobbler 1/2″ Seam Binding and attached it to the card front using Mini Glue Dots.
Now for some more inspiration pop over the Sunny Challenges and Creations and see what Gwen and Vicky have in store for you. Once you have created your card, 3d or scrap page add it to Mr. Linky. Since we had such a great response to our last challenge, I am really looking forward to seeing what you all create for this one.
Bye for now, Kris.
Hearts A Flutter
This card is a case from the magazine Stampin’ Up! creates for demonstrators. I love that it is a Valentine but could work equally as well as a Wedding or Anniversary card by interchanging the sentiment.
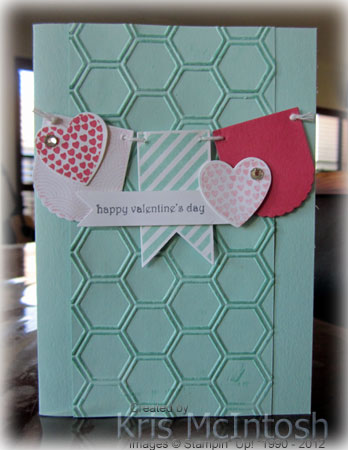 I embossed a piece of Pool Party card using the Honeycomb Embossing Folder, rubbed the Pool Party ink pad lightly over the top to enhance the embossing and then attached it to scored and folded Pool Party card. I stamped the images from the Hearts A Flutter stamp set using Pretty in Pink, Pool Party and Primrose Petals ink. Once the images were stamped, you just use the matching Hearts a Flutter Framelits to cut them out. I also cut one of the framelits using Primrose Petals card. I pierced holes in the top corners of the three banners pieces and threaded them with Whisper White Bakers Twine, tying the ends in a knot. The banner is attached to the card front using dimensionals. I attached one of the hearts to the left hand side and added a Basic Rhinestone. I stamped the greeting onto Whisper White card using Basic Gray ink and cut it using the largest Bitty Banner Framelit. The greeting is also attached to the card front using dimensionals.
  I added dimensional behind the right hand side of the Pretty in Pink heart and a Mini Glue Dot on the left hand side and attached it over the end of the greeting banner. I also added a Basic Rhinestone to this heart.
Well what do you think? I am loving all the gorgeous new product in this Seasonal Catalogue. My only problem is having enough time to get to “play” with all my new goodies.
Bye for now, Kris.
There is Still Time…
…to play along with the current challenge at Sunny Challenges and Creations. All you need to do is create a card, 3d item or scrap page with a “birthday” theme. Just to give you a little more inspiration here is another card I made to fit the challenge. Of course I also got to play with a couple of new items from the Seasonal Catalogue which is available today. You are going to love it!
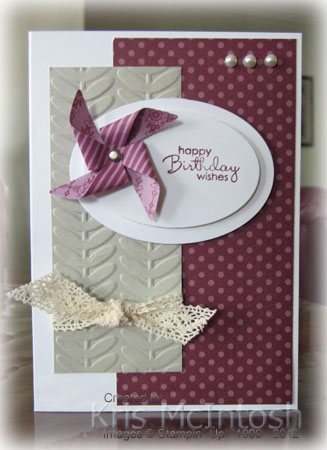 I attached Rich Razzleberry Polka Dot Designer Series Paper from the Brights Designer Series Paper Stack to scored and folded Whisper White card. I embossed a piece of Sahara Sand card using the Vine Street Embossing Folder (Free with a qualifying Sale-A-Bration order), wrapped it with Victoria Crochet Trim and tied a knot before attaching it to the left hand side of the card front. I used the new Ovals Collection Framelits to cut two ovals from Whisper White card. I stamped the greeting from Petite Pairs onto the smallest oval using Rich Razzleberry ink. I attached the smaller oval to the centre of the larger oval using dimensionals. I cut a pinwheel using the new Pinwheel Sizzlit S Die available in the Seasonal Catalogue from Rich Razzleberry Striped Designer Series Paper. I used a Mini Silver Brad to hold the pinwheel together. I attached the pinwheel to the smaller oval using a Mini Glue Dot.
  The image panel is attached to the card front using dimensionals. Lastly I added three large Basic Pearls to the top right hand corner of the card front.
I think I am going to love this little pinwheel! Hope you find time to join our challenge. I love seeing all your creations.
Bye for now, Kris.
Journal & Candle Set
This is the last project for this month’s edition of Craft Project Central. The very talented Nicki Toll created this fantastic tutorial. Take a visit to her blog to see more of her gorgeous work and don’t forget to let her know how much you love it.

Turn any plain composition book or journal into a special keepsake you will love or love to give as a gift. This project incorporates beautiful new Designer Fabric and gives your journal a wonderful soft texture that will make you love holding in your hand. And don’t worry, if you don’t sew, this is a no-sew fabric project that is easy enough for anyone to do.
Just visit Craft Project Central and subscribe to the January edition to get the tutorial for this project as well as the previous projects I have shown you. Remember the subscription costs only $10.00 and you will get the instructions for ten gorgeous projects. Pop back soon to see what Craft Project Central has in store for February.
Bye for now, Kris.
Collage Curios
Here is a card I made with some of my new toys from the Seasonal Mini which is available for purchase on the 1st February.
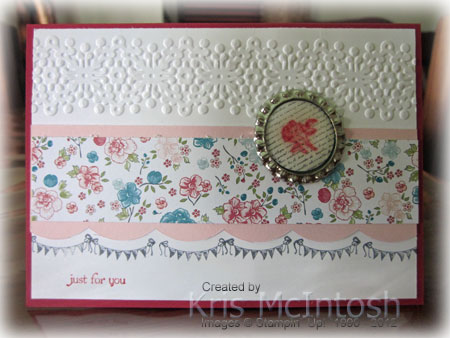 I embossed Whisper White card using one of the Delicate Designs Embossing Folder and attached it to scored and folded Ridinghood Red card. I cut one long edge of Pink Pirouette card using the Large Scallop Edgelit, attached a strip of Twitterpated Designer Series Paper and then attached it to the card front. I stamped the banner image from the Collage Curios stamp set underneath the scallops using Basic Gray ink. I stamped the writing image from the Collage Curios stamp set onto Whisper White card using Basic Gray ink and stamped the flower image from the same stamp set over the top using Ridinghood Red ink.
 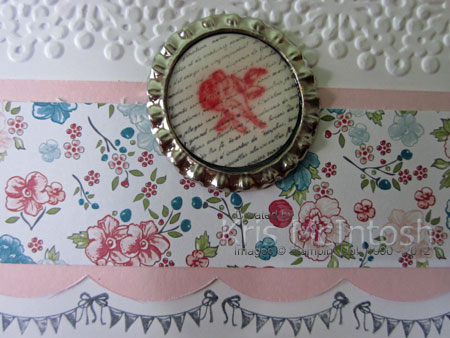 The image was punched using the 1″ Circle Punch and attached to the centre of one of the large Soda Pop Tops which I flattened in my Big Shot. I covered the image with Crystal Effects, let it dry and then attached it to the card front using Mini Glue Dots. I think these little images and the Soda Pop Tops are going to be great fun to work with.
Let me know what you think.
Bye for now, Kris.
The Sale-A-Bration Continues
I told you I would pop back with some more creations using the items I got from the Sale-A-Bration catalogue for free.
 I used the beautiful Vine Street Embossing Folder (Free) to emboss Whisper White card and attached it to scored and folded Sahara Sand. I cut a wide strip of the Sycamore Street Designer Series Paper. cut a fish tail in one end and attached it to the card front. Next I embossed another piece of Whisper White card using the Perfect Polka Dots Embossing Folder, attached it to Calypso Coral card with one long edge punched with the Scallop Border Punch and then to the card front. I stamped the image from the Madison Avenue stamp set onto Whisper White card using Sahara Sand ink and punched it using the 1-1/4″ Circle Punch. I also punched a 1-3/8″ Circle from Sahara Sand card and a 1-3/4″ Scallop Circle from Island Indigo card. I layered the circles one on top of the other and then attached them to the card front. I stamped “hello” from the Perfect Banner stamp set onto Whisper White card using Calypso Coral ink and punched it using the Word Window Punch.
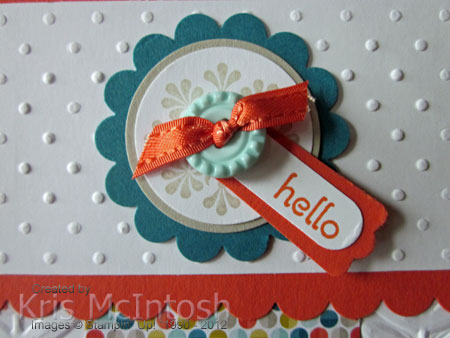 I attached the greeting to a Calypso Coral Modern Label and trimmed off the left edge. I attached it to the centre of the image using a Mini Glue Dot. I tied some of the Sycamore Street Tangerine Tango ribbon (Free) through a Pool Party Sycamore Street button (Free) and then attached it to card front using a Mini Glue Dot.
I am really loving all these beautiful Sale-A-Bration goodies, what about you?
Bye for now, Kris.


