Happy Birthday Sarah
 My eldest daughter celebrates her birthday today and I thought I would share the gift and card that I made for her.
You will recognise this little cage as being one of the tutorial at Craft Project Central this month. I changed up the colours of the butterflies but otherwise followed the tutorial. It was a fun and fairly easy project to put together. I wanted to give my daughter some money to put towards camera equipment (you will remember that she is a great photographer and trying to get her business up and running). I made this little tag to hang inside the cage and hold some money (I hope you can see it in the photo). I cut the top if a strip of Crumb Cake card using one of the new Hearts a Flutter Framelits (available 1st February in Australia). 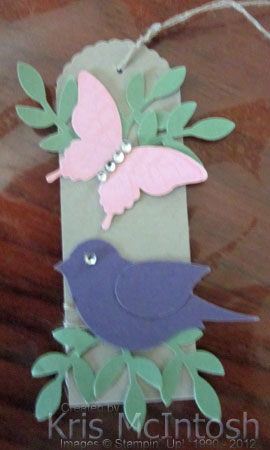 I scored about an 1″ from the bottom of the card and turned it up. I wrapped it with Linen Thread and tied a knot. I punched some leaves using the Bird Builder Punch and added a bird over the top. Another butterfly near the top of the tag and some extra leaves just to fill it out (I stamped one of the images from the Papillon Potpourri stampset and they are punched using the Elegant Butterfly Punch). I punched a hole in the top and tied some Linen Thread through the top. I tied the tag onto the thread which holds the top of the cage closed.
I made a card by adding some Perfect Plum Paper from the Subtles Designer Series Paper Stack to Very Vanilla card. I cut Very Vanilla card using the Paper Doily Sizzlits L, cut it in half and attached half to the right hand side of the Designer Paper. I cut one long edge of a strip of Very Vanilla card using the Large Scallop Framelit and embossed it using the Delicate Designs Embossing Folder. This piece is attached to the left hand side of the card front over the Paper Doily. I wrapped the edge of the Very Vanilla embossed card using Victoria 5/8″ Crochet Trim and attached the whole piece to scored and folded Perfect Plum card.  I stamped three flowers from the Bloomin’ Marvelous stamp set (Free to qualifying orders during Sale-A-Bration) three times onto scrap paper using Perfect Plum ink and cut them out. I stamped the leaves from the same stamp set onto scrap Very Vanilla card three times and cut them out. I also stamped the butterfly from the same set onto scrap Very Vanilla card using Perfect Plum ink and cut it out. I attached the flowers and leaves over the embossed card on the left hand side of the card from and the butterfly to the right hand side. I added medium Basic Pearls to the centre of the flowers and two small Basic Pearls to the butterfly. I stamped happy birthday from the Create-A-Cupcake stamp set onto Very Vanilla card using Perfect Plum ink and cut it using the Word Window Punch.
  I attached it to a Perfect Plum Modern Label and then to the card front. Lastly I tied a bow using the Victoria 5/8″ Crochet Trim and attached it using Mini Glue Dots.
I love the way both the card and the bird cage turned out. What do you think?
Bye for now, Kris.
Updated Classes
I have updated my Classes and Workshops page with a couple of classes I have lined up for the New Year. My first class is scheduled on Saturday 19th January at 2pm. During this class we will be making a desktop notecard holder and a DVD case organiser, so you can keep organised on the go.

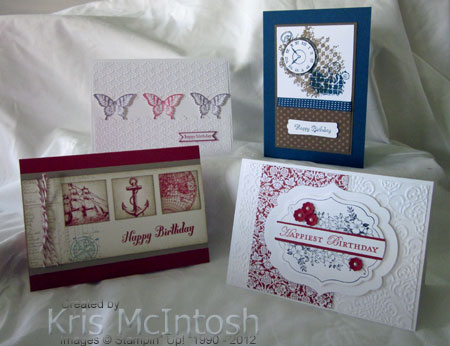
The next scheduled class is a Stamp-A-Stack on Saturday 2nd February at 2pm. We are going to make 2 each of the pictured designs. I have to say that a couple of these cards are CASES of some that I have seen on Pinterest. I am going to run a midweek class as well but I need to confirm the day that I am committed to working at my grandchildren’s school. So look for this date after the 29th January.
The third class I have scheduled is a Scrapbooking class on Saturday 16th February. I am trialling this one to see the interest, so if you can’t make the first class or have a request for a specific time, then please let me know so that I know whether to keep running this class. We are going to complete two double page spreads in these classes and I am going to design the pages as much as possible around the standard 4″ x 6″ photo size.

So check out my Classes and Workshops page for more information and let me know which classes you would like to attend. Space is limited so please get in early to reserve your place.
Bye for now, Kris.
Valentine Heart Box and Card
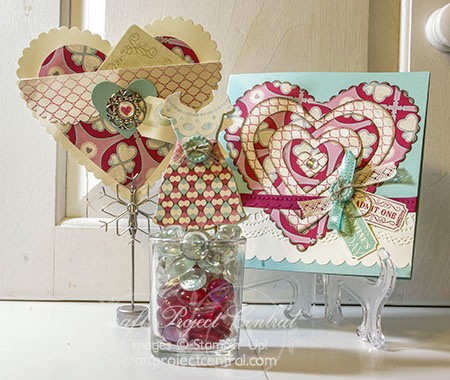
Look at this gorgeous heart shaped box and matching card. Don’t they look sensational. I can just imagine giving that box to someone special filled with chocolates for Valentines Day or perhaps holding a special gift for a special anniversary. This gorgeous project was designed for Craft Project Central by Christy Fulk, To see more of her work take a visit to her blog and leave a comment letting her know how much you love it.
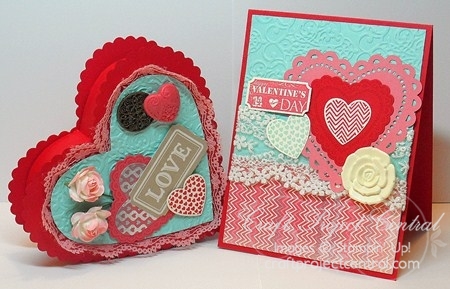
We are really lucky in Australia because our Seasonal Catalogue doesn’t begin until 1st February and we can start our shopping list early. This project showcases some fantastic things from the new catalogue, especially the Artisans Embellishment Kit, More Amore Specialty Designer Series paper and Hearts A Flutter Bundle. So sign up now and get all the tutorials so you can start creating as soon as your order arrives – just visit Craft Project Central. Remember is only costs $10.00 for 10 step by step (with photos) tutorials – amazing value.
Bye for now, Kris.
A Birthday Gift
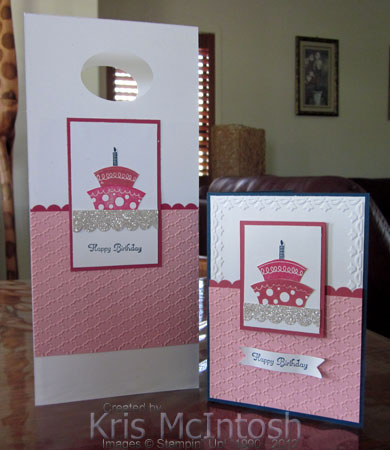 I attended the first birthday of a friends little girl today and needed to make a card and a matching gift bag. I used the Topsy Turvy Celebration Stampset.
The bag is made using an envelope. I cut the length down a little and scored at 1″ on each side and across the bottom. Once you open the score lines and fold over the triangle at the bottom you have a really roomy bag. I cut Whisper White card and punched an Extra Large Oval at one end through both pieces before attaching them to the front and back of the bag. I embossed Pretty in Pink card using the Fancy Fan Embossing Folder and attached a narrow strip of Rose Red card to the top edge. The Rose Red card has one long edge punched using the Scallop Border Punch. I stamped the cake layers onto Whisper White card using Primrose Petals ink and Rose Red ink and cut them out. I stamped the candle image onto Whisper White card using Midnight Muse ink and cut it out. I stamped happy birthday onto the Whisper White card using Midnight Muse ink. I attached a narrow piece of Silver Glimmer Paper which has one long edge punched using the Scallop Border Punch above the stamped image. I attached the cake layers and the candle above the Silver Glimmer Paper. The image panel is attached to Rose Red card and then the bag front.
To make the card I embossed the top two-thirds of Whisper White card using the Framed Tulips Embossing Folder and attached it to scored and folded Midnight Muse card. I embossed the Pretty in Pink card using the Fancy Fan Embossing Folder. I punched one long edge of Rose Red card using the Scallop Border Punch and attached it behind the top edge of the embossed Pretty in Pink card before attaching it to the card front. The image panel is created in a similar manner to the one on the bag. I stamped happy birthday from the Create-A-Cupcake stamp set onto Whisper White card using Midnight Muse ink and cut it using the largest framelit from the Bitty Frames Framelits. I attached the greeting to the card front with a dimensional in the centre and a Mini Glue Dot at each end.
I think this is a cute duo and that I need to use this stamp set more often, what do you think?
Bye for now, Kris.
More Amore Valentine Ensemble
Here is another gorgeous project from the January edition of Craft Project Central. This fabulous threesome was designed by the very talented Regina Andari. To see more of her work just visit her blog and don’t forget to let her know how much you love her work.
This pretty pocket, bookmark and matching card is a really fabulous gift for someone special. It uses lots of new product from the soon to be released Seasonal Catalogue (isn’t that little dress just fabulous). So to be ready for Valentine’s day, subscribe to the January edition of Craft Project Central.
Bye for now, Kris.
Casing Stampin’ Up!
Here is another card I made too late for the Sudsol Case challenge. We had to case a card from the US Stampin’ Success magazine (for demos only). I followed the layout but changed up the colours. I seem to be on an In-Colour kick at the moment.
 I used one of the framelits from the Apothecary Accents Framelits to cut a window in Whisper White card and then embossed it using the Perfect Polka Dots Embossing Folder. I attached a piece of Island Indigo Polka Dot Designer Series paper from the 2011-2012 In-Colour Designer Series Paper Stack behind the frame using Mini Glue Dots. I attached a narrow piece of Early Expresso card which has a “flag” cut in one end over the frame. This whole piece is then attached to scored and folded Whisper White card using dimensionals. I used the Boho Blossom Punch to cut one large flower from Island Indigo card and one small flower from Calypso Coral card.
 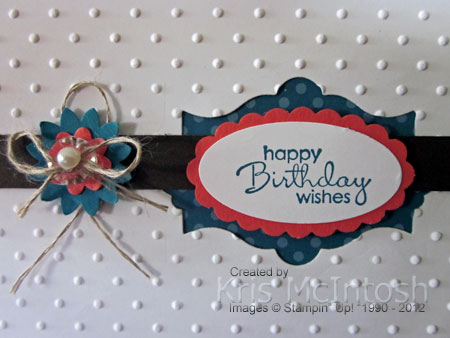 I tied Linen Thread in a bow through a small Vintage Faceted Button and attached it to the centre of the Calypso Coral flower and then to the Island Indigo flower using Mini Glue Dots. I added a Mini Glue dot to the back of the Island Indigo flower and attached a loop of Linen Thread before attaching the whole piece to the card front. I stamped “happy Birthday wishes” from the Petite Pairs stampset onto Whisper White card using Island Indigo ink and punched it using the Large Oval Punch. The greeting is attached to a Calypso Coral Scallop Oval and then to the inside of the frame using dimensionals.
I think this card is kind of cute, what about you.
Bye for now, Kris.
Serene Silhouettes Portfolio & Cards
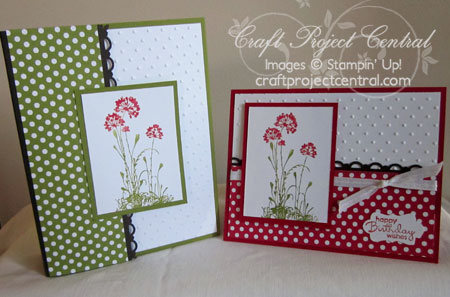
I’m excited to share my latest tutorial for Craft Project Central. It uses the gorgeous Serene Silhouettes stamp set and the fantastic Polka Dot Parade Designer Series Paper. Each card comes in a different colour but you can make each card design in one colour if you choose. Stamp the envelopes to match and keep the set for yourself or give it away as a gift. Better yet, make several sets and be sure to keep one for yourself. This project would also make a fun class, stamp or club project too!
If you would like these instructions, then please visit Craft Project Central and subscribe to the January edition or leave me a comment and you could win a free subscription.
Bye for now, Kris
Scrapbook in a Tin
Here is another project from the January Edition of Craft Project Central. This project has been designed by the very talented Amanda Corbet. You can see more of her beautiful work here and don’t forget to let her know how much you enjoy her projects.

What a simply gorgeous project and quite timely too with Valentines Day just around the corner. Wouldn’t this make a gorgeous gift for that special someone in your life. Lots of new product from the Seasonal Catalogue which goes on sale here in Australia on the 1st February – don’t you just love that Designer Series Paper. In case you are wondering there is a framelit set that you can buy to cut those amazing banners. If you would like to make this little scrapbook and card, just visit Craft Project Central and sign up for the January edition. Remember it is fantastic value at only $10.00 for 10 tutorials.
Bye for now, Kris.
Nip and Tuck card
Last week I found a link to a tutorial on Sudsol (for demos only) to make a Nip and Tuck card. I had to play around a little to get it to work on a standard metric card. I also decided to cut mine down and make it a layer for a card front.
 My base card is Night of Navy and I used Very Vanilla card to make the Nip and Tuck. Basically you cut two sides of a triangle shape and fold the card back onto itself. I embossed mine using the Elegant Lines Embossing Folder. I wrapped the embossed card with Night of Navy 1/4″ Stitched Grosgrain ribbon before attaching it to the card front. I stamped the ferris wheel image from the Sale-A-Bration stamp set Feeling Sentimental (love it) onto Very Vanilla card using Night of Navy ink, attached it to Night of Navy card and then to the card front using dimensionals. I stamped “celebrate” which is also from the Feeling Sentimental stamp set onto Very Vanilla card using Night of Navy ink, punched it using the Modern Label Punch and attached it to a Night of Navy Wide Oval. The greeting is attached to the card front over the ribbon using dimensionals. I also tied another length of ribbon through the ribbon already attached.
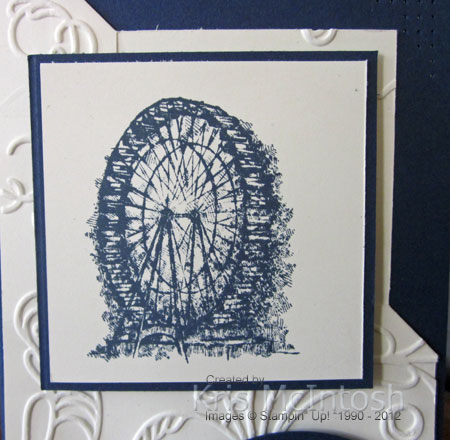 Then I decided to pierce some holes in the Night of Navy card to frame the Very Vanilla card – great idea – but I haven’t lined it up too well. Never mind! I think it is important that we realise that a card can still look good even though it isn’t “perfect”.
Bye for now, Kris.
A Sneak Peak
I wanted to join the sketch challenge at Sudsol this week (a demo only site) but life being what it is I missed the deadline. However, I thought I would share it with you as it uses one of the stamp sets which you can obtain FREE during Sale-A-Bration.
I embossed the Whisper White card using the Flower Garden Embossing Folder, which is simply quite gorgeous (don’t know why I don’t use it more often). The embossed card is attached to scored and folded Island Indigo card. I attached a piece of the designer series paper from the Festival of Prints Designer Series Paper Stack(Holiday Mini) to Island Indigo card which has one long edge punched using the Scallop Trim Border Punch, before attaching it to the left hand side of the card front. I stamped the greeting from the Bloomin’ Marvelous stamp set onto Whisper White card using Island Indigo ink. I attached the greeting to Calypso Coral card which also has one long edge punched using the Scallop Trim Border Punch and then to the card front. I stamped the flower using Calypso Coral ink onto Whisper White card and cut it out and stamped the leaf image twice onto Whisper White card using Lucky Limeade ink and also cut them out.  I punched a 1-3/8″ Circle from Whisper White card, attached it to a 1-3/4″ Scallop Circle of Pacific Point card and attached it to the card front. The flower and leaves are attached to the centre of the 1-3/8″ Whisper White circle and a Large Basic Rhinestone is added to the centre of the flower.
I love how you can use such small images to create a big impact on a card front. What do you think?
Bye for now, Kris.


