Baker’s Dozen
Here is another project from the December edition of Craft Project Central. This gorgeous set is designed by Nicki Toll. Take a visit to her blog and see what else she has been doing. Don’t forget to leave a comment. We all love comments!
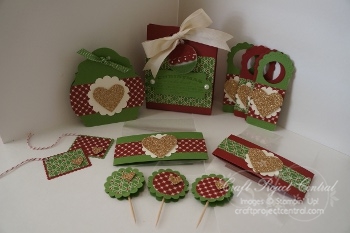
‘Tis the season for baking and crafting! It’s the time of year to give gifts and home-made gifts are the best! This project will give you lots of ideas for embellishing those yummy treats you plan on handing out this holiday season! And if you aren’t a baker yourself, give the entire ensemble as a gift to someone who is. Ensemble includes a Treat Box, Treat Pocket, Wine Bottle Tags, Tie-On Tags, Cello Bag Cookie Treat and Cupcake Toppers!
To get the tutorial for this fantastic set, all you need to do is visit Craft Project Central and sign up for the December edition. Remember it is only $10.00 for 10 tutorials. The tutorials are all step by step with photos which makes re-creating very easy.
Bye for now, Kris.
Snow Festival Ornament, Box and Card
I have designed a project for the December edition of Craft Project Central. I love working with these guys, the projects are always fantastic and provide lots of inspiration. I hope you will take the time to visit and see what great projects are available, not only this month but for previous months as well.

This is the first project for the December edition designed by the fabulous Regina Andari. A gorgeous ornament, keepsake box and a card. What a lovely gift to make for yourself or to give to someone special. Take a visit to Regina’s blog to see what other beautiful things she has been creating.
To get the tutorial all you have to do is visit Craft Project Central and subscribe to the month of December. It only costs $10.00 for 10 tutorials. Fantastic value. Why not buy one for your favourite crafty relative or friend for Christmas. They’ll be so grateful that you did.
I’ll be back with more soon.
Bye for now, Kris.
Sunny Challenge 70
This week our challenge has been brought to us by Vicky and she has given us a great sketch and all we have to do is make a non-traditional Christmas card. I thought about this for quite a while and decided to make my card using both non-traditional colours and some non-traditional images. I did take a little licence with the sketch, but not too much.
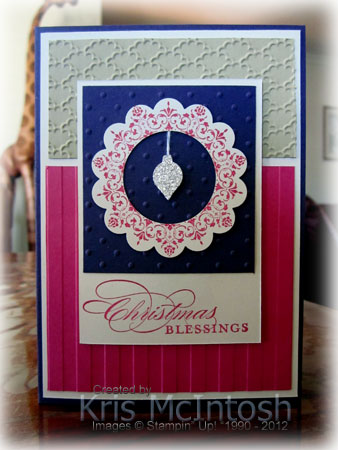 I attached Very Vanilla card to scored and folded Elegant Eggplant card. I cut one piece of River Rock card which I embossed using the Fancy Fan Embossing Folder and attached it to the top of the Very Vanilla card. I cut a piece of Melon Mambo card, embossed it using the Stripes Embossing Folder and attached it to the bottom of the Very Vanilla card. I stamped “Christmas Blessings” from the More Merry Messages stamp set onto the bottom of another piece of Very Vanilla card using Melon Mambo ink. I embossed a piece of Elegant Eggplant card using the Perfect Polka Dots Embossing Folder and attached it above the greeting. I stamped the journalling image from the Everything Eleanor stamp set onto scrap Very Vanilla card using Melon Mambo ink and punched out the centre using the 1-3/8″ Circle Punch and then punched the remainder of the image using the 2-3/8″ Scallop Circle which created a “wreath”.
 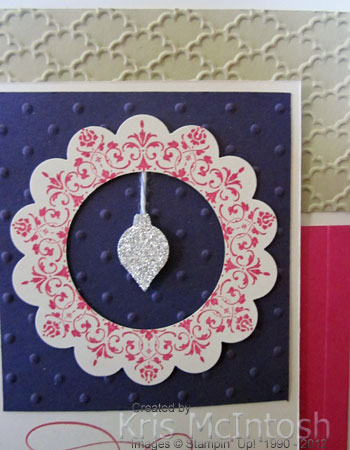 I used the ornament punch from the Merry Minis Punch Pack to punch Silver Glimmer Paper. I attached a piece of Whisper White Baker’s Twine to the back of the ornament and then to the back of the wreath before attaching it to the Embossed Elegant Eggplant card. I did add a Mini Glue Dot to the back of the ornament so that it would stay in position.
All in all I think this has turned out to have a real Christmas feel to it, even using such bright colours. What do you think?
Now for some more inspiration pop over Sunny Challenges and Creations to see what the rest of the design team have created. Once you have made your card, scrap page or 3d item add it to Mr. Linky. I know you guys are busy with your Christmas preparations but we can always use another Christmas card, can’t we? I look forward to seeing what you have created.
Bye for now, Kris.
Christmas Angels
I wanted to share with you the Angel Christmas Tree ornaments that my grandchildren and I created this past week. Every year my grandchildren help me to put the tree up and then we have to make something new to add to it. I saw these cute little angel ornaments that Cindee Wilkinson made and thought that they would be relatively easy for the children to make. Cindee shared a link to a great video tutorial by Kay Kalthoff which made it very easy to duplicate them.
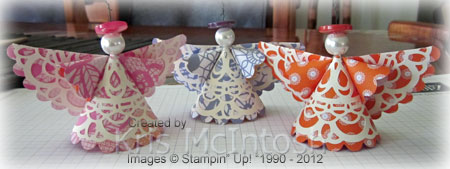
I used some retired Flirtatious Designer Series Paper and some beads I found at my local Spotlight store. The buttons are from various Designer Button packs. The Paper Doilies were cut from Very Vanilla card.

My grandchildren range in age from 2-1/2 to nearly 8 so they had varying degrees of help. Of course I didn’t let them use the hot glue gun by themselves but they all added glue and held the various pieces together.

They look pretty cute hanging onto the tree too. Many thanks to Cindee and Kay for providing the inspiration and the tutorial.
Bye for now, Kris.
More Free Tutorials
I have been asked to share my tutorial for my Christmas Ornament and also the Presentation Box which I designed for it.
You can download the Christmas Ornament Tutorial here and the Presentation Box Tutorial here. You can also find these tutorials on my Free Tutorial page.
Enjoy!
Bye for now, Kris.
New Tutorial
I had a few requests for a tutorial for my Christmas Ornament Shaker Card, so I have created one and added it to my Free Tutorial Page. If you would like to download this tutorial, then click on the photo below.

I hope you enjoy this tutorial. I will be uploading more FREE tutorials in the next couple of days.
Bye for now, Kris.
Calendar
This is another project that we made at the all day class at Beachmere. If you remember last year my friend Vicky shared a calendar she made with me and gave me a template for the calendar months. This year we used a template that was part of a tutorial I purchased from Create with Connie and Mary New Catalogue 2012 Edition by the very talented designer Melissa Davies.
 We used Very Vanilla card and stamped the swirl image from Everything Eleanor using Chocolate Chip ink. We stamped the “frame” image onto Very Vanilla card using Summer Starfruit ink attached it over the stamped swirl and embossed the card using the Square Lattice Embossing Folder. The ladies were impressed with this folder as it is so forgiving.
  You can emboss and re-emboss using this folder and it always looks gorgeous, so you can fix any mistakes in the joining of the pattern over larger pieces such as these. We attached the embossed pieces to Chocolate Chip card along with a strip of unembossed Very Vanilla. The join in the two pieces on the left hand side is covered by a strip of Chocolate Chip card. Both long edges are punched using the Scallop Trim Border Punch and then wrapped with Primrose Petals 1/2″ Stitched Satin Ribbon. We tied a smaller piece of ribbon to make a knot. The Chocolate Chip card was attached to a full sheet of Sahara Sand card.
 The numbers for 2013 were cut using the Timeless Type Junior Alphabet (retired) from Chocolate Chip card. The flower was stamped six times onto Very Vanilla card using Primrose Petals ink and cut out, three full flowers and three partial flowers. The smaller flowers were attached to the full flowers using dimensionals and then over the swirls using Mini Glue Dots. We attached medium Basic Pearls to the centres of the flowers.
We attached the calendar pages by piercing three holes through the calendar and the Sahara Sand card and inserted Mini Silver Brads. We punched holes in the top corners and threaded through a long piece of Primrose Petals 1/2″ Stitched Satin Ribbon, tying knots at the back to create a hanger.
I love these calenders, they make great gifts and you can even add photos to truly personalise them. I’d love to hear what you think.
Bye for now, Kris.
Sunny Challenge 69
This week’s challenge has been set by Gwen. She has provided us with a wonderful sketch to use and no additional requirement. So you can let you imagination soar as long as you use the sketch.
 With Christmas fast approaching and me being totally unprepared I decided on a Christmas card. I embossed Very Vanilla card using the Perfect Polka Dots Embossing Folder and attached it to scored and folded Early Expresso card. I cut strips of Be of Good Cheer Designer Series Paper, cut the ends into a point, attached them to Early Expresso card before attaching them to the card front. I inked my new stamp (I got it at Regionals just for making an ornament for the Christmas tree on display) using a Blender Pen and Cherry Cobbler and Gumball Green ink pads. I cut the image using one of the Labels Collection Framelits. I wanted to add a little bling, so I used my Two-Way Glue Pen to add glue to the edge of the framelit and then spinkled on my Champagne Glitter Glass. I pressed the glass onto the glue and shook off the excess. I am so impressed by how gorgeous this looks and now cannot understand why it has taken me a year to use this beautiful Glitter Glass.
  The image panel is attached to the card front using dimensionals.
Ok so now off the visit Gwen, Vicky and Vicki to see what inspiration they have in store for you. Once you have created your card, scrap page or 3d item pop over to Sunny Challenges & Creations and add it to Mr. Linky. This should be an easy challenge for everyone, so I look forward to seeing lots of entries.
Bye for now, Kris.
Bookmarks
I volunteer on Thursday afternoon at my grandchildren’s school. I join the library class for my two grandsons and check the books in and out. It takes a while for the children to get used to me and for me to get used to them. By the end of the year, the children all say hello when they see me and often stop to have a chat.
 Its my last visit to the class today and I wanted to give them a little something for letting me become part of their school day. I made them all a bookmark. I used the stampset Bug Me, which is so cute and lets you make all kinds of bugs. The girls bookmarks are made using Melon Mambo card and ink and the boys Pacific Point card and ink. I also used a little Basic Gray ink. I printed their names on one end using the Computer and added a little note on the back from me.
 Of course I had to make one for each of the teachers and the teacher’s aid. These are corner bookmarks and lots of fun to make. I used the Finishing Touches Edgelits on the bottom and embossed using the Delicate Designs Folders. I used my newest favourite stamp set Everything Eleanor to decorate. I used Midnight Muse, Primrose Petals, Raspberry Ripple and Gumball Green ink and the matching 1/2” Stitched Satin Ribbon.
I think they turned out really lovely, what about you?
Bye for now, Kris.
Beachmere Classes
Last week I had an all day class with the ladies at Beachmere Retirement Resort. We started the day around 9am (or should I say we were supposed to but I got almost to the class and had to turn around and go home because I suddenly remembered that I hadn’t packed the clear blocks – round trip of an extra 40mins!) and finished at about 4.30pm.
Today I want to share a couple of photos I took on the day, although Mary is missing from the photos, somehow she must have always been on a different table.
Cindy showing off her “Noel” blocks.

Jan, Cathy and Josie.

Jenny, Margie and Sue.

Jenny and Pam.

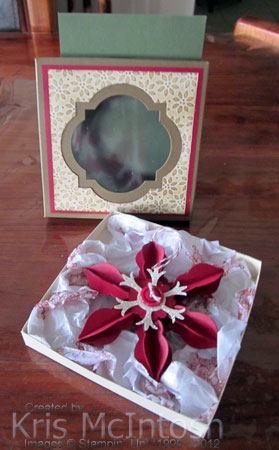
We made six projects including the Cherry Cobbler Christmas ornament I shared with you here. A few of the ladies commented that it would make a lovely gift, so this week we made a special box to present the ornament.
 I made the base using Naturals Ivory card 6 1/4″ x 6 1/4″ scored at 3/4″ all the way round. The lid is Soft Suede card 6 1/4″ x 6 1/4″ scored at 3/4″ all the way around but this time using the Box Making Shim that Connie Stewart shares on her blog here. Using the Shim means that the lid is every so slightly larger than the base and I don’t have to do any maths calculations – maths not being one of my strong points! To decorate the lid we embossed a piece of Naturals Ivory card 4 1/4″ x 4 1/4″ using the Petals-A-Plenty Embossing Folder. We sponged the edges and the embossing using Soft Suede ink. The embossed card is attached to Cherry Cobbler card 4 1/2″ x 4 1/2″ and then cut the centre using the 3rd smallest Window Frame Framelit. This actually smooths out the embossing but because it has been sponged with colour you still get the effect. This piece was then attached to the centre of the lid and cut using the 2nd smallest Window Frame. Window sheet is attached to the back of the opening using Mini Glue Dots. We stamped one of the images from the Delicate Doilies stampset over some White Tissue Paper using Cherry Cobbler ink and scrunched it into the bottom of the box.
I think the ornament looks lovely in its little box and makes a lovely gift for a friend or family member. Of course the box would also be great filled with any other gift you can think of.
What do you think, would you like to receive this gift?
I have a couple of other projects to share with you so will pop back soon.
Bye for now, Kris.


